Task 15 - Branch and merge-request workflow (Optional)
Estimated Time to Complete: ~20 minutes
Prerequisite
Basic familiarity with Git (branches, commits) and GitLab (merge requests, protected branches). If you're new to these, skim Git's Basic Branching guide first.
What you'll learn
By the end of this task you will have:
- Enabled protected-branch rules on
mainso direct commits are blocked - Created a feature branch, committed to it, and opened a merge request
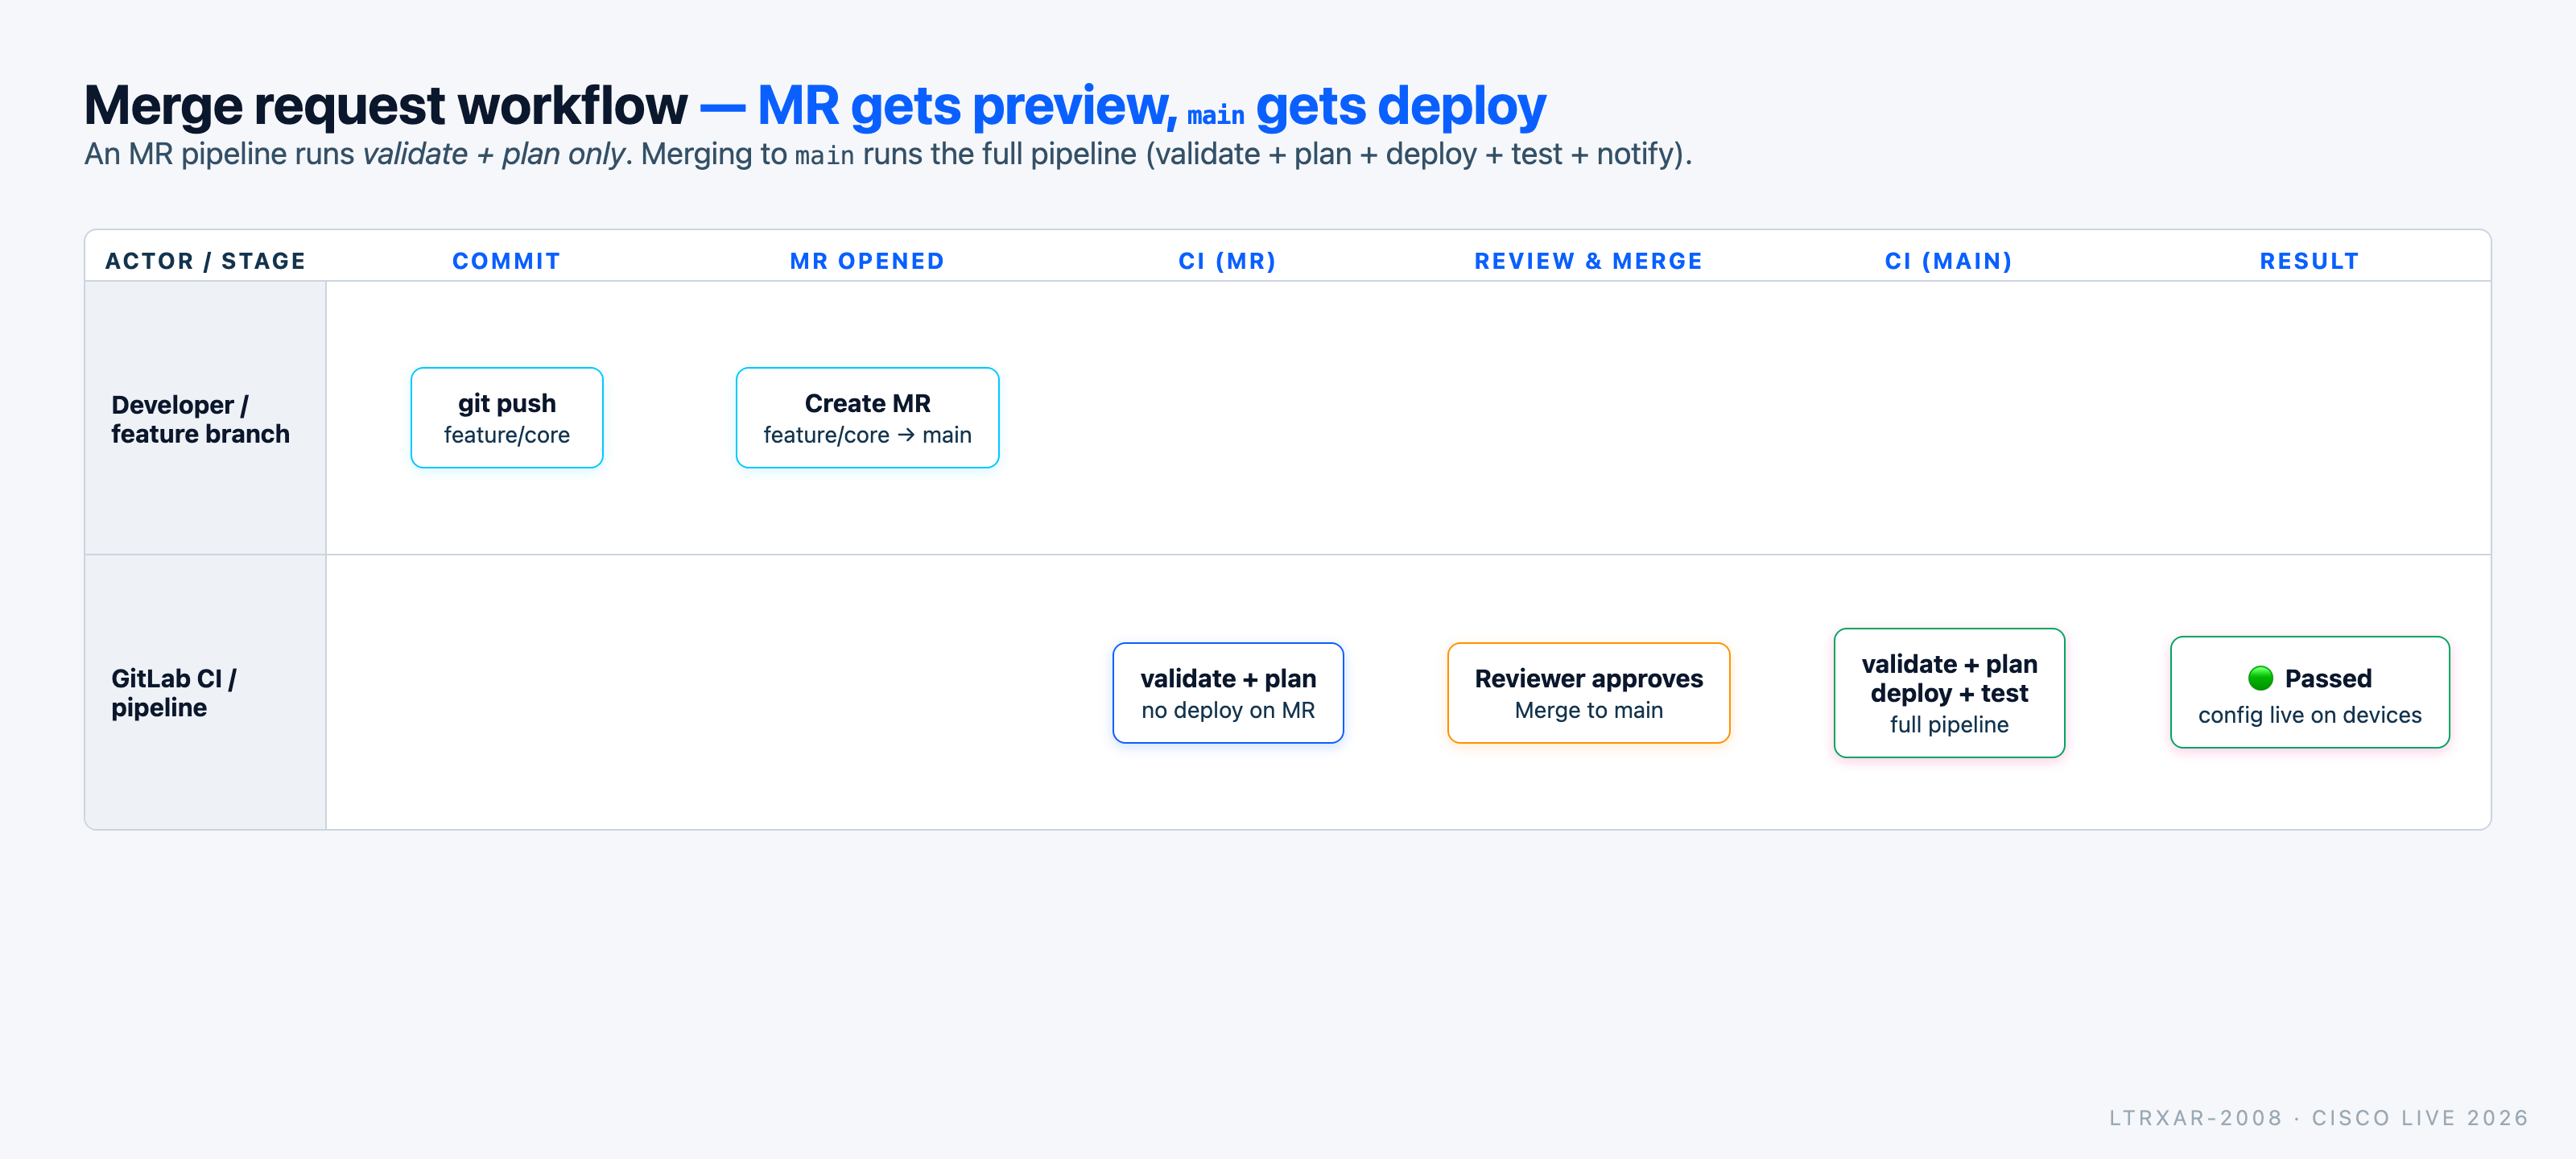
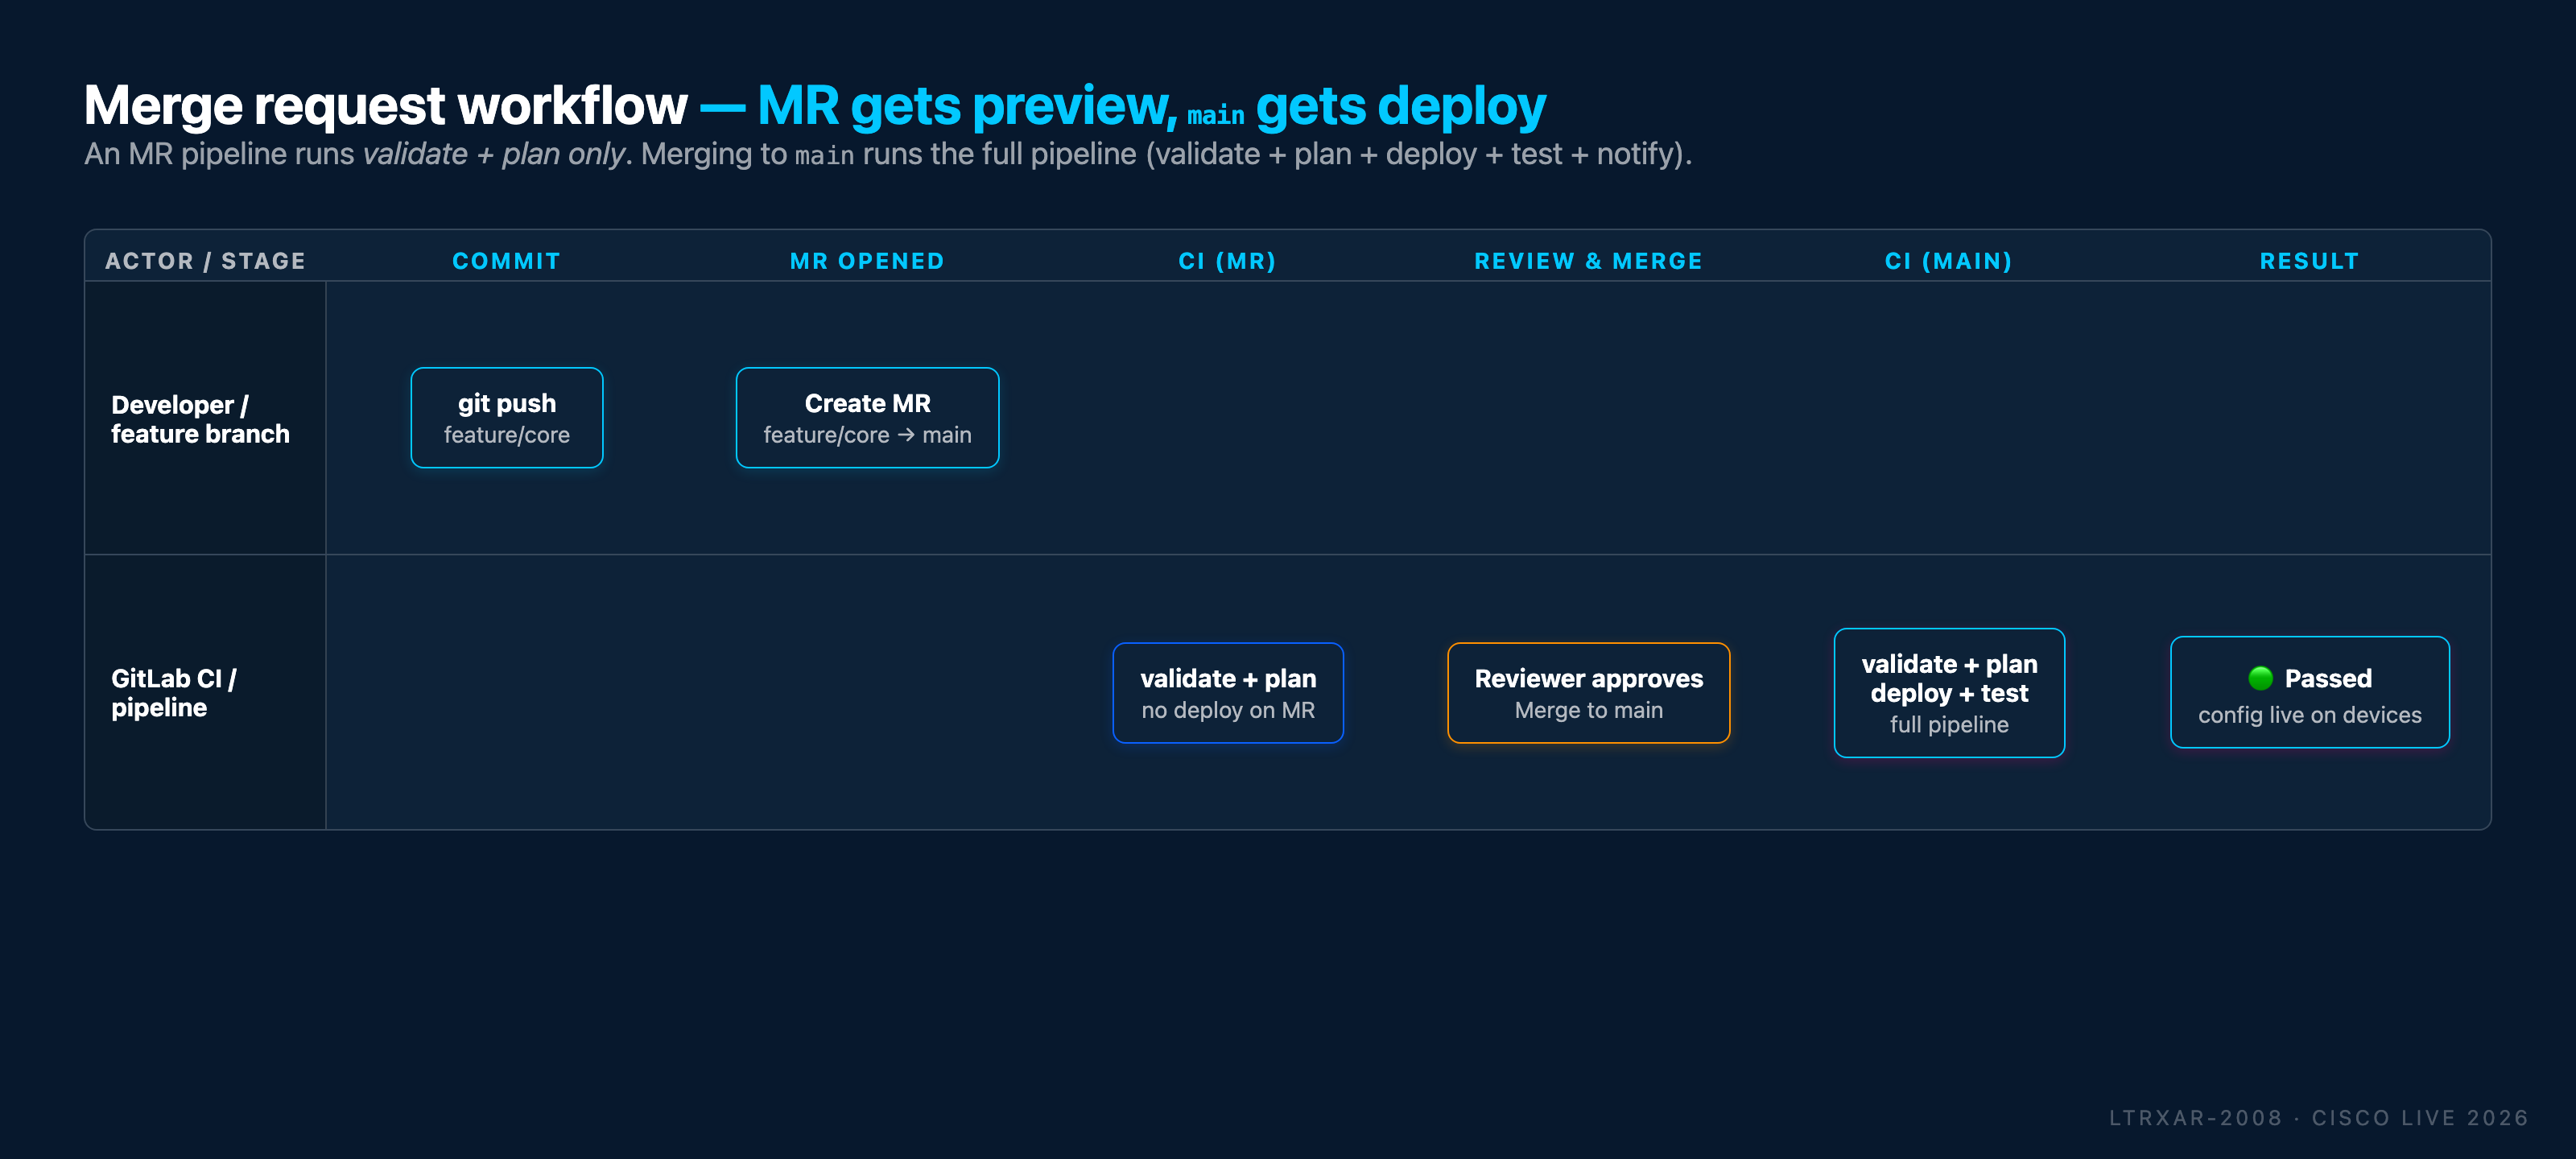
- Observed two pipelines - the MR preview (validate + plan only) and the post-merge deploy (all five stages)
- Approved and merged a change, seeing GitOps end-to-end: code review → plan preview → deploy
Why this matters
In Tasks 13 and 14, you triggered CI/CD pipelines by committing directly to the main branch. While this approach works for learning purposes, it's not how production environments operate.
In Network as Code, the main branch represents the live production network configuration.
In real-world scenarios, many engineers collaborate on the same codebase. To ensure stability, reliability, and accountability, changes must go through a structured review process before being applied to production.
Best Practice
Committing directly to the main branch (as done in earlier tasks) is generally not recommended in production environments. This task teaches you the proper way to manage changes using branches and merge requests.
Lab exercise: complete branch and merge request workflow
In this exercise, you will:
- Protect the
mainbranch to require merge requests - Create a feature branch for your changes:
feature/core - Add the core switch configuration with host IP host entries, and commit the changes to the
feature/corebranch - Create a merge request
- Observe the first pipeline (validate + plan)
- Approve and merge the request
- Observe the second pipeline (validate + plan + deploy + test + notify)
Merge Request (MR) vs. Pull Request (PR)
Different version control platforms use different terminology. In GitLab, the term is Merge Request (MR), while in GitHub, it's called a Pull Request (PR). Both serve the same purpose: to propose changes from one branch to another and facilitate code review.
Step 1: Protect the main branch
First, you'll set up branch protection of the main branch. This means that you can no longer push changes directly to main; instead, all changes must go through a merge request (MR) process.
What is a protected branch?
A protected branch is a branch with restrictions that prevent accidental or unauthorized changes. When you protect the main branch:
- Direct commits are blocked: No one can push changes directly to main
- Force push is not allowed: History cannot be rewritten
- Merge requests are required: All changes must go through the review/approval process
Configure main branch protection
Access GitLab
- Open Chrome on the Windows 10 VM and navigate to GitLab: https://198.18.133.101
- Log in with credentials: Username:
root/ Password:C1sco12345 - Navigate to the netascode/nac-iosxe-terraform project.
Open Branch Protection Settings
- In your project, click on Settings in the left sidebar
- Select Repository
- Scroll down to find the Protected branches section
- Expand section to see the settings
Protect the Main Branch
- In the Protected branches section, you should already see
main (default)listed - Configure the following settings:
| Setting | Value | Explanation |
|---|---|---|
| Allowed to merge | Maintainers | Only maintainers can merge approved changes |
| Allowed to push and merge | No one | Prevents direct commits to main |
Why two separate knobs?
GitLab protects a branch along two dimensions - who can merge an approved MR and who can push directly. Those are different capabilities:
- Merge is the gated, reviewed path: an MR has to exist, pipelines have to pass, reviewers have to approve.
- Push is the ungated path:
git push origin mainbypasses the MR flow entirely.
A role can have one without the other. For a production repo you typically want Maintainers: allowed to merge, No one: allowed to push - maintainers can approve and click the button, but nobody (not even maintainers) can force-push around the review process. That's the configuration this task sets up. You'll see the effect in Step 2 when GitLab rejects your direct commit to main.
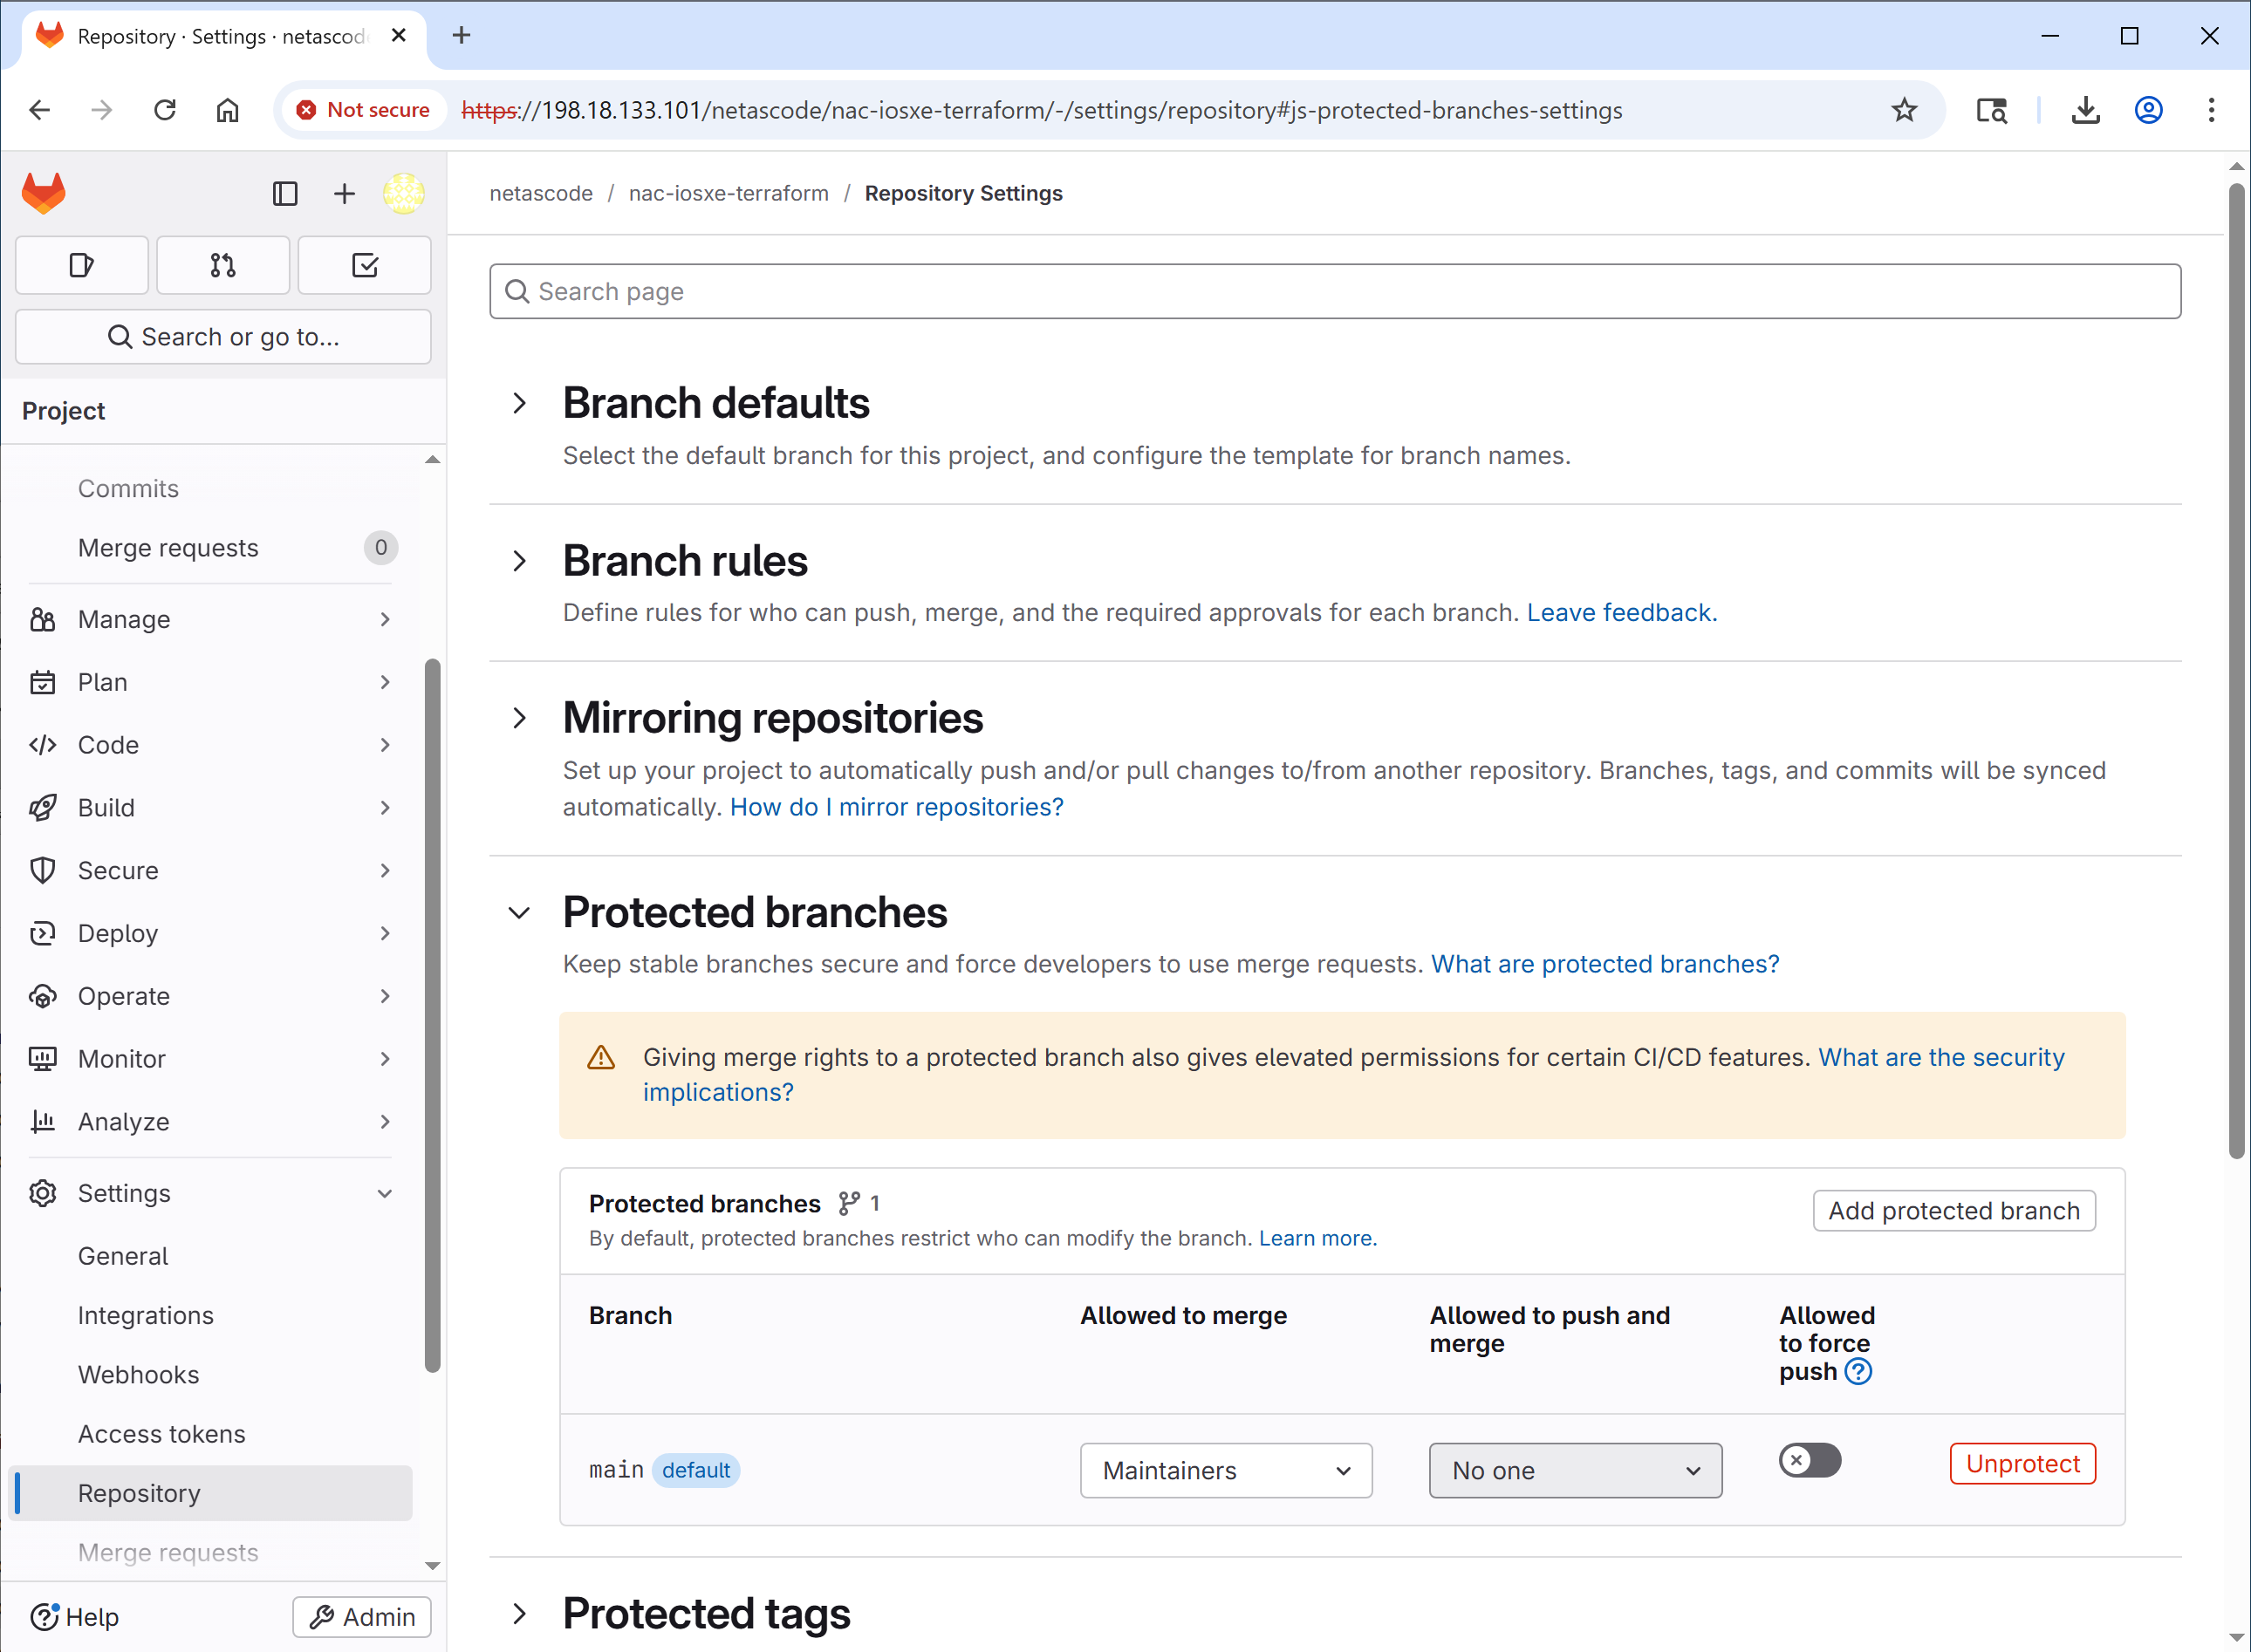
Default Branch Protection in GitLab
By default, GitLab protects the main branch, but as you already saw, direct pushes are still allowed from maintainers. In this lab, the user root is a maintainer, so you need to explicitly block direct pushes to enforce the MR workflow.
Verify branch protection
To confirm that the main branch is protected:
- Open the Web IDE from the project page
- Add the core device configuration: rename
data/devices/core.nac.yaml_todata/devices/core.nac.yaml(remove the trailing underscore) - Click on the Source Control icon in the left sidebar
- Enter a commit message:
- Attempt to commit the change directly to
main: click Commit and push to 'main'
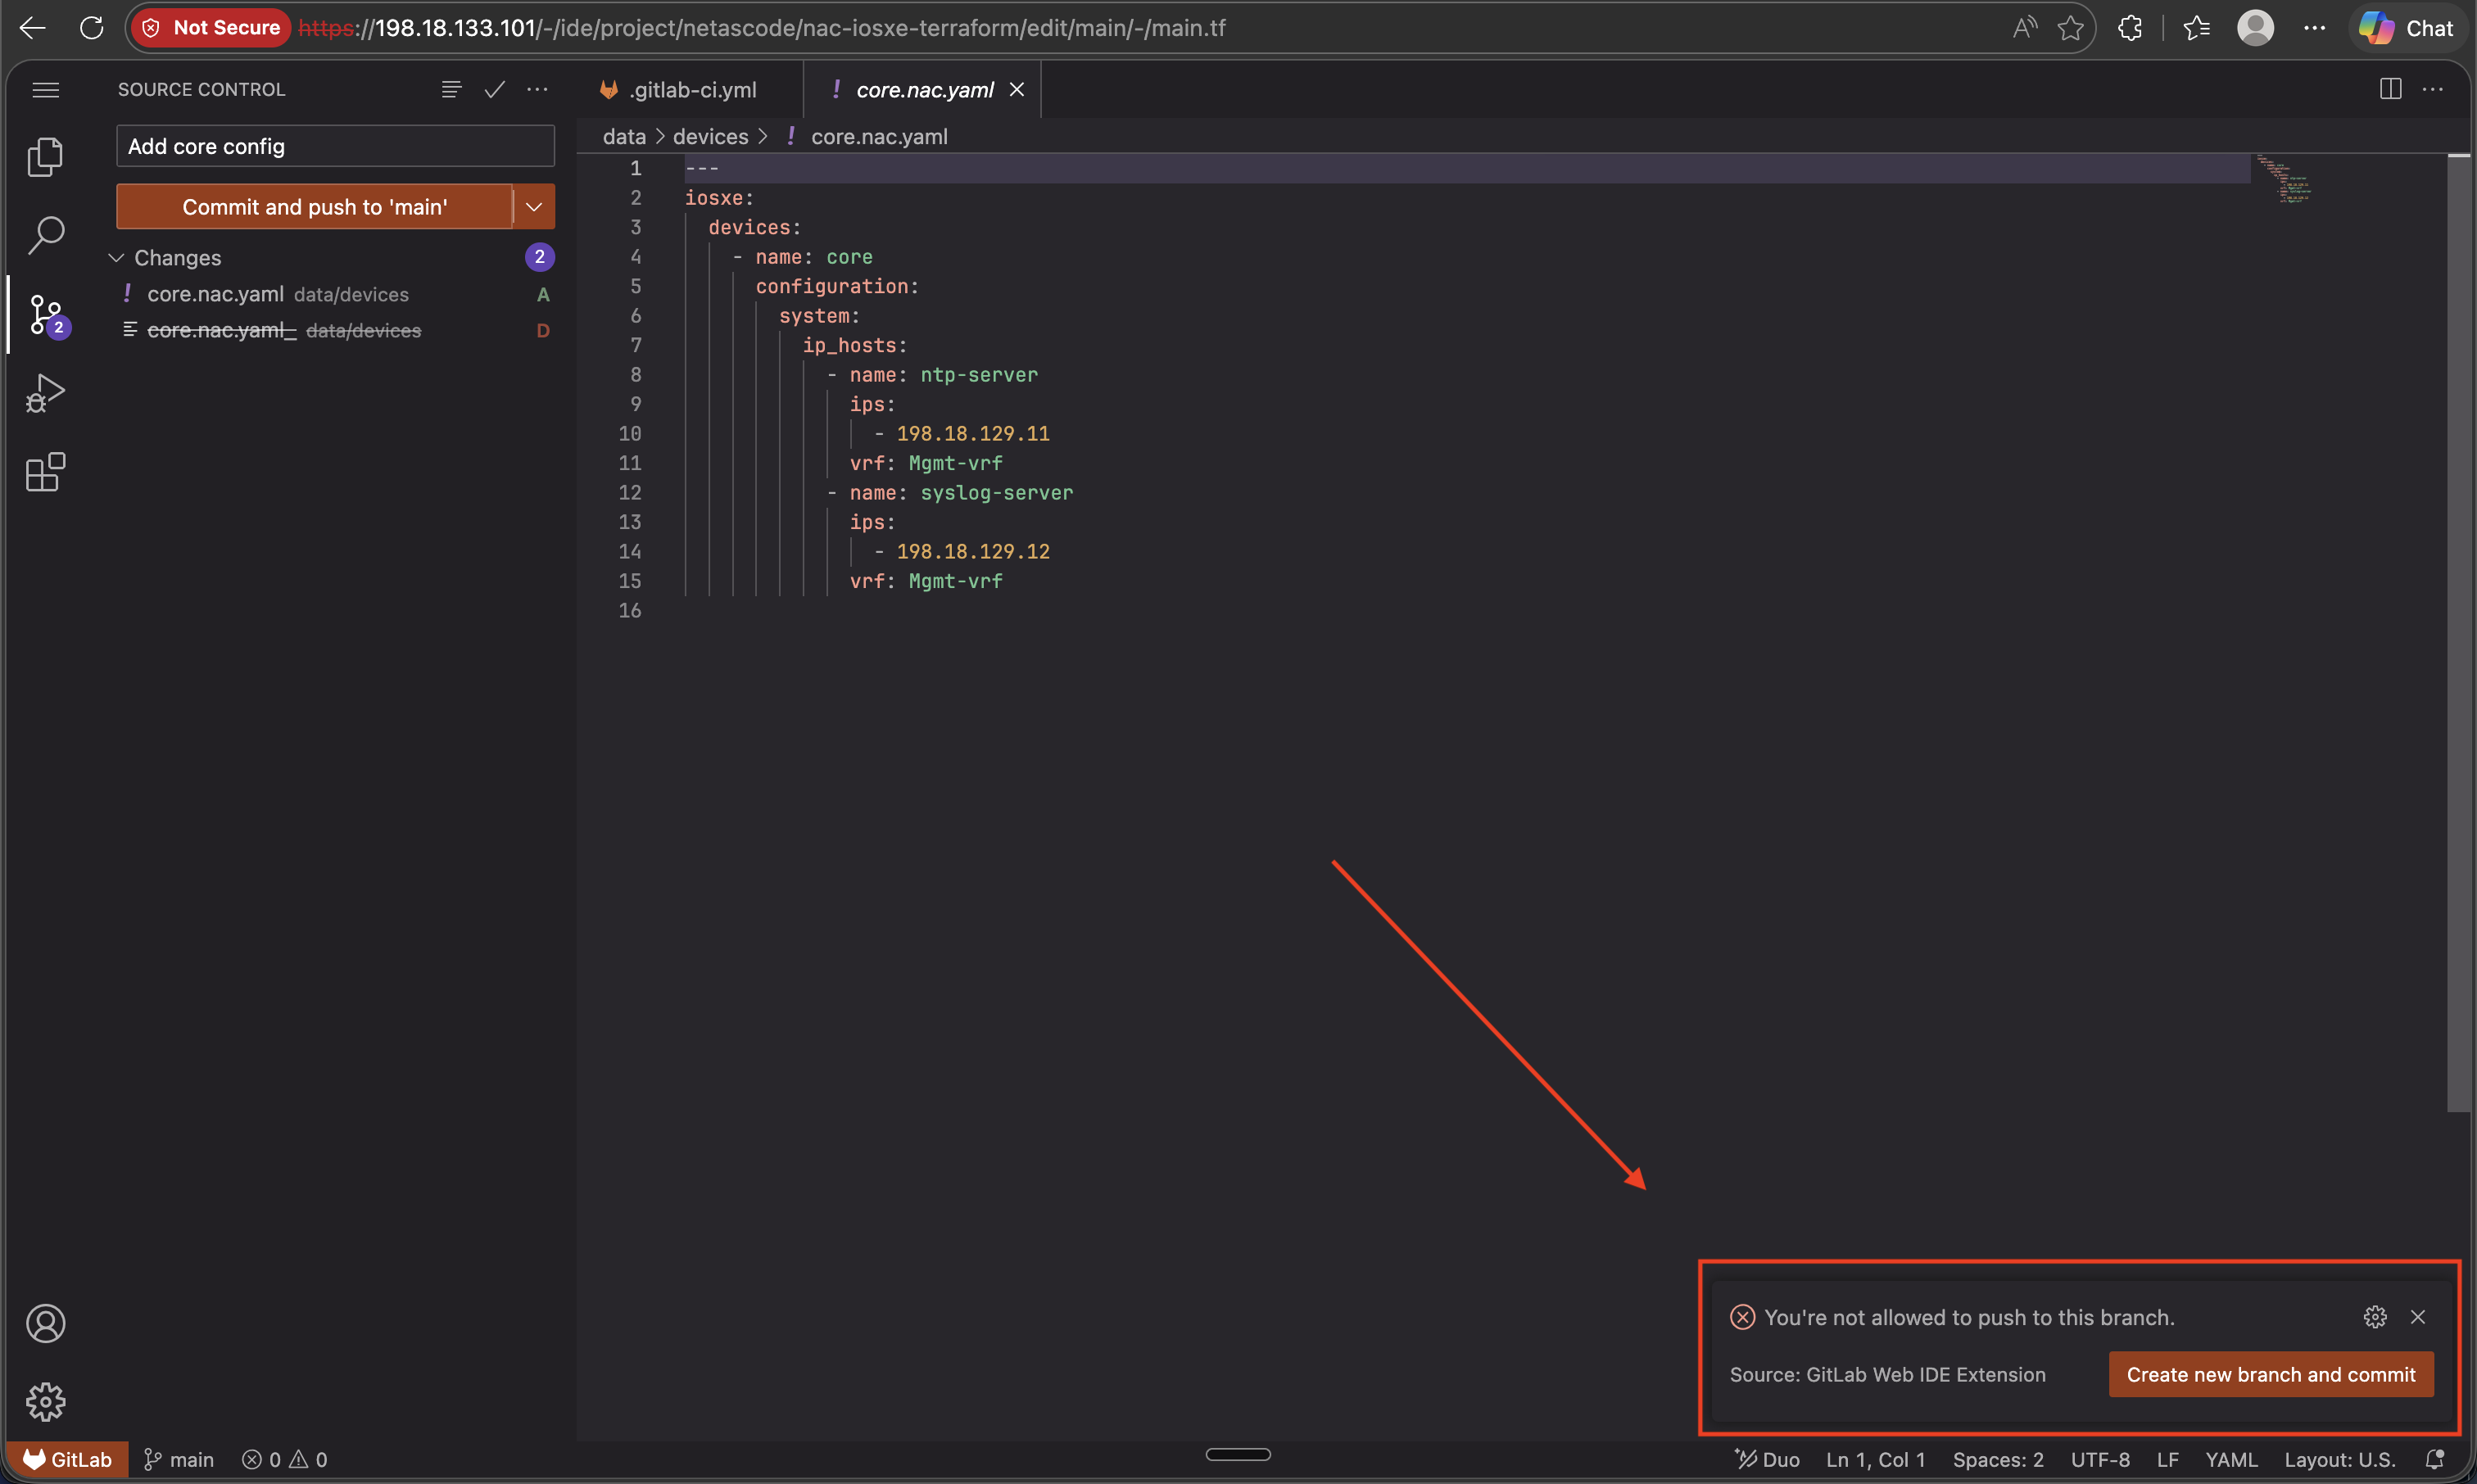
You can't push to the main branch
You should see an error message indicating that pushing to the protected branch is not allowed. This confirms that the main branch is successfully protected.
Step 2: Create a feature branch and commit changes
In the previous step, the Web IDE already prompted you to create a new branch when you tried to commit to main.
- Press the Create new branch button
- Enter the branch name:
- Press Enter to create the branch
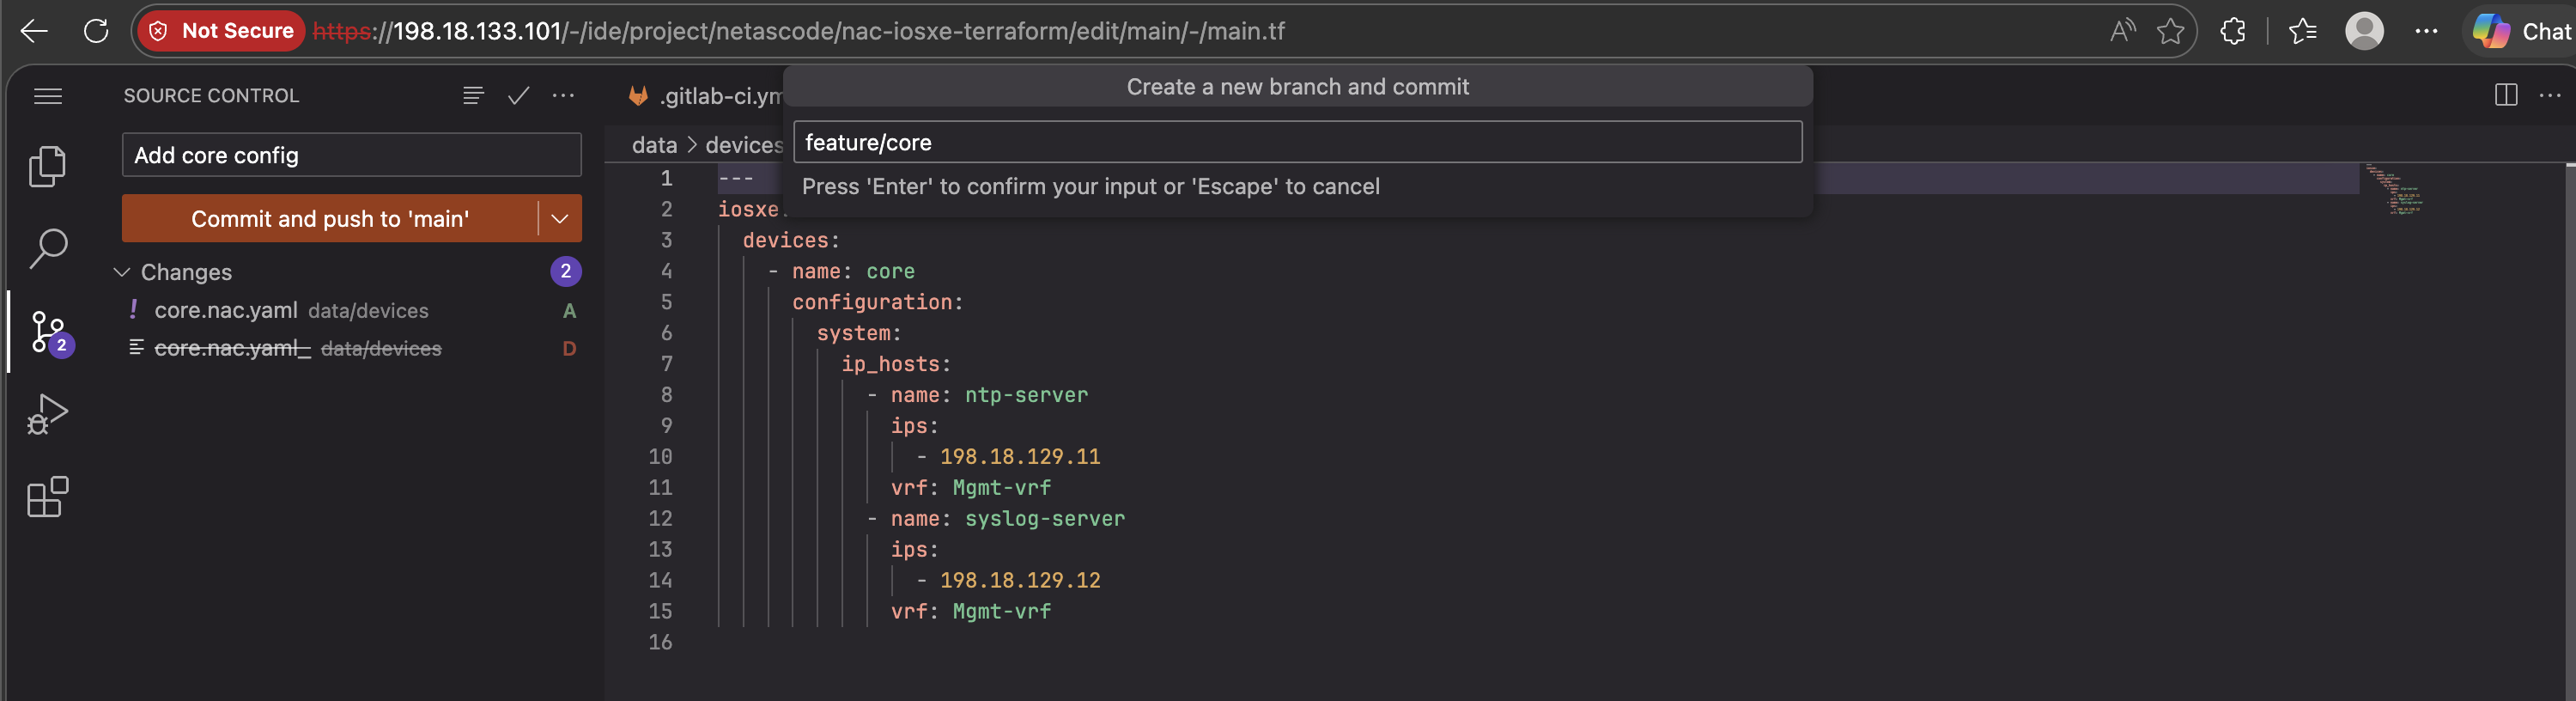
Branch Created
You have successfully created a new branch named feature/core. This branch is now your isolated workspace to make changes without affecting the main production branch.
You can also see feature/core displayed in the bottom-left corner, indicating you're working on your new branch. The commit Add core config is already pushed to it.
Branch Naming Conventions
Use descriptive branch names that indicate the purpose of the changes:
| Example Branch Name | Purpose |
|---|---|
feature/add-vlan-100 |
Adding a new feature |
fix/acl-typo |
Fixing a bug or error |
update/banner-message |
Updating existing configuration |
This makes it easy to see what each branch contains without looking at the code.
Step 3: Create merge request
After committing to your feature branch, you need to create a merge request to propose merging your changes into main. Luckily, the GitLab Web IDE makes this very easy too: after pushing the commit, it shows a prompt to create a merge request.
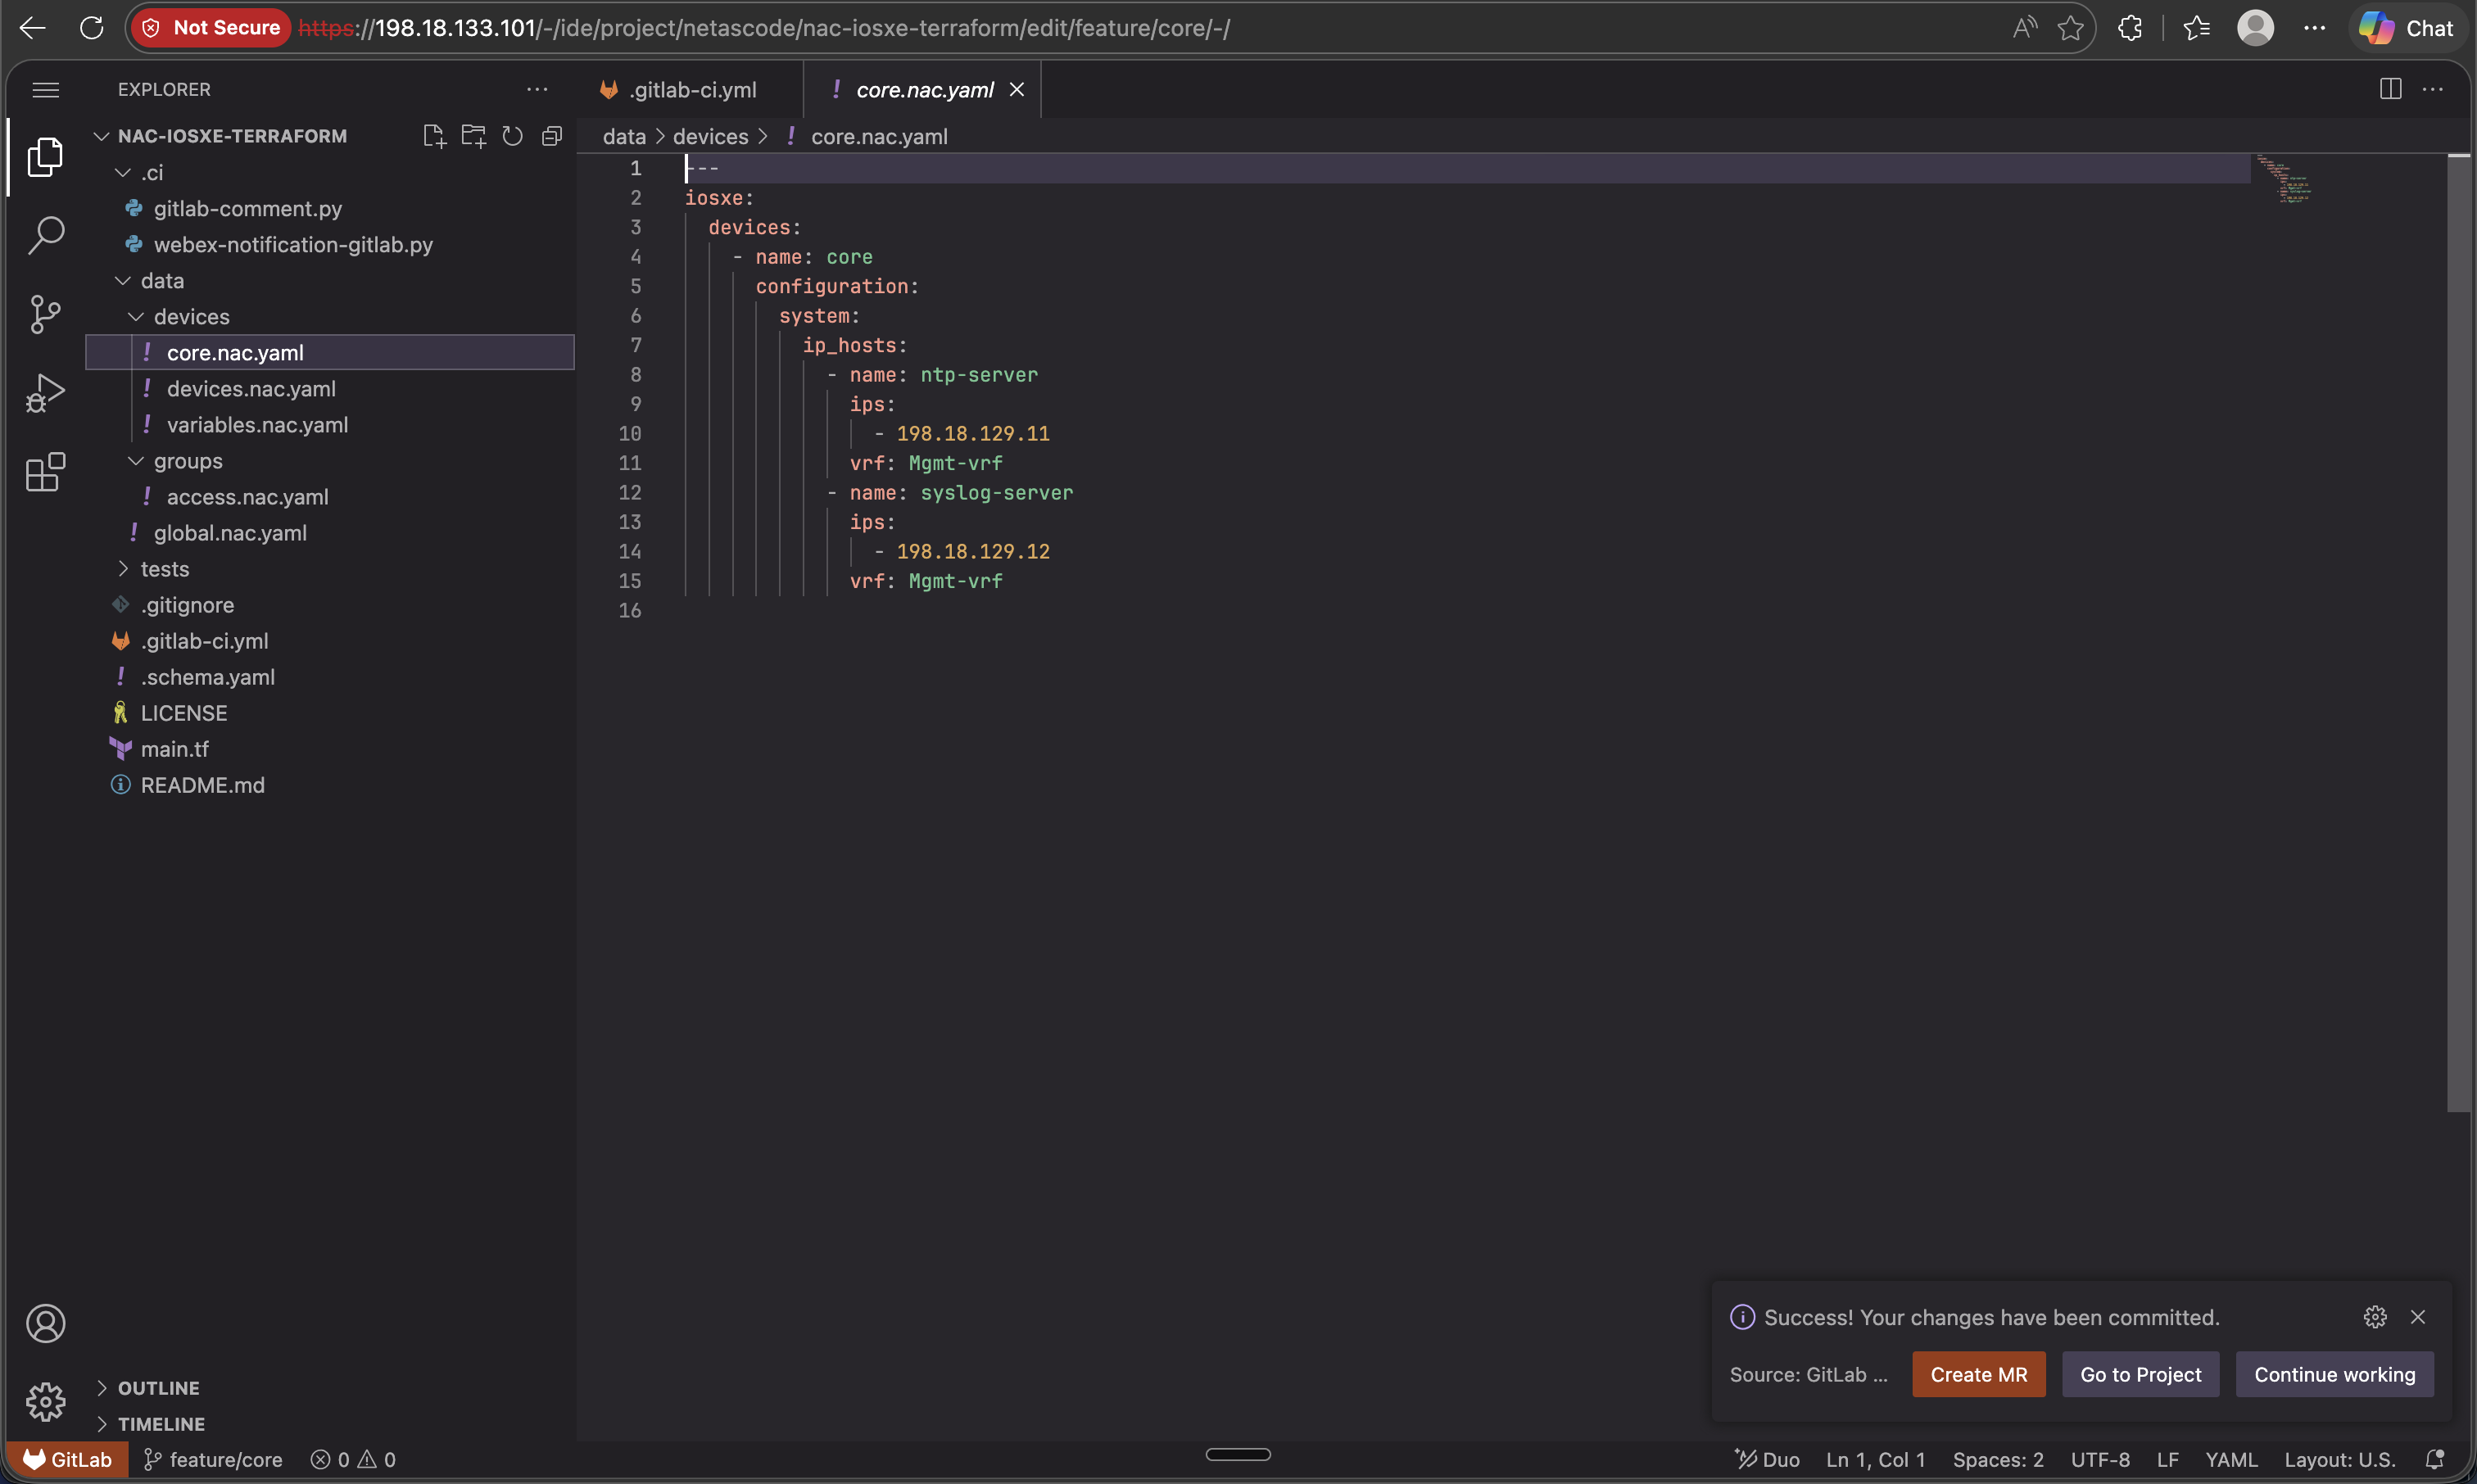
Click the Create merge request button to proceed. It will take you to the merge request creation page.
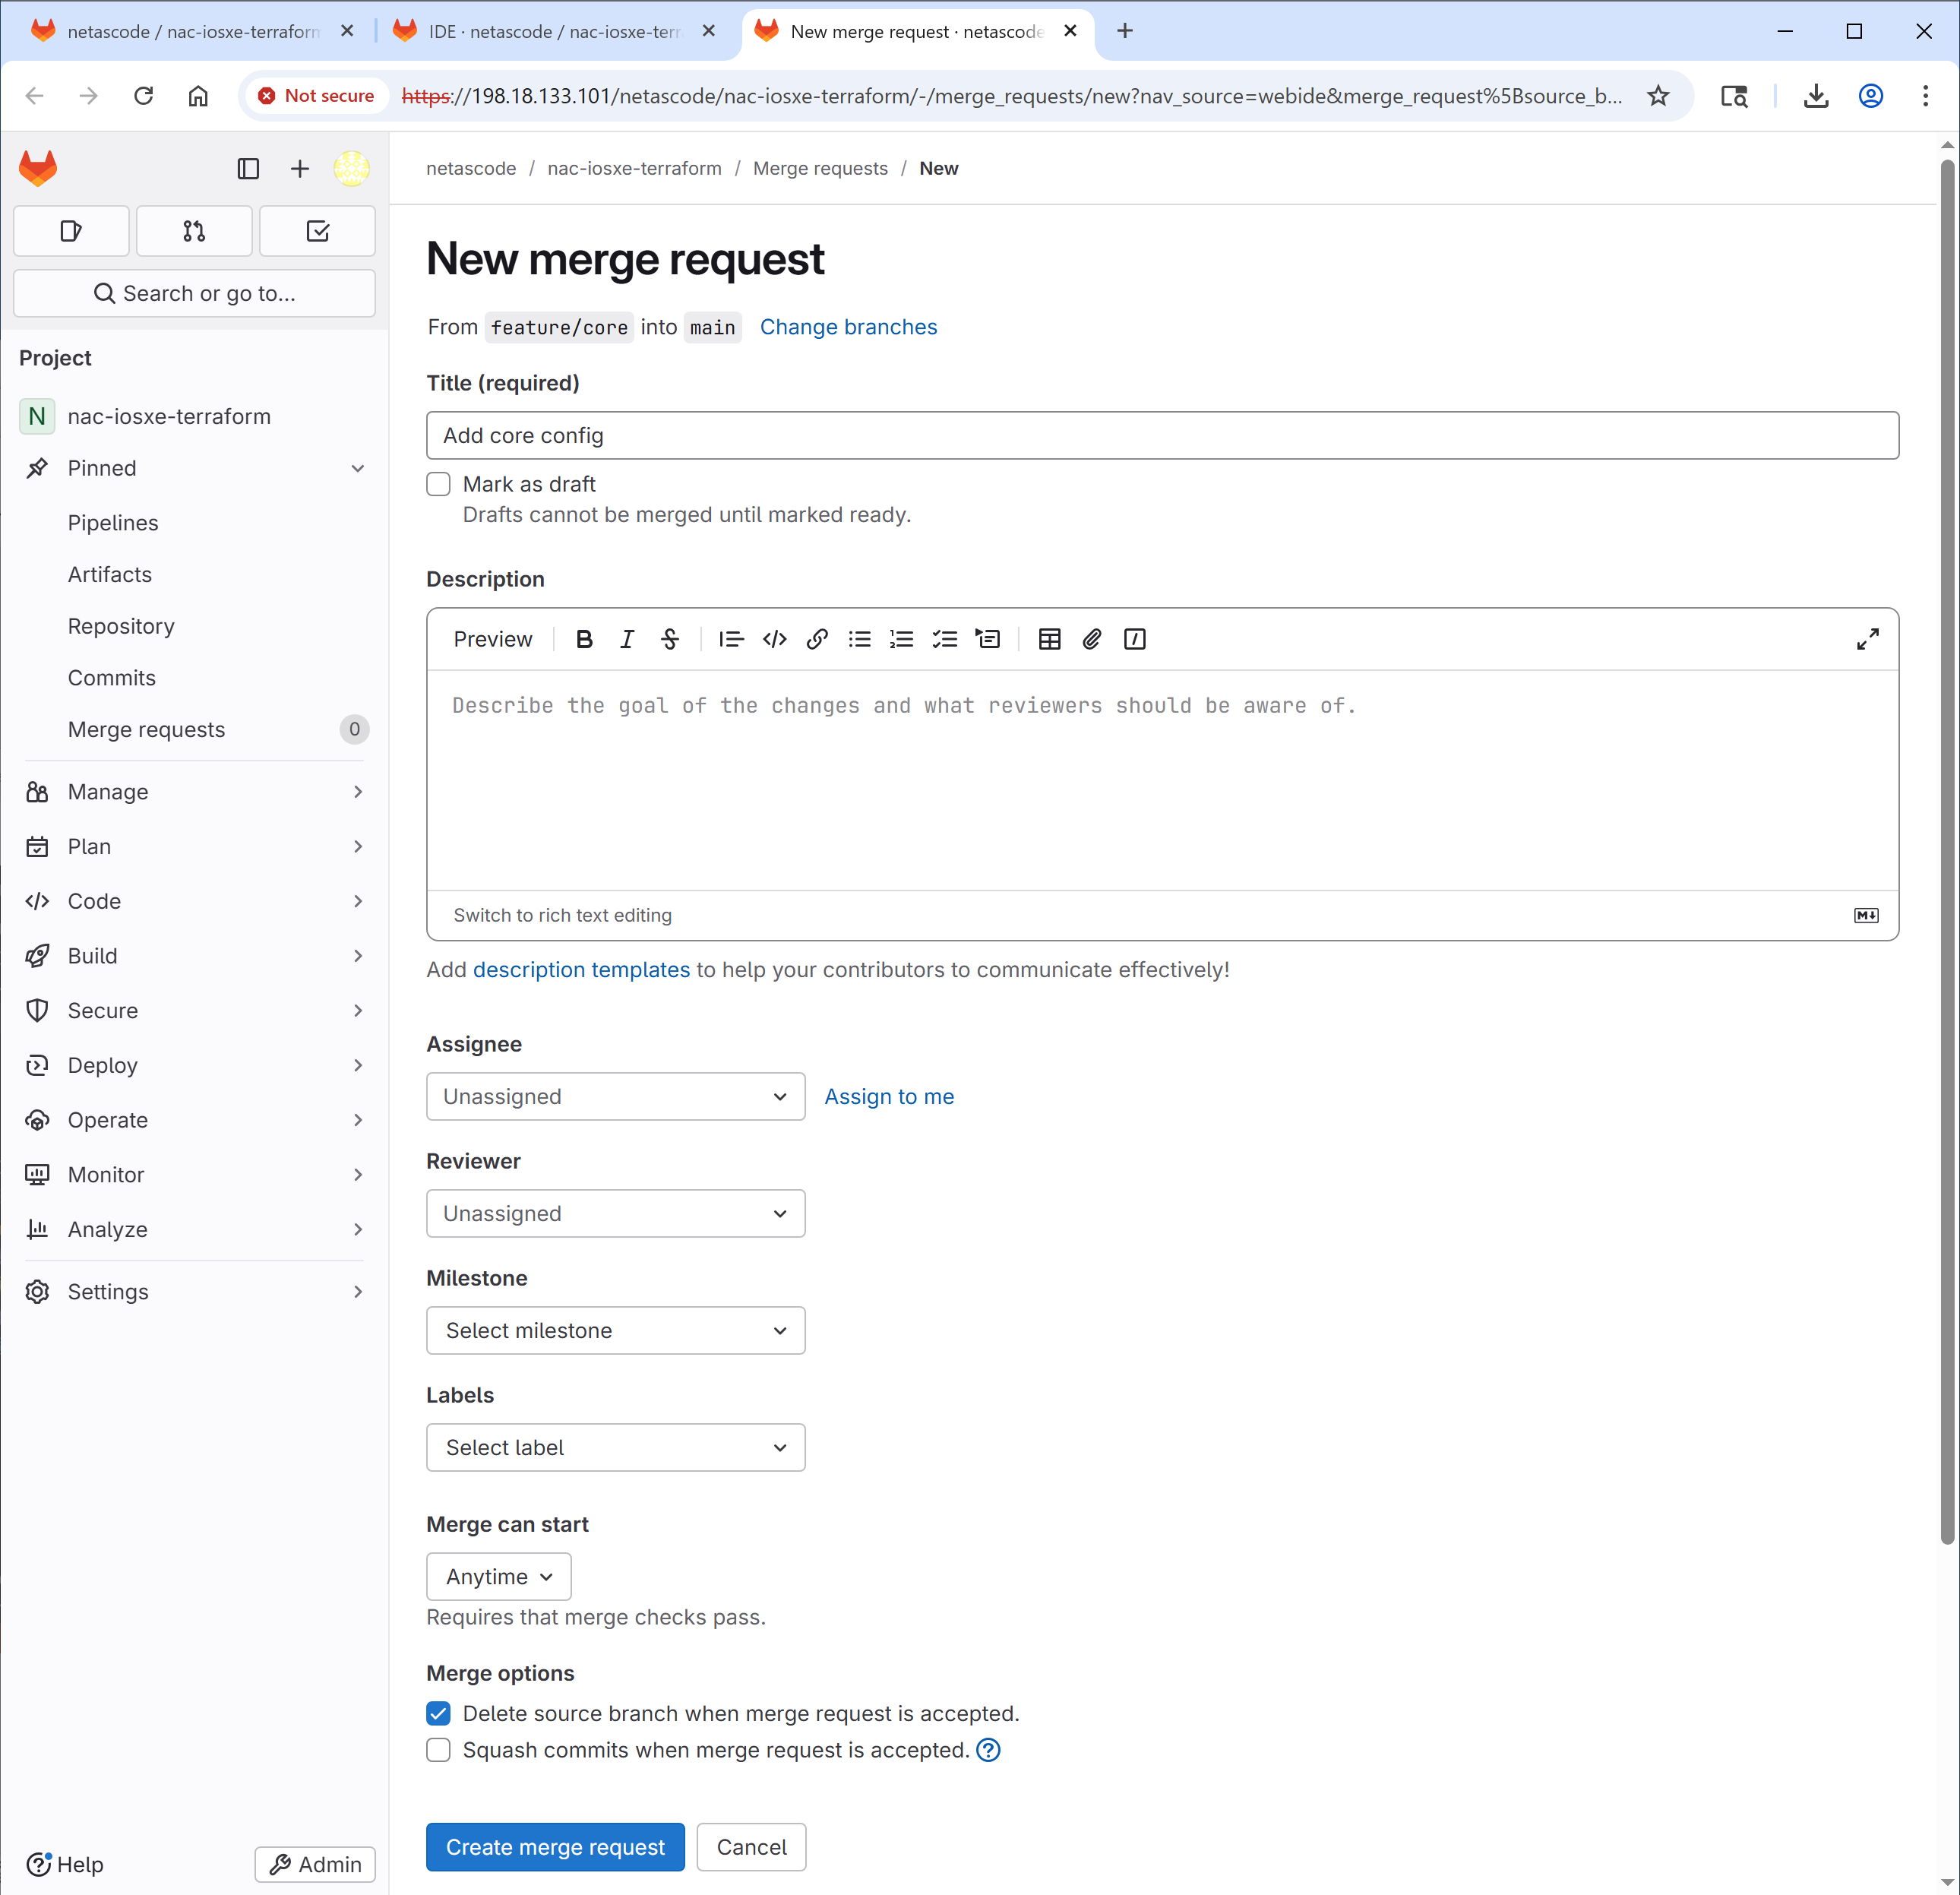
You can leave the default values as they are for now. The source branch should be feature/core, and the target branch is main.
Click Create merge request at the bottom to finalize.
Alternatively, Create Merge Request From the GitLab UI
If you missed the prompt in the Web IDE, you can also create a merge request manually from the GitLab UI:
- Go to your project in GitLab
- Go to Code → Merge requests in the left sidebar
- Click New merge request
- Select the source branch (
feature/core) and target branch (main) - Click Compare branches and continue
The merge request is now created! You should see the merge request page with details about the changes.
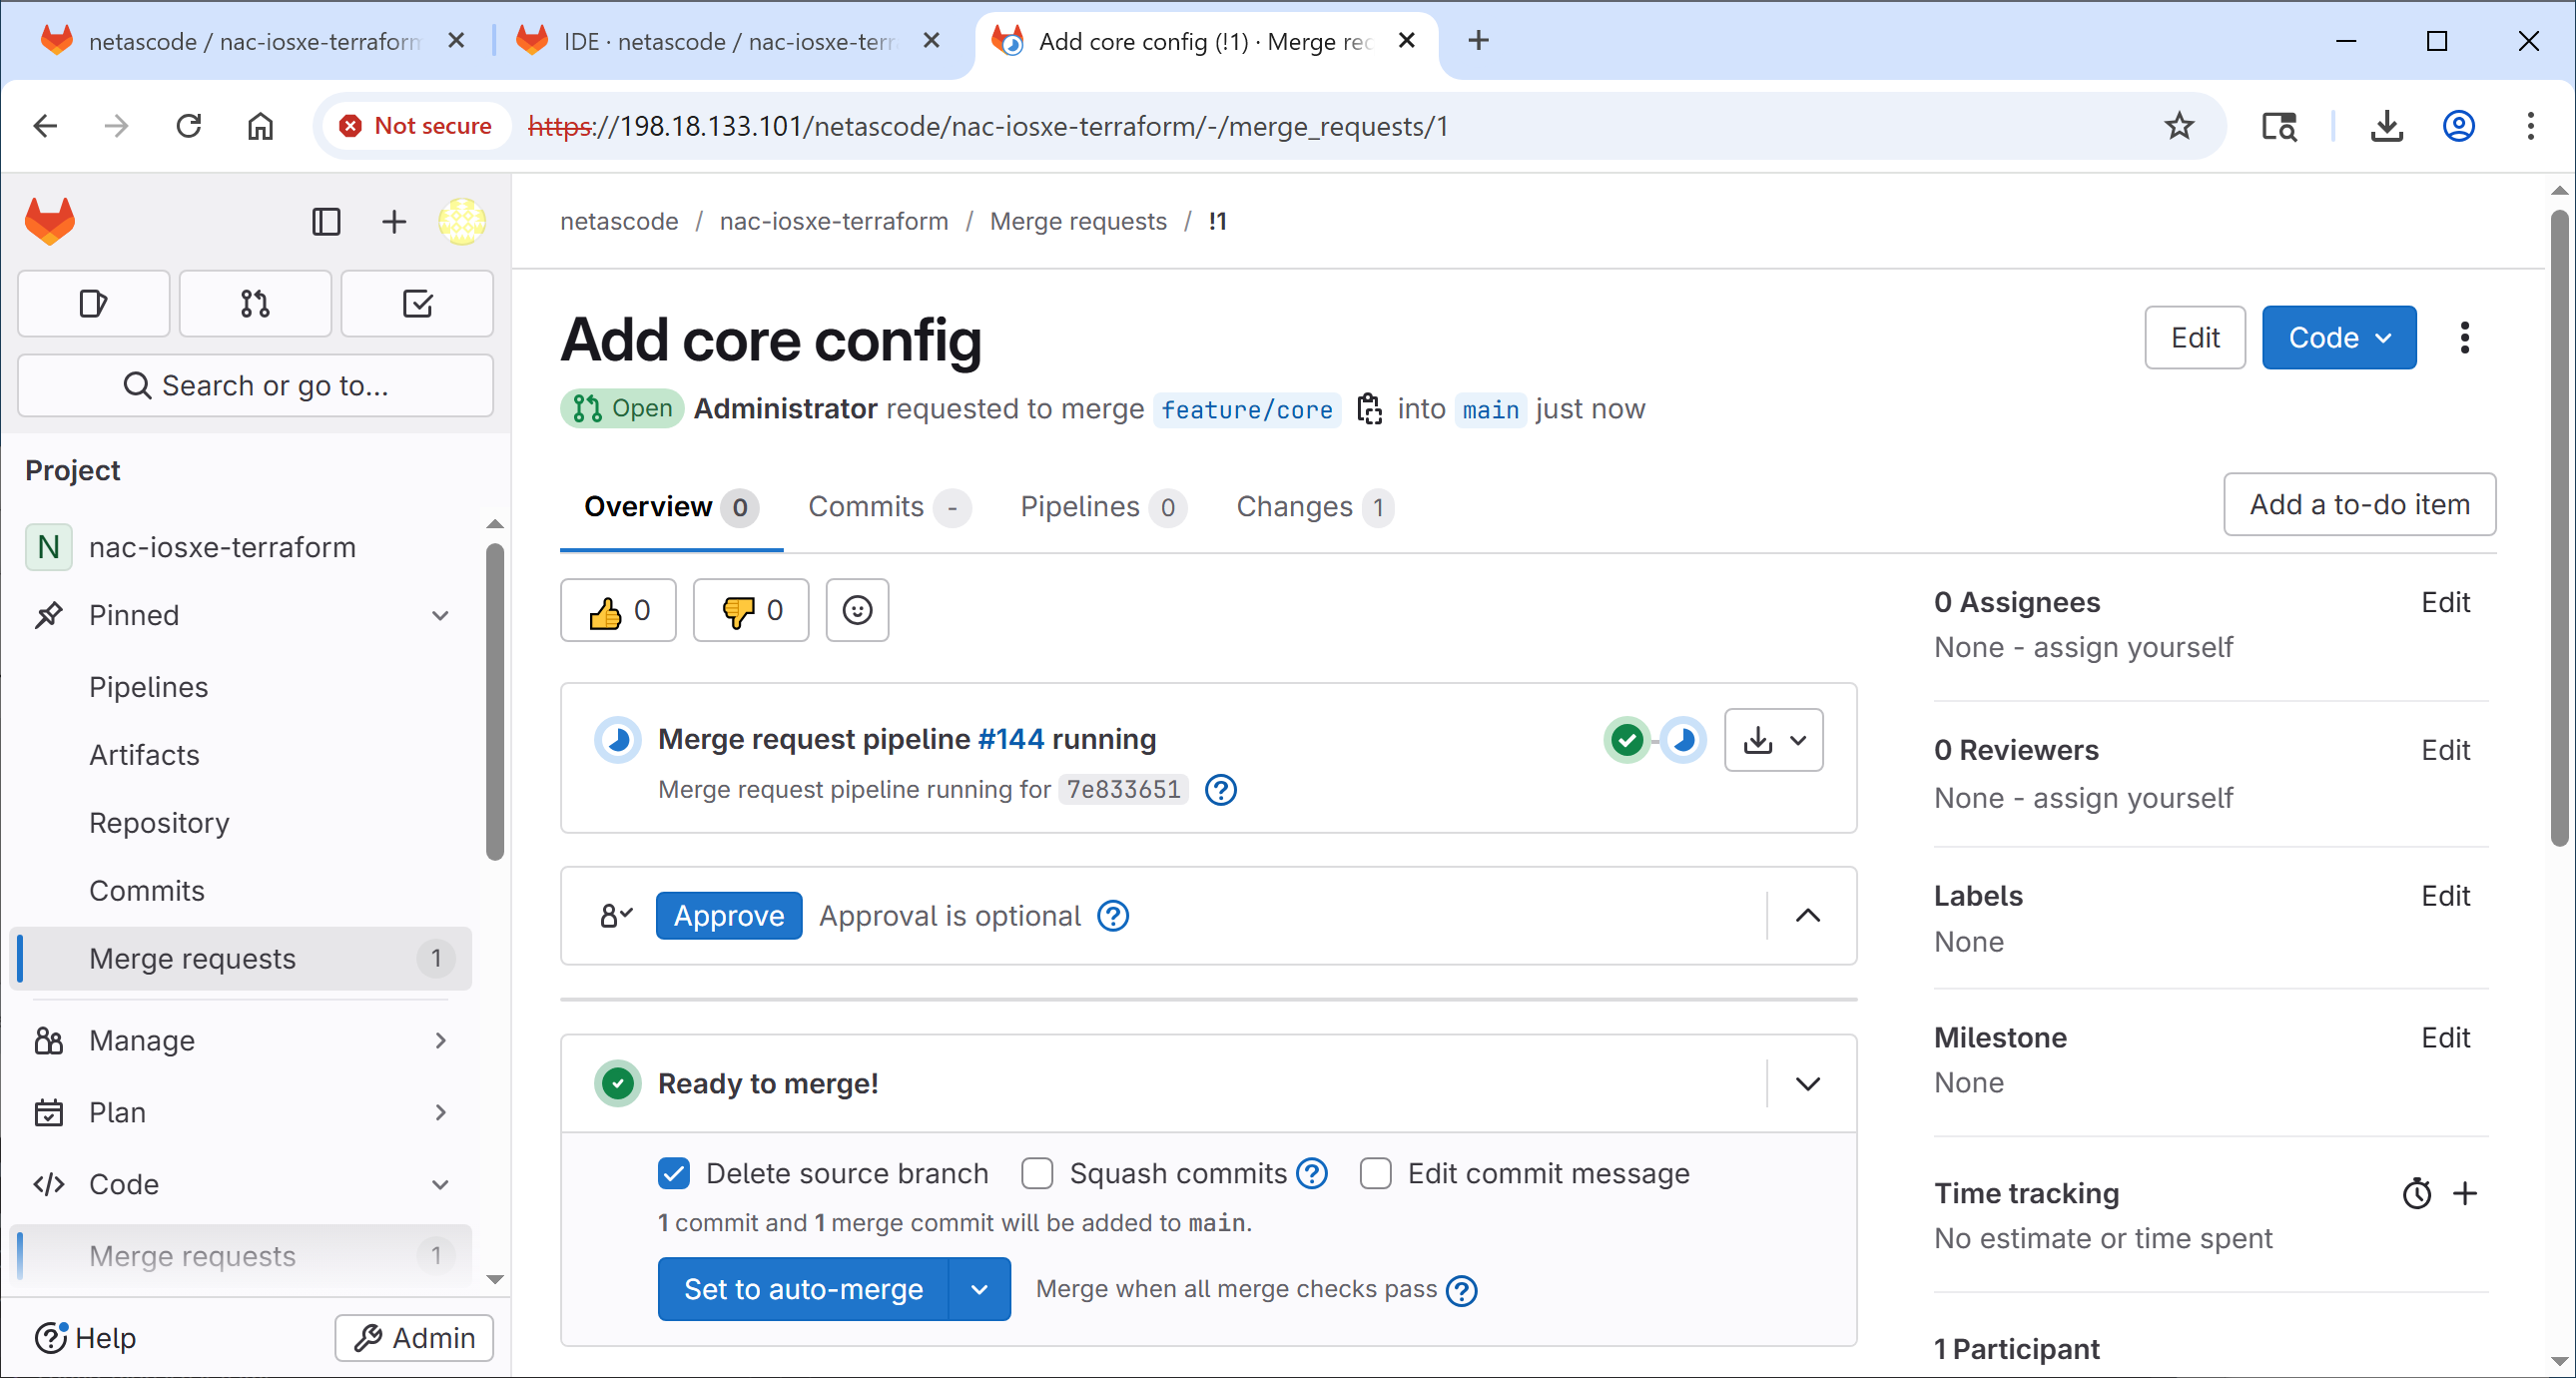
Step 4: Observe the first pipeline (validate + plan)
When you create the merge request, GitLab automatically triggers the same pipeline used in the previous tasks. However, since this is a merge request, the pipeline only runs the validate and plan stages - it does NOT deploy anything yet.
View the Pipeline Details
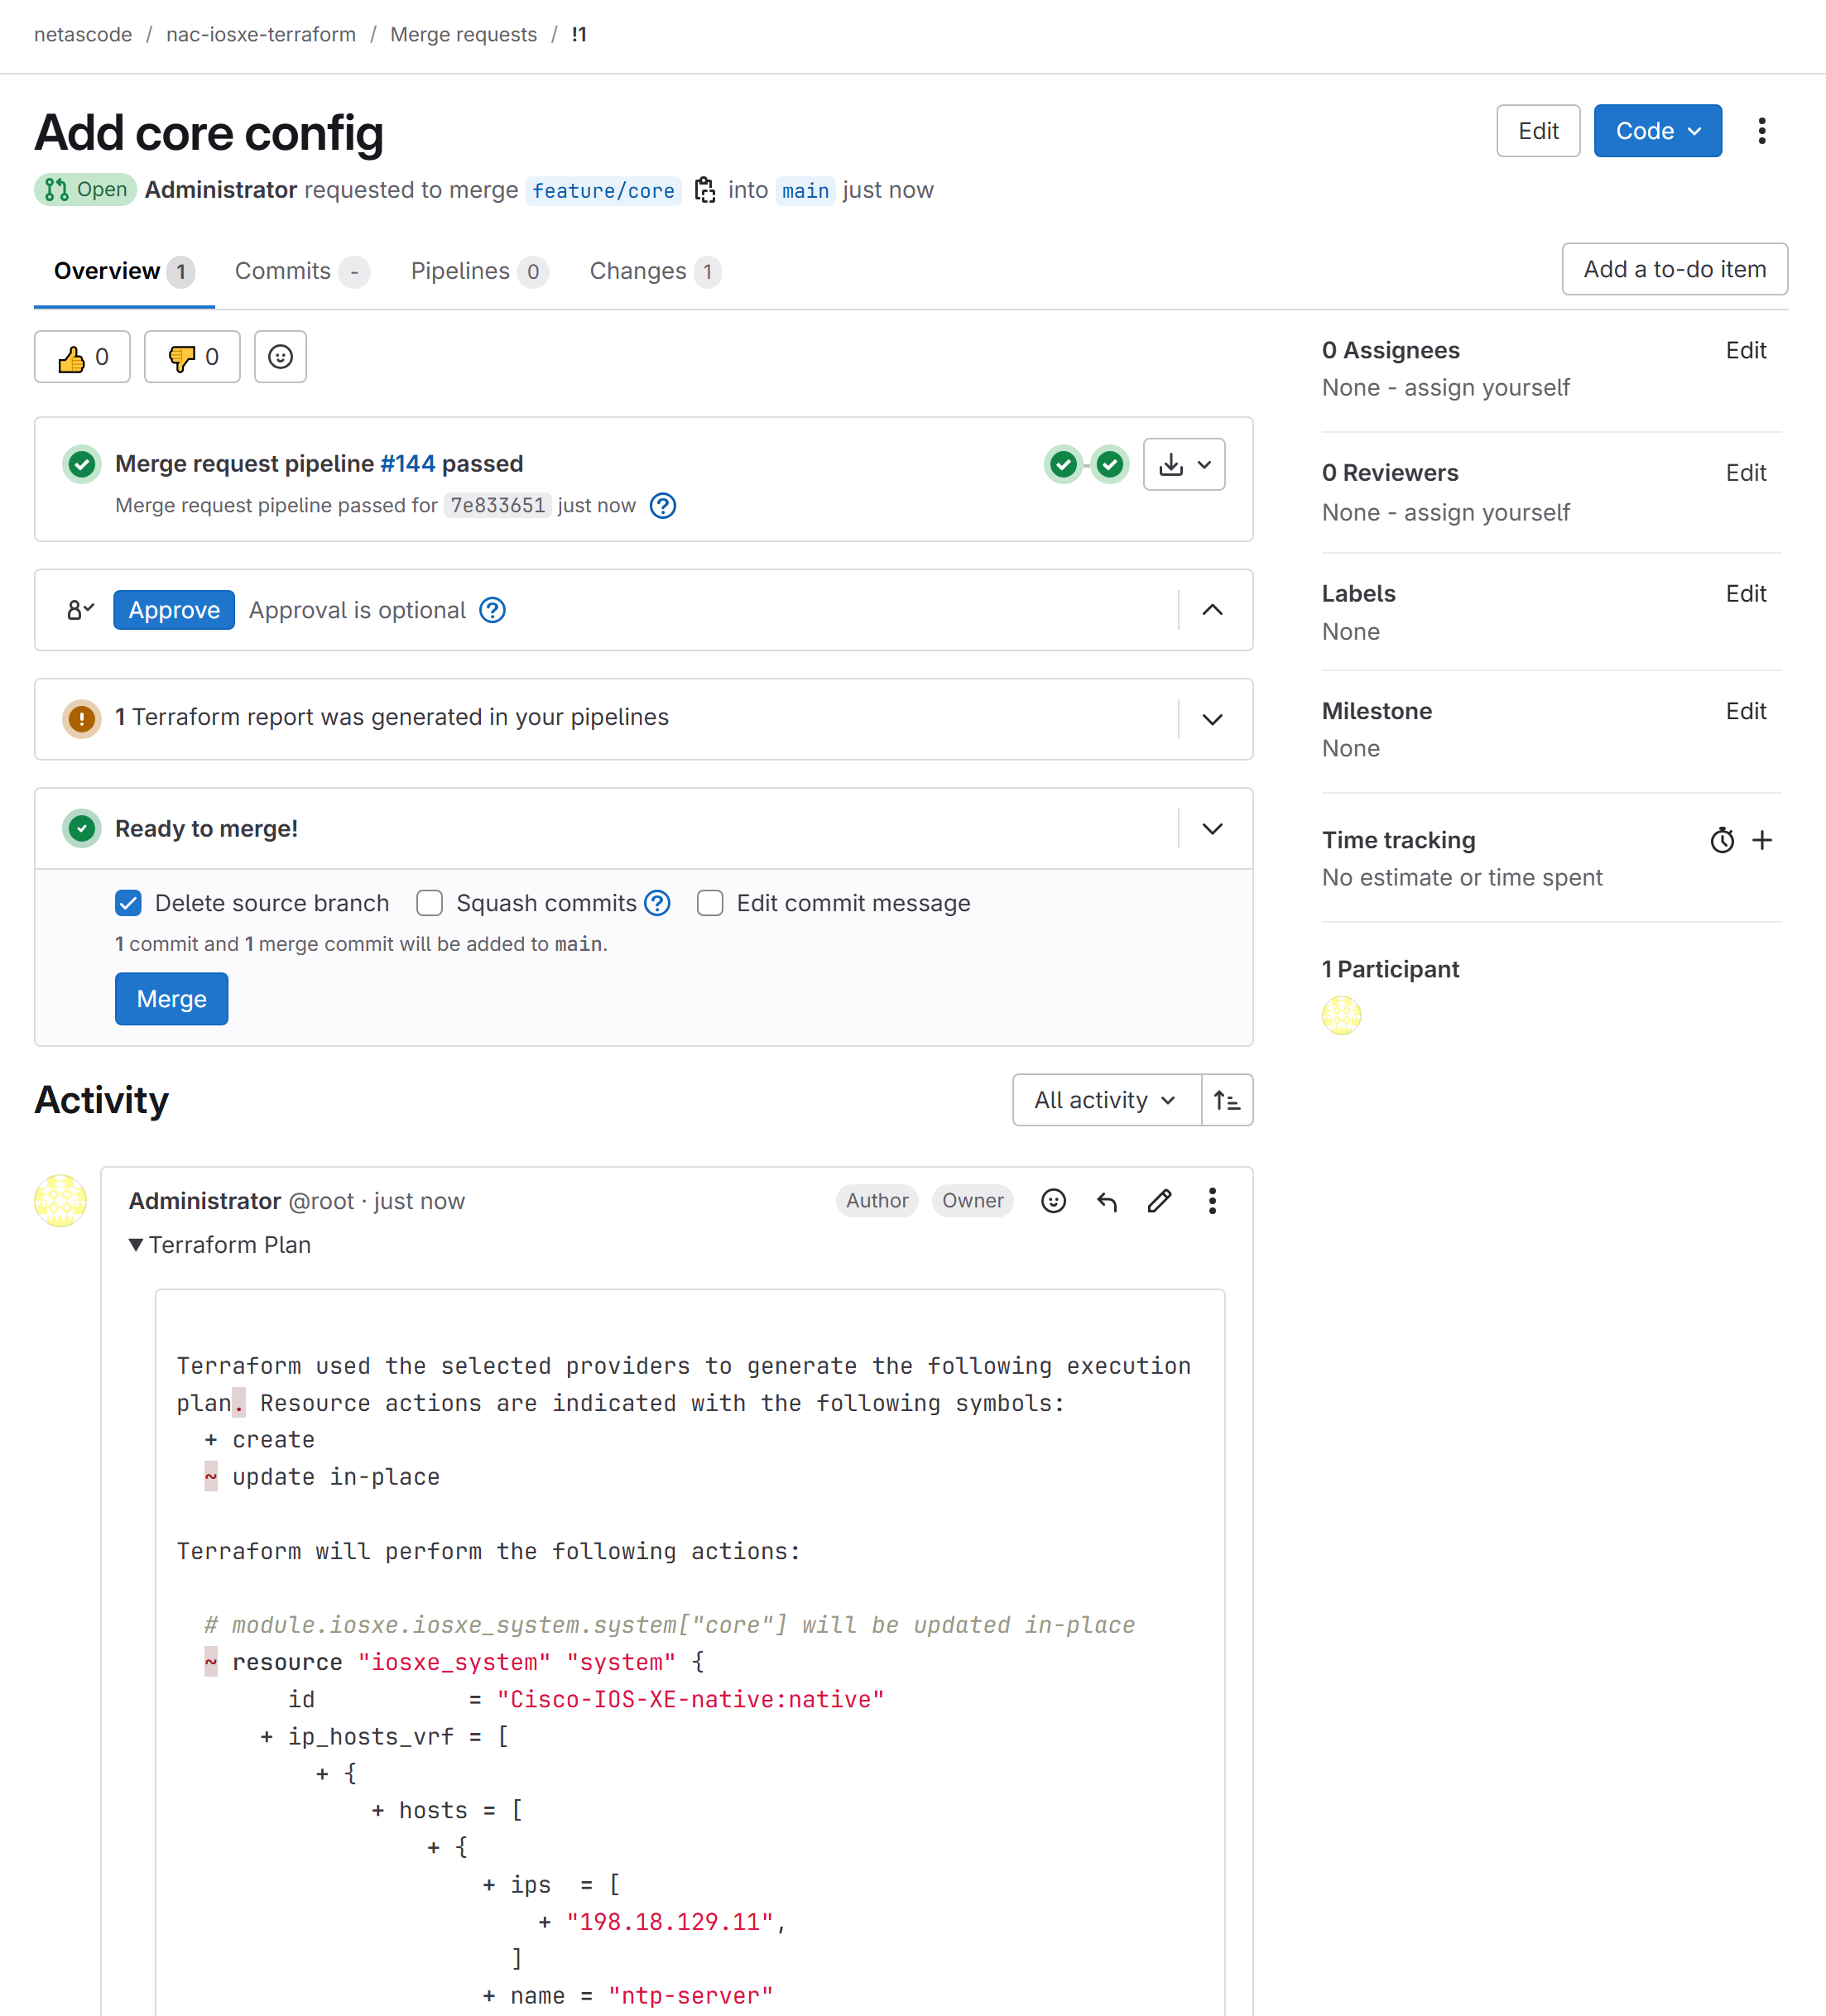
- On the merge request page, click on the pipeline ID (#144 in the image above)
- You'll see a pipeline running or completed
The pipeline uses the config from your feature branch (feature/core) and runs the following stages:
| Stage | Job | Purpose | Typical duration |
|---|---|---|---|
| validate | terraform fmt, nac-validate |
Check YAML syntax and schema compliance (See Task 10) | <10s |
| plan | terraform plan |
Show what changes will be made to the network | ~30-60s |
End-to-end the MR pipeline completes in about 90 seconds. If it's still running at 3+ minutes, something's stuck - click into the running job to see where.
No Deploy Stage!
Notice that the deploy stage does NOT run on merge request pipelines. This is intentional - you want to see what will change without actually changing anything yet.
The plan stage also adds the terraform plan output as a comment to the merge request for easy review. Once the pipeline completes, you can expand the Terraform plan section in the comment under Activity.
Step 5: Review and approve the merge request
This is your opportunity to verify that the changes are correct before approving! In this case, you can see that the IP host entries will be added on the core switch.
In a real environment, a team lead or senior engineer would review the merge request. For this lab, you'll continue on your own.
Approval Step
In this lab, the approval step is not required to merge. In production environments, you would typically configure the project to require at least one approval from another team member.
Tip
You can also set up the project to require successful pipeline completion, and potentially perform other checks before allowing the merge.
Step 6: Merge to main
Verify Pipeline Passed
Before merging, ensure that the pipeline completed successfully, all stages passed, the config and the plan looks good.
You can now merge the changes into main.
- On the merge request page, review the final diff one more time.
- Review the merge options below the Merge button:
- Delete source branch - removes the feature branch after merging. Leave checked to keep the repository tidy.
- Squash commits - combines all commits from the feature branch into one before merging. Useful for noisy feature branches.
- Edit commit message - lets you rewrite the merge commit message.
- Click Merge.
Merged!
Your changes are now on main. Because main is the deployed branch, this automatically triggers the full deployment pipeline (validate + plan + deploy + test + notify).
Step 7: Observe the deployment pipeline
Merging to main triggers a new pipeline - this time including the deployment and test stages. This pipeline is identical to the one run in Tasks 13 and 14.
View the Deployment Pipeline
- Go to Build → Pipelines in the left sidebar
- You'll see a new pipeline that was triggered by the merge
- Click on it to view the stages
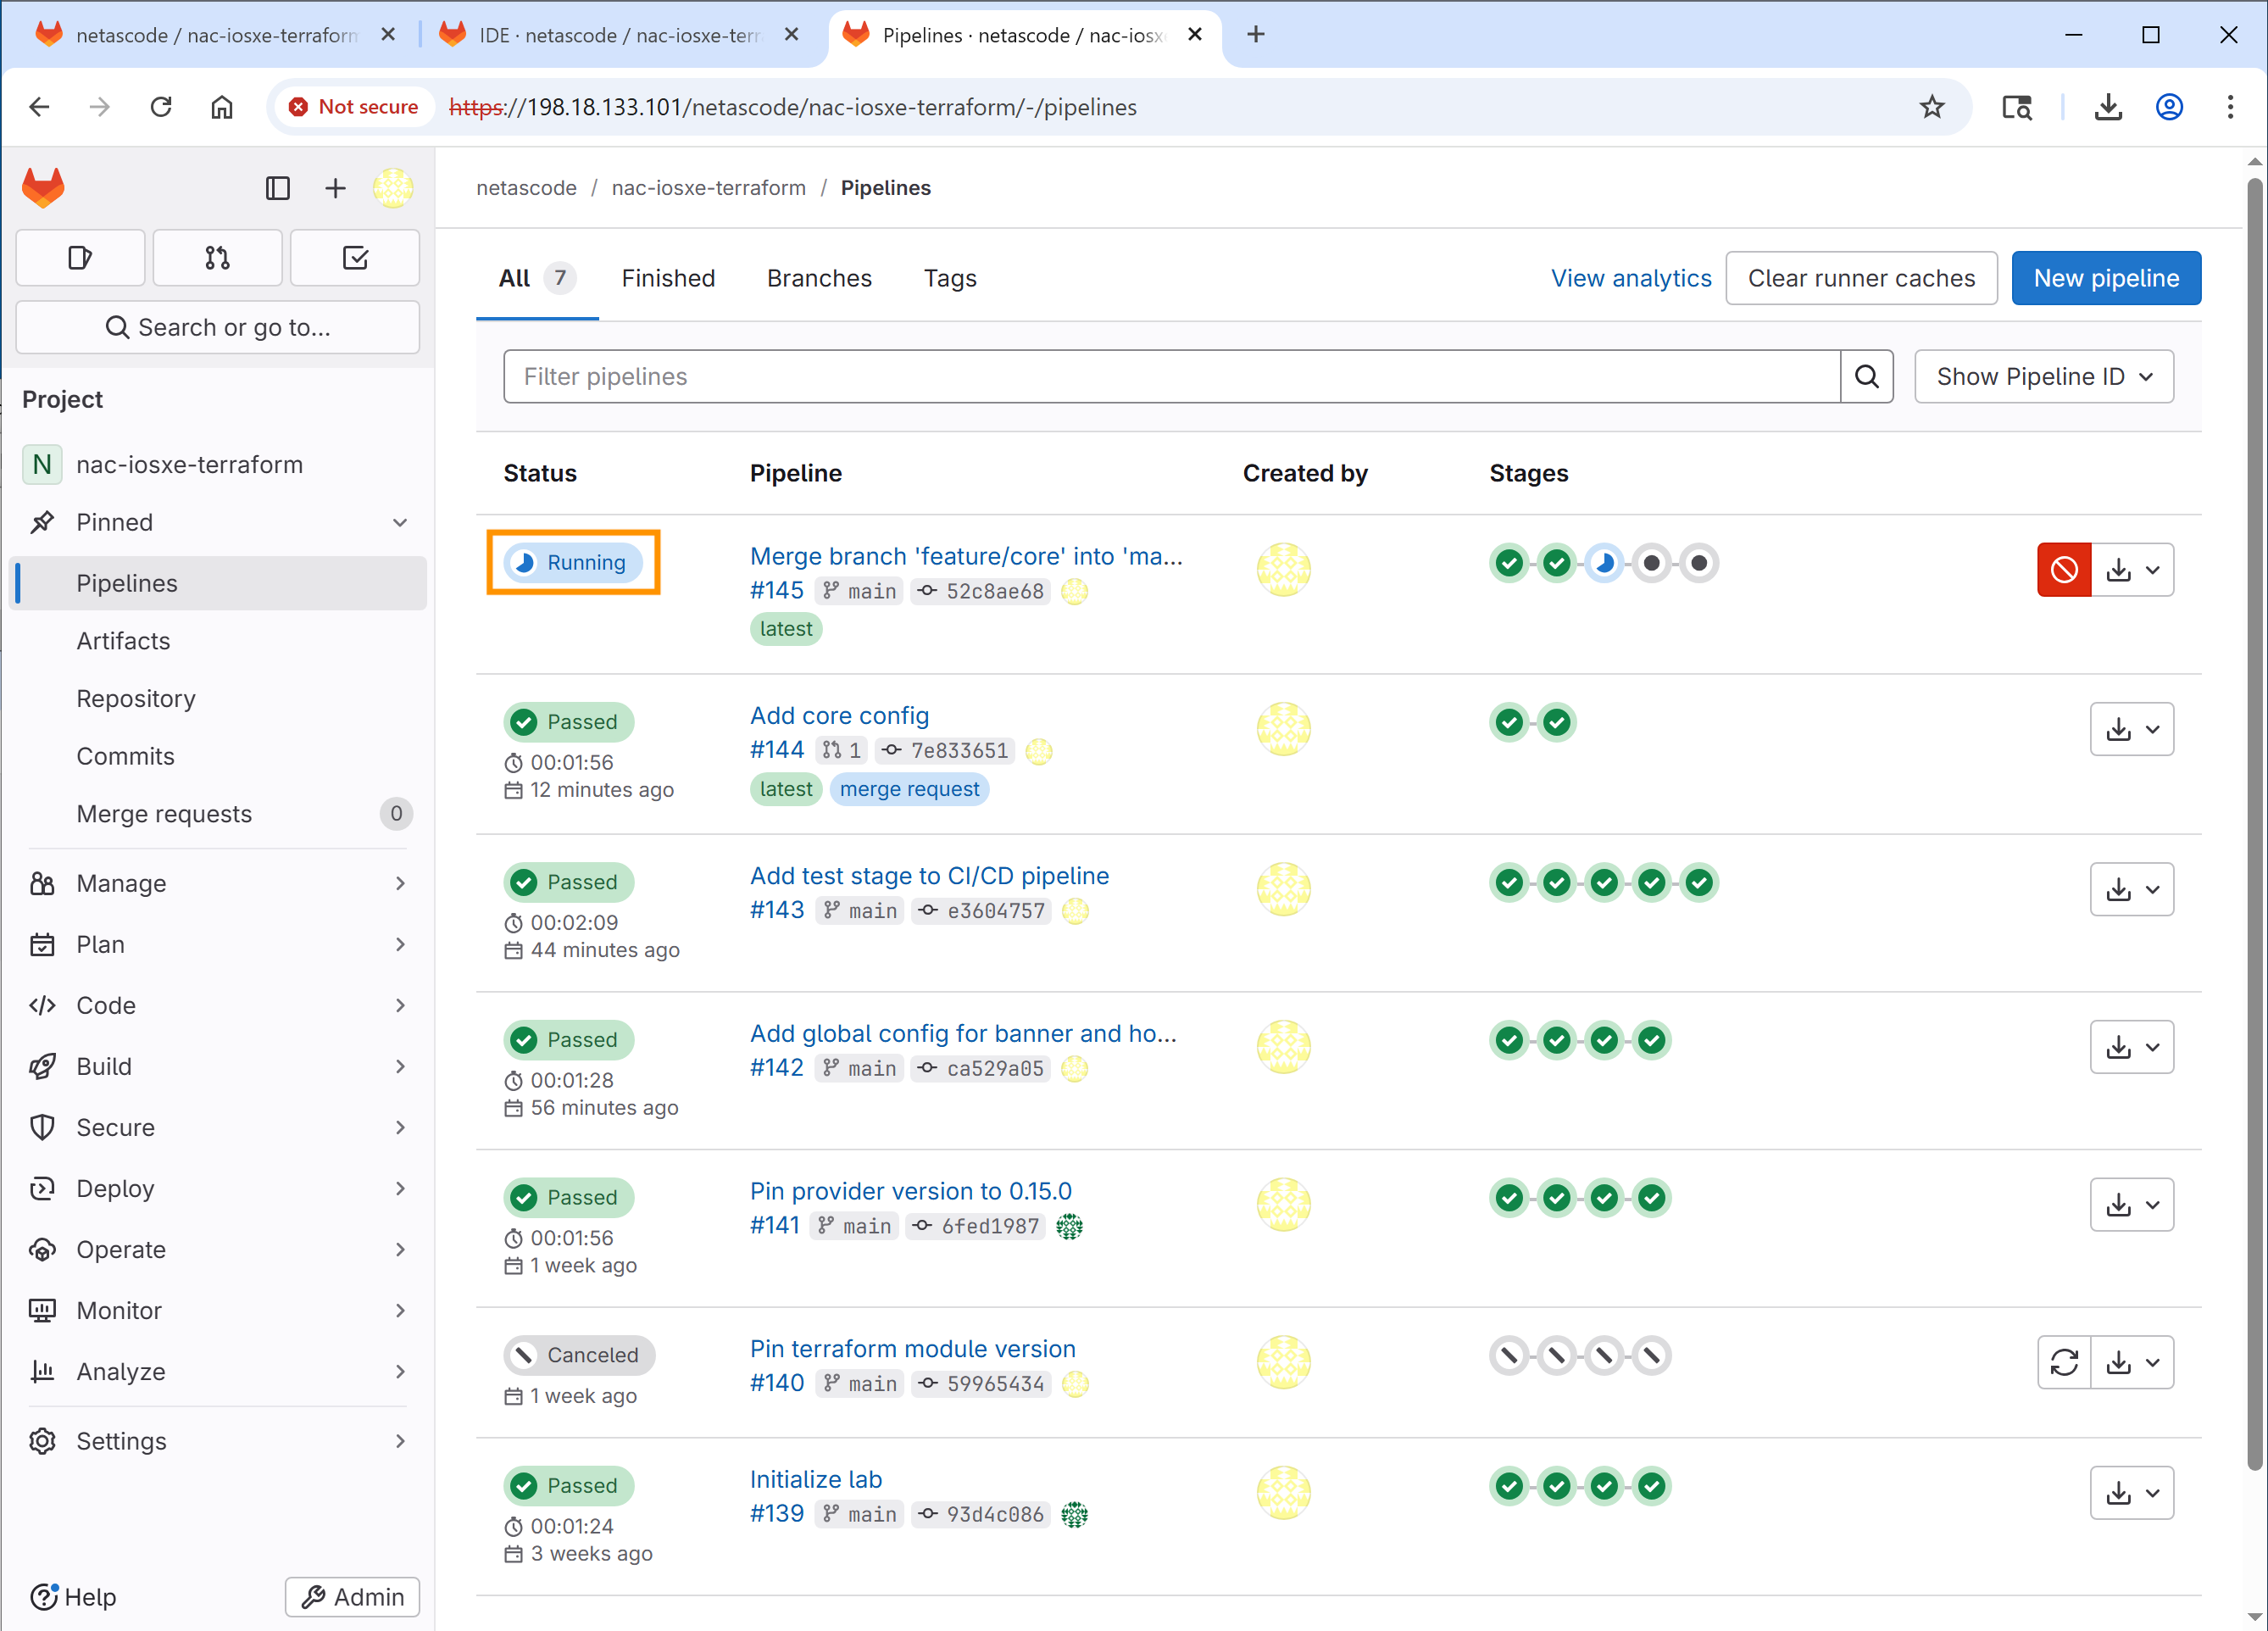
The main branch pipeline runs ALL stages:
- validate - <10s
- plan - ~30-60s
- deploy - ~60-90s
- test - ~45-60s
- notify - <5s
Total: about 3-4 minutes end-to-end. If it stalls in deploy or test past 4 minutes, click into the job logs - it's usually a device that went unreachable or a test that timed out on operational state (see the troubleshooting section below).
After the pipeline completes successfully, verify the changes landed on the devices:
Confirm the IP host entries on core
Open Solar-PuTTY and connect to core (198.18.130.10). Run:
Expected output:
core#show run | include ip host
ip host host01 192.168.100.100
ip host host02 192.168.100.200
Two ip host lines, one for each host. If you see fewer (or none),
scroll to the Troubleshooting section below.
Confirm the deploy log, too
As in Task 13, click into the deploy job on the merge pipeline and look for:
The Resources: N added/changed line is the authoritative record of
what Terraform actually pushed - useful for audit purposes once you
take this pattern to production.
Troubleshooting - common issues
You cannot push to this branch
This means the branch protection is working! Create a feature branch instead of trying to push to main directly.
Validation failed
Check the job logs for nac-validate to see what schema or syntax errors occurred. Fix them in your feature branch and push again.
For more details, refer to Task 10 - Schema Validation.
Merge conflicts
If there are merge conflicts, GitLab will notify you on the MR page. To resolve:
- Fetch the latest main branch into your feature branch
- Resolve conflicts locally or in the Web IDE
- Commit and push the resolved changes to your feature branch
- The MR will update automatically
Terraform plan or apply failed
Check the job logs for terraform plan or terraform apply to see what went wrong. Common issues include:
- Connectivity issues to devices
- Authentication failures
- Configuration errors
If you see "Failed to install provider", re-run the job.
Pipeline failures
This can happen for various reasons. Common steps to resolve:
- Check the job logs for specific errors
- Fix the issues in your feature branch
- Commit and push again to your feature branch - the MR pipeline will re-run automatically
If you need help, feel free to ask your instructors!
What you've accomplished
In this task, you have:
- ✅ Configured the main branch as protected to enforce change control
- ✅ Created a feature branch for your configuration changes
- ✅ Modified configuration safely in your branch
- ✅ Created a merge request and observed the preview pipeline (validate + plan)
- ✅ Experienced the review and approval process
- ✅ Merged changes and observed the deployment pipeline (validate + plan + deploy + test + notify)
- ✅ Learned the complete end-to-end workflow used in production environments
← Previous: Task 14 - Extend CI/CD pipeline · Next: Conclusion