Task 03 - Global configuration
Estimated Time to Complete: ~25 minutes
In this task you'll use IOS XE as Code global configuration to apply settings across all devices at once. A login banner is the example - you'll see how global settings eliminate the need to repeat the same configuration on each device individually.
What you'll learn
By the end of this task you will have:
- Written a global Network as Code configuration file that applies to every registered device
- Run the full Terraform workflow end-to-end:
init→plan→apply - Verified the deployed banner by SSH-ing to each device
Global configuration
Global configurations define network-wide settings that apply to all devices unless explicitly overridden at the device group or device level. The configuration precedence hierarchy works as follows:
- Device (highest precedence) - device-specific overrides
- Device Group (medium precedence) - role or location-specific settings
- Global (lowest precedence) - organization-wide defaults
By placing the banner in the global section, it will automatically apply to all devices listed in your configuration, ensuring consistency without duplication.
Create the global configuration file
First, create the global configuration file using your WSL Ubuntu terminal:
Alternative: File creation with VS Code
You can also create the file using VS Code by clicking on the data/ folder in the Explorer sidebar, then on the new file icon next to the NaC-IOSXE folder name,
or by right-clicking the data/ folder and selecting New File.
Throughout this lab guide, you will use the touch command in WSL to create files, but feel free to use VS Code if you prefer a graphical interface.
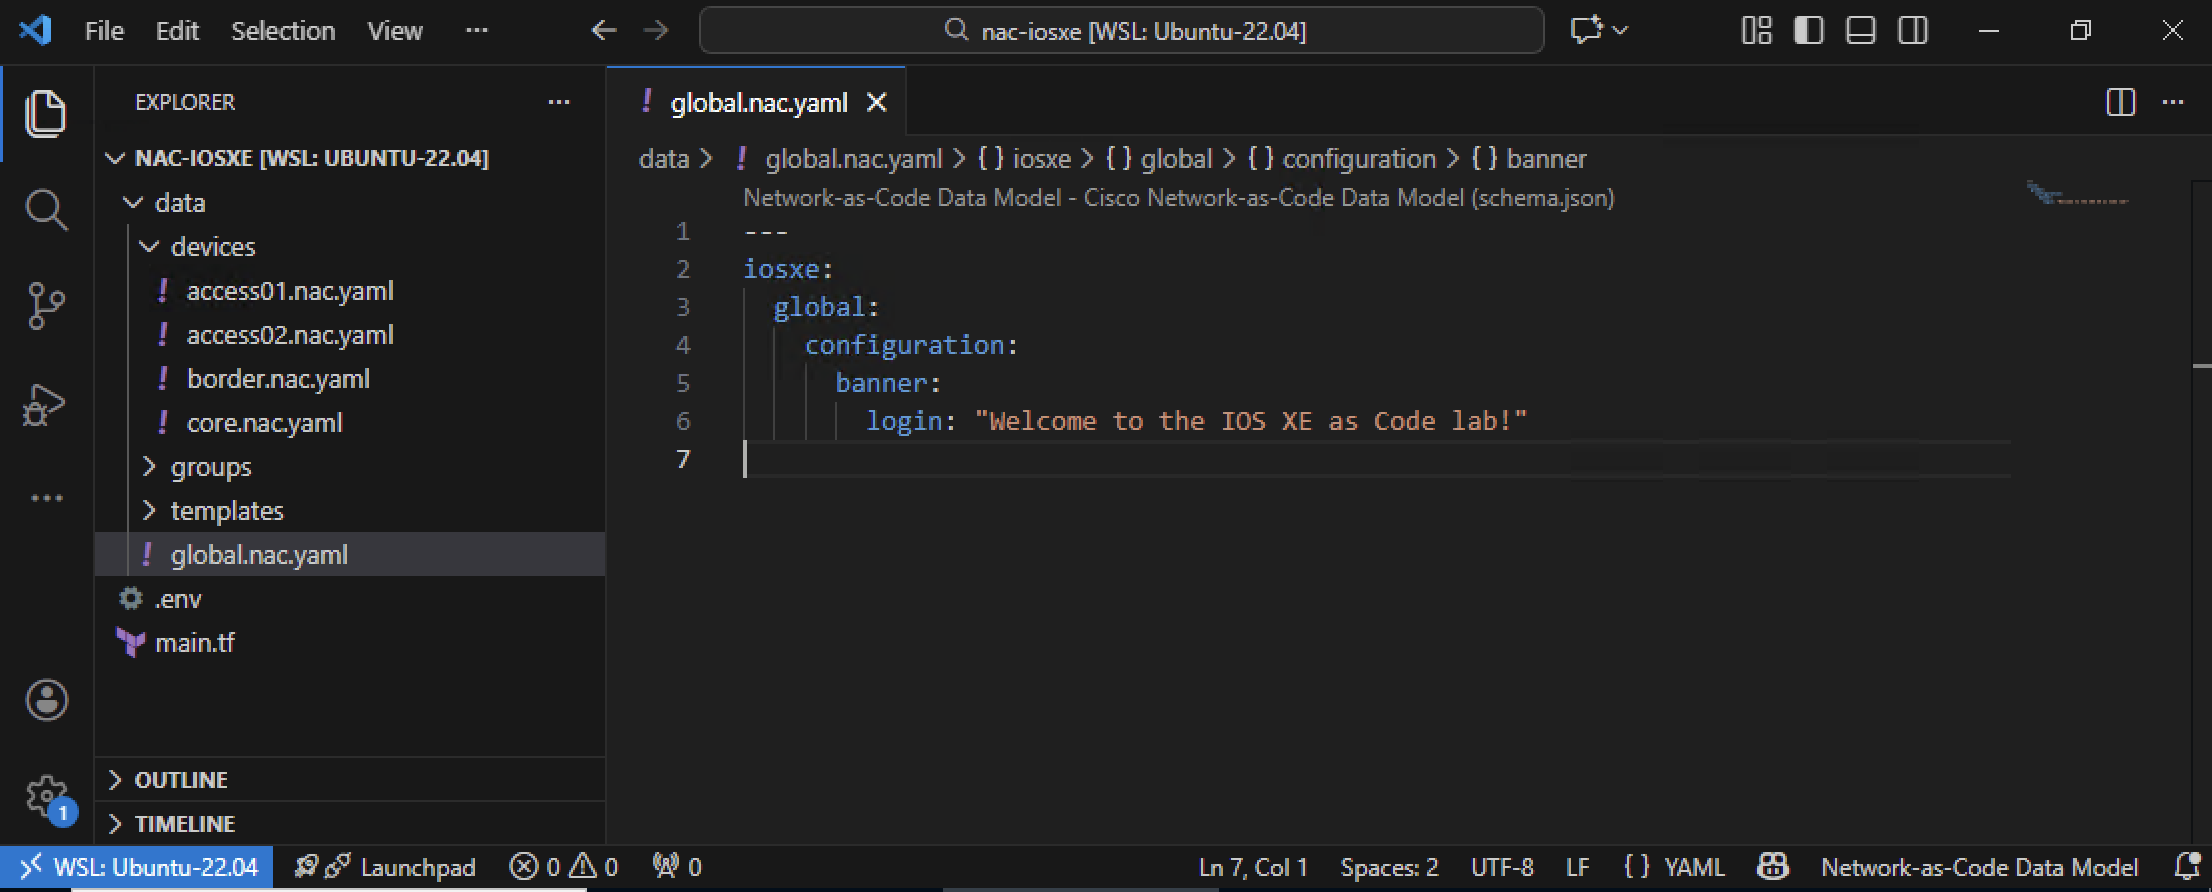
Then open data/global.nac.yaml in VS Code and add the following content. Notice how the banner is defined once in the global section and will be applied to every device registered in the per-device files you created in Task 02:
---
iosxe:
  global:
    configuration:
      banner:
        login: "Welcome to the IOS XE as Code lab!"
Key elements explained:
---- YAML document start markeriosxe:- Root key indicating IOS XE specific configurationglobal:- Defines configurations that apply to all devicesconfiguration:- Contains the actual configuration settingsbanner:- Specifies banner configurations (note: singular, not "banners")login:- The login banner text displayed to users before they log in to the device
Separation of concerns
The global configuration lives in its own file (global.nac.yaml), separate from the per-device files. This modular layout keeps "what applies to everyone" distinct from "what applies to one device" - NaC merges them all automatically when it reads the data/ directory.
The figure below illustrates how to create the data/global.nac.yaml file with Visual Studio Code:
Documentation reference
But how do you know what configuration options are supported, and what the correct YAML structure is?
The data model documentation is published on the Network as Code website. Specifically, the banner configuration is described here: IOS XE Banner Configuration.
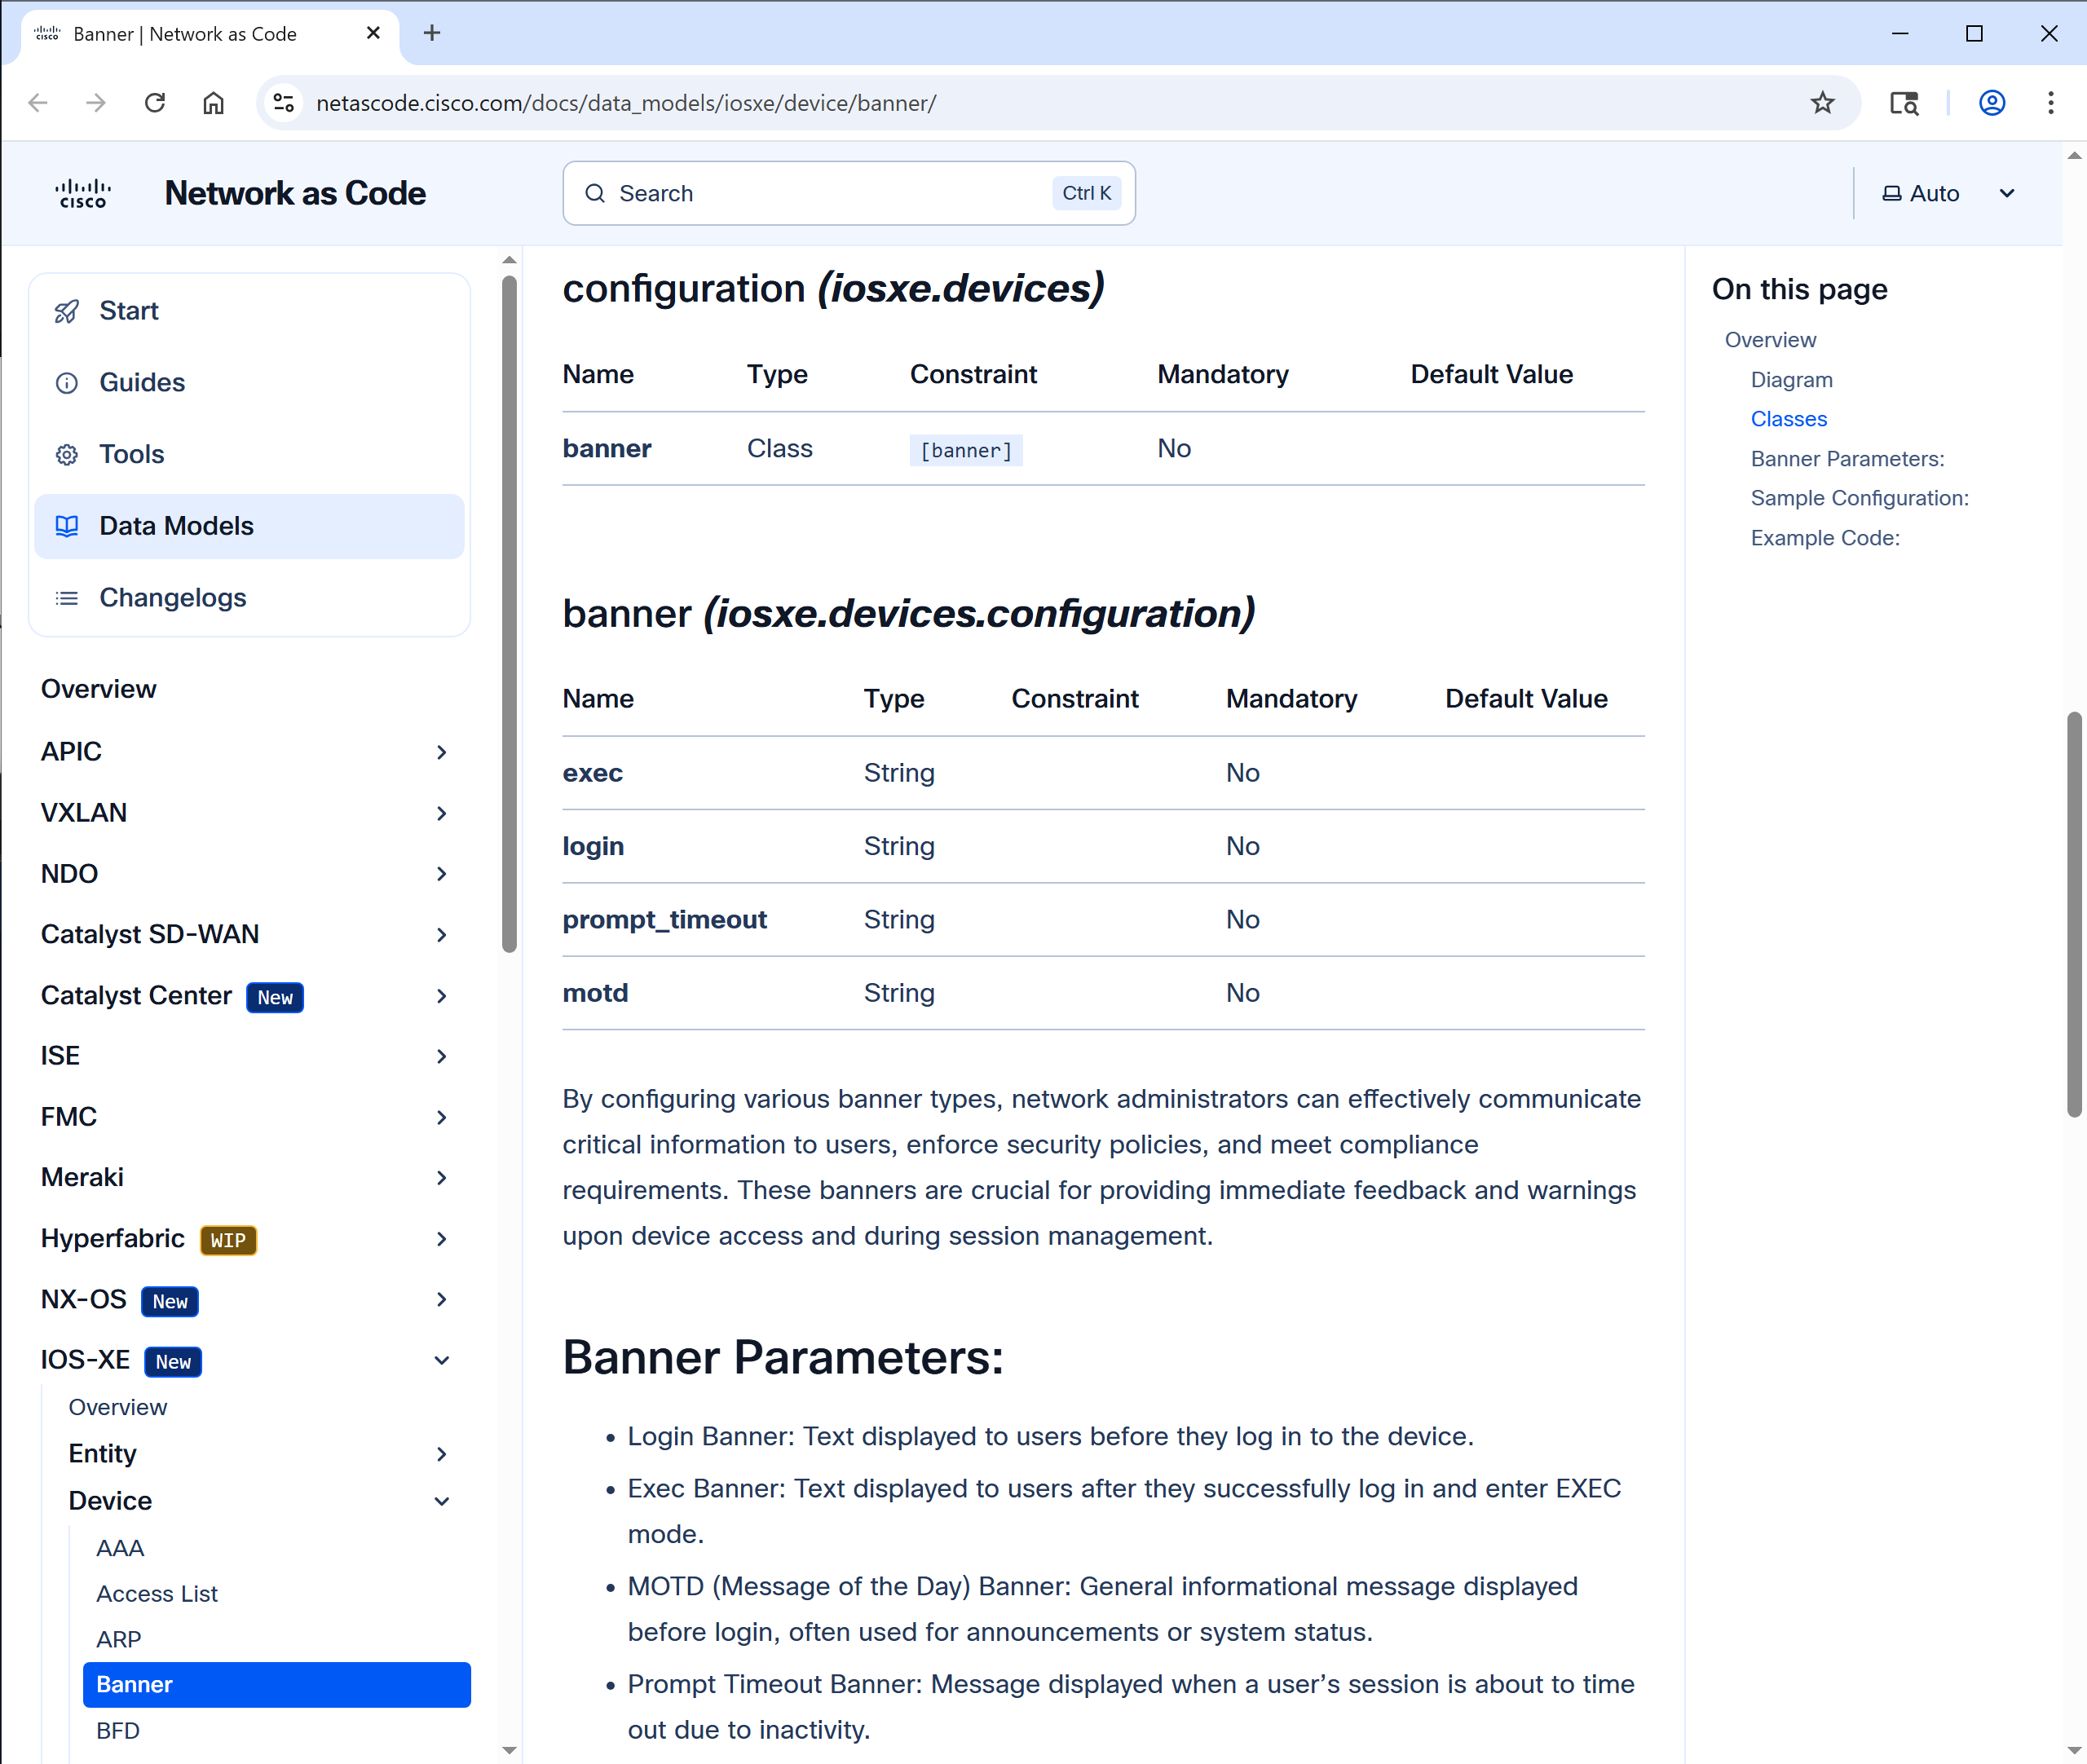
You can refer to this documentation at any time for more details on available configuration options, data types and guides. The curated configuration examples provide excellent references to help you create your own configurations.
Applying configuration with Terraform CLI
Now that you've created your configuration files, it's time to deploy them to your network devices using Terraform. Terraform follows a simple three-step workflow that ensures safe and predictable infrastructure changes.
Terraform workflow
Terraform uses a declarative approach where you define the desired state (in your YAML files), and Terraform figures out how to achieve that state. There are four moving parts:
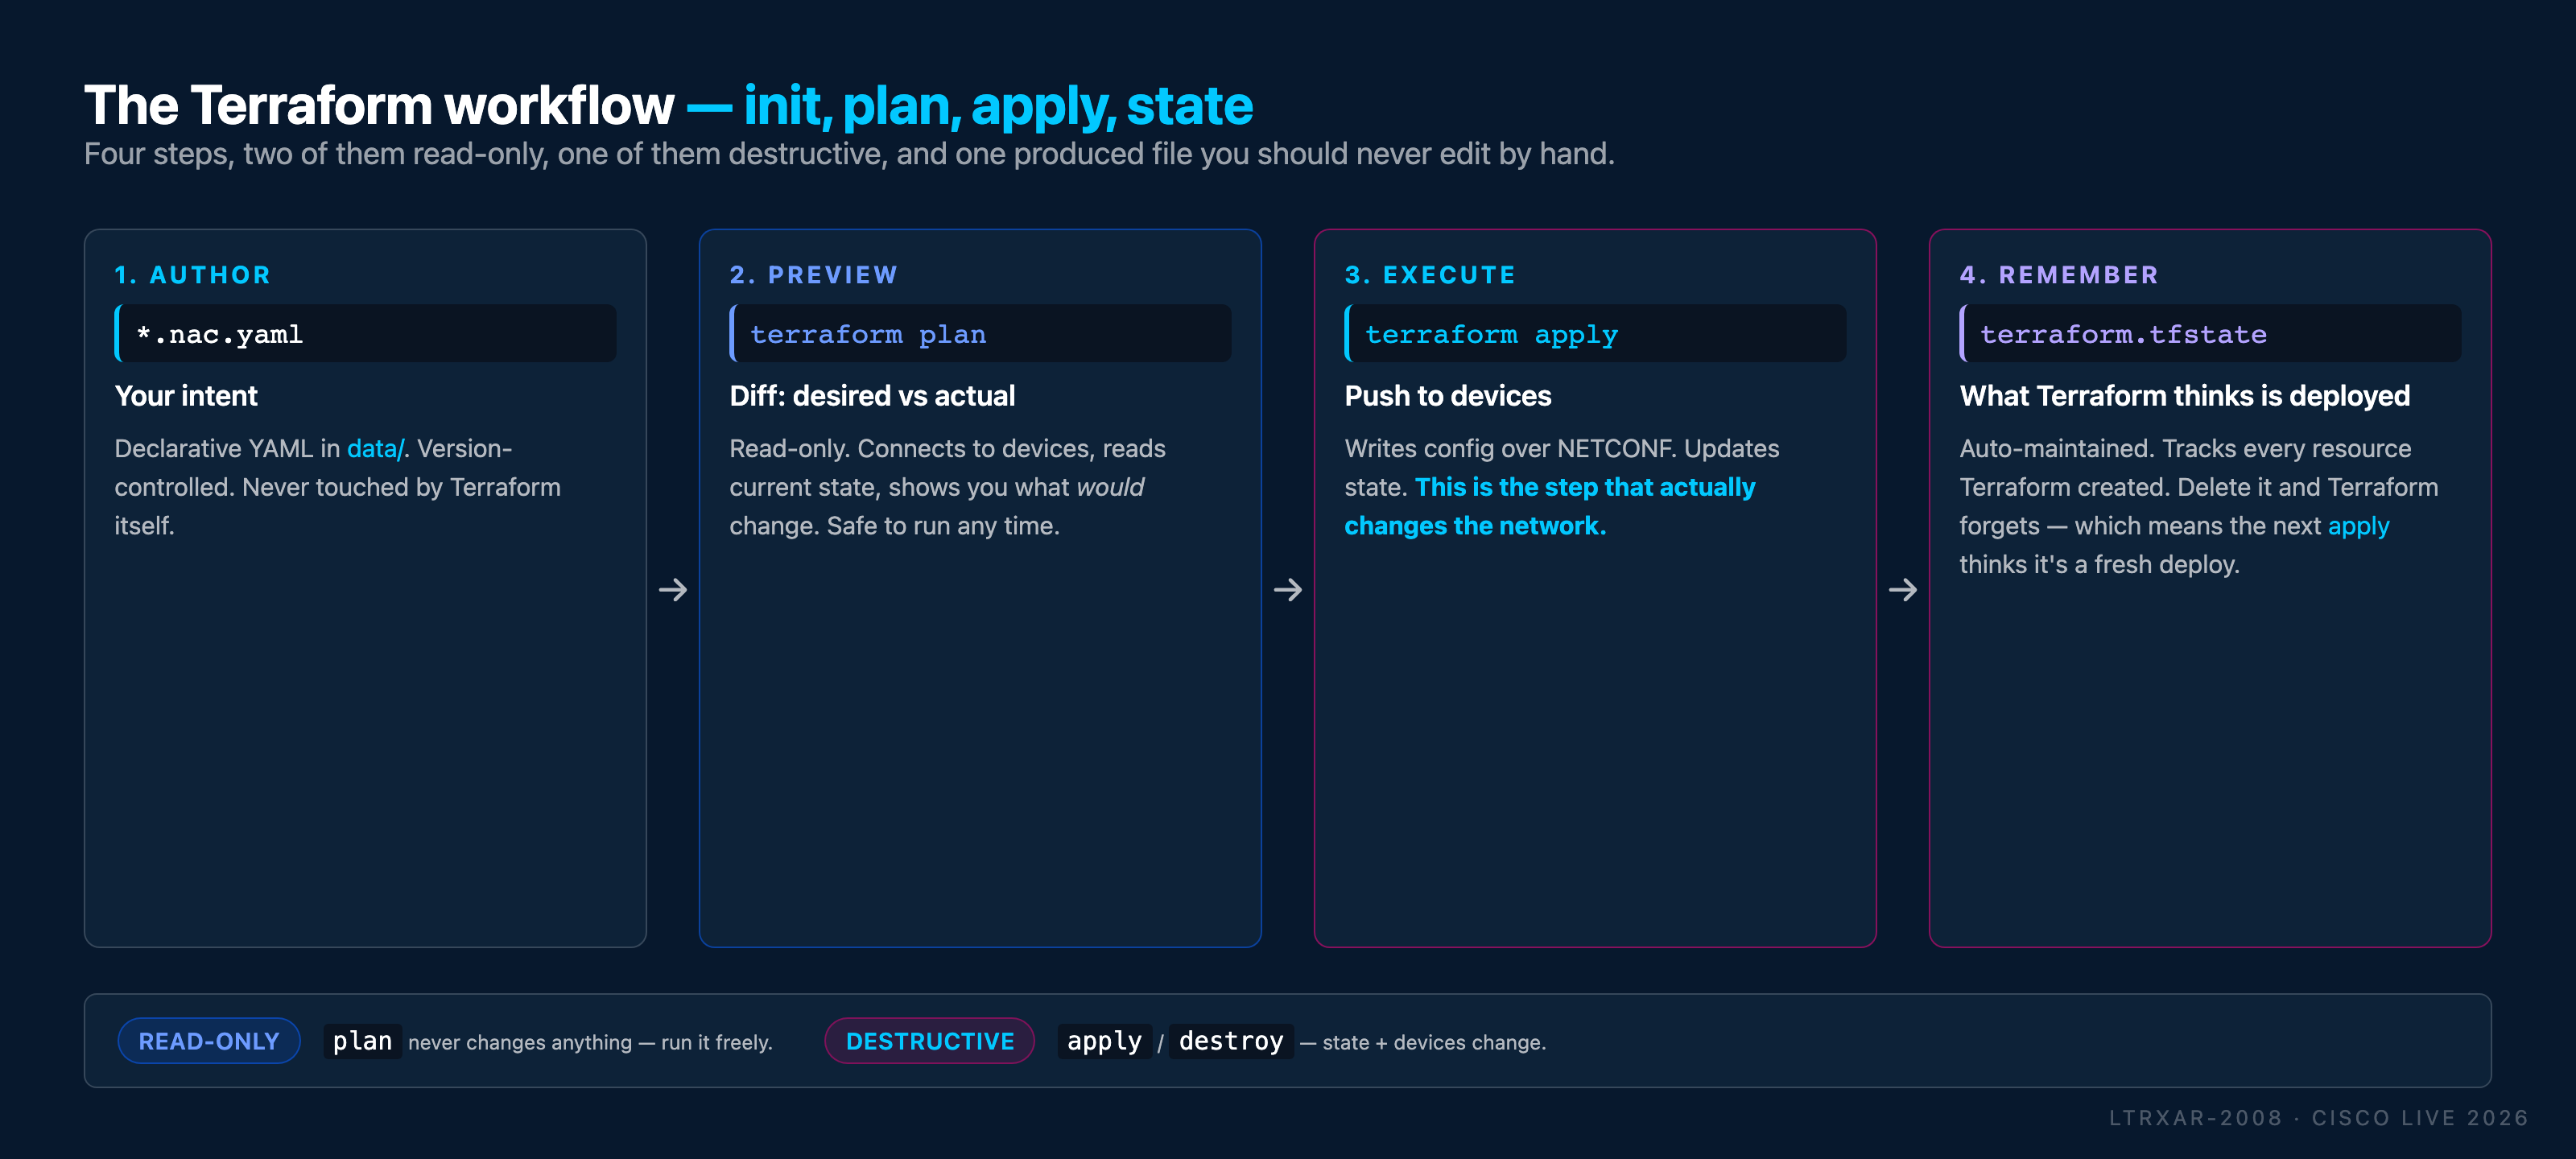
- Author (
*.nac.yaml) - the YAML you write. Version-controlled, never touched by Terraform itself. - Preview (
terraform plan) - read-only. Connects to devices, reads current state, shows you what would change. Safe to run any time. - Execute (
terraform apply) - writes configuration over NETCONF and updates state. This is the step that actually changes the network. - Remember (
terraform.tfstate) - auto-maintained. Tracks every resource Terraform has created, so subsequent plans know what's already there.
Of the three commands, only apply (and its counterpart destroy) change anything on the wire. plan is a read-only diff and can be run freely.
Step 1: In WSL (Ubuntu) and navigate to your project
In Windows Subsystem for Linux (WSL) terminal, navigate to your project directory:
Integrated Terminal in VS Code
You can also open the WSL terminal directly in VS Code by going to the menu and selecting Terminal > New Terminal. This opens a terminal at the root of your project, making it easy to run Terraform commands without switching windows.
Whenever this guide mentions running commands in WSL, you can use either the standalone WSL terminal or the integrated terminal in VS Code.
List the files in your directory:
You should see your project structure:
cisco@wkst1:~/nac-iosxe$ tree -a
.
├── .env
├── data
│   ├── devices
│   │   ├── access01.nac.yaml
│   │   ├── access02.nac.yaml
│   │   ├── border.nac.yaml
│   │   └── core.nac.yaml
│   ├── global.nac.yaml
│   ├── groups
│   └── templates
└── main.tf

4 directories, 7 files
cisco@wkst1:~/nac-iosxe$
Step 2: Load environment variables from .env file
Before running Terraform, you need to load the credentials from your .env file. Your .env file contains simple key-value pairs (e.g. IOSXE_USERNAME=nac_admin).
Convert the file to Unix format to avoid encoding issues
You might encounter a situation where you have edited the .env file on Windows, causing it to have Windows-style line endings (CRLF). Run the following command in your WSL Ubuntu terminal to convert the .env file to Unix format: dos2unix .env
To load these variables and make them available to Terraform, use this simple command:
Verify the variables are loaded:
You should see the environment variables displayed:
cisco@wkst1:~/nac-iosxe$ env | grep IOSXE
IOSXE_USERNAME=nac_admin
IOSXE_PASSWORD=cisco
cisco@wkst1:~/nac-iosxe$
These credentials allow Terraform to authenticate with your IOS XE devices over NETCONF.
Making Environment Variables Persistent:
Environment variables exported in your current shell session are not persistent - they disappear when you close the terminal. If you exit WSL and later open a new session, you must export them again.
To avoid manually exporting variables every time you open WSL, you can add the export command to your ~/.bashrc file. This file runs automatically whenever you start a new bash session, so your environment variables will be loaded automatically.
To make the export permanent, add it to your bashrc
This appends the source command to your ~/.bashrc file. Now every time you open WSL, your IOS XE credentials will be automatically loaded from the .env file.
Step 3: Verify NETCONF reachability
Before running Terraform, confirm the NETCONF subsystem is up on one of the lab devices. NETCONF listens on TCP/830 by default, and the simplest way to check it from WSL is a one-shot SSH handshake against the netconf subsystem - the device replies with an XML <hello> message containing its supported capabilities.
Test against access01 (198.18.130.11):
ssh -s -p 830 -o StrictHostKeyChecking=no $IOSXE_USERNAME@198.18.130.11 netconf
When prompted, enter the password (cisco).
What each flag does:
-s- request an SSH subsystem (rather than an interactive shell).-p 830- NETCONF's default port.-o StrictHostKeyChecking=no- skip the first-connection host-key prompt (lab-only; never use this in production).netconf- the subsystem name.
<?xml version="1.0" encoding="UTF-8"?>
<hello xmlns="urn:ietf:params:xml:ns:netconf:base:1.0">
  <capabilities>
    <capability>urn:ietf:params:netconf:base:1.0</capability>
    <capability>urn:ietf:params:netconf:base:1.1</capability>
    <capability>urn:ietf:params:netconf:capability:writable-running:1.0</capability>
    <capability>urn:ietf:params:netconf:capability:rollback-on-error:1.0</capability>
    ...
  </capabilities>
  <session-id>123</session-id>
</hello>
]]>]]>
If you see the <hello> XML with a capability list, NETCONF is reachable and your credentials work. Press Ctrl+C to exit - Terraform will manage its own NETCONF sessions from here on.
No candidate:1.0 capability yet - that's expected
Notice that the highlighted writable-running:1.0 line appears, but candidate:1.0 and confirmed-commit:1.1 are not in the capability list. That's because the netconf-yang feature candidate-datastore CLI was intentionally left unconfigured on the lab devices (see Task 01). You'll enable it in Step 4 below, and the capability list will then advertise candidate:1.0 instead.
Step 4: Enable the NETCONF candidate datastore on each device
While the base NETCONF subsystem is already running, the candidate datastore capability has not yet been enabled. This is the missing CLI line that activates the <candidate> -> <commit> -> <discard-changes> flow Terraform relies on for transactional, all-or-nothing pushes (see the NETCONF datastore diagram in Task 01). Without it, NETCONF on IOS XE falls back to writing directly to running, which loses the "all RPCs commit together or none of them do" guarantee.
Enable it on all four lab devices using Solar-PuTTY. Open Solar-PuTTY, connect to each of core, border, access01, access02 as nac_admin / cisco, and run the same three commands on each:
configure terminal
netconf-yang feature candidate-datastore
end
write memory
Repeat for all four devices before moving on. Each box should accept the commands and save without errors.
Wait 1-2 minutes before testing NETCONF
Enabling candidate-datastore causes the NETCONF subsystem to restart internally. Until it finishes reinitializing (typically 1-2 minutes), SSH connections to port 830 will be refused with a "Connection refused" error. If you see this, wait a minute and try again - the device is not broken, the NETCONF process is simply restarting.
Verify the capability now appears. Re-run the Step 3 NETCONF handshake against access01:
ssh -s -p 830 -o StrictHostKeyChecking=no $IOSXE_USERNAME@198.18.130.11 netconf
<?xml version="1.0" encoding="UTF-8"?>
<hello xmlns="urn:ietf:params:xml:ns:netconf:base:1.0">
  <capabilities>
    <capability>urn:ietf:params:netconf:base:1.0</capability>
    <capability>urn:ietf:params:netconf:base:1.1</capability>
    <capability>urn:ietf:params:netconf:capability:candidate:1.0</capability>
    <capability>urn:ietf:params:netconf:capability:confirmed-commit:1.1</capability>
    <capability>urn:ietf:params:netconf:capability:rollback-on-error:1.0</capability>
    ...
  </capabilities>
  <session-id>124</session-id>
</hello>
]]>]]>
The candidate:1.0 and confirmed-commit:1.1 capability lines are what tells you the feature is now active. Press Ctrl+C to exit. Terraform will use this datastore for every subsequent apply.
Step 5: Initialize Terraform
Initialize your Terraform project to download the required Network as Code module:
What happens during initialization:
- Terraform reads your
main.tffile - Downloads the
netascode/nac-iosxemodule from GitHub (as defined inmain.tf) - Creates a
.terraformdirectory with downloaded modules - Creates a
.terraform.lock.hclfile to lock module versions
Expected output:
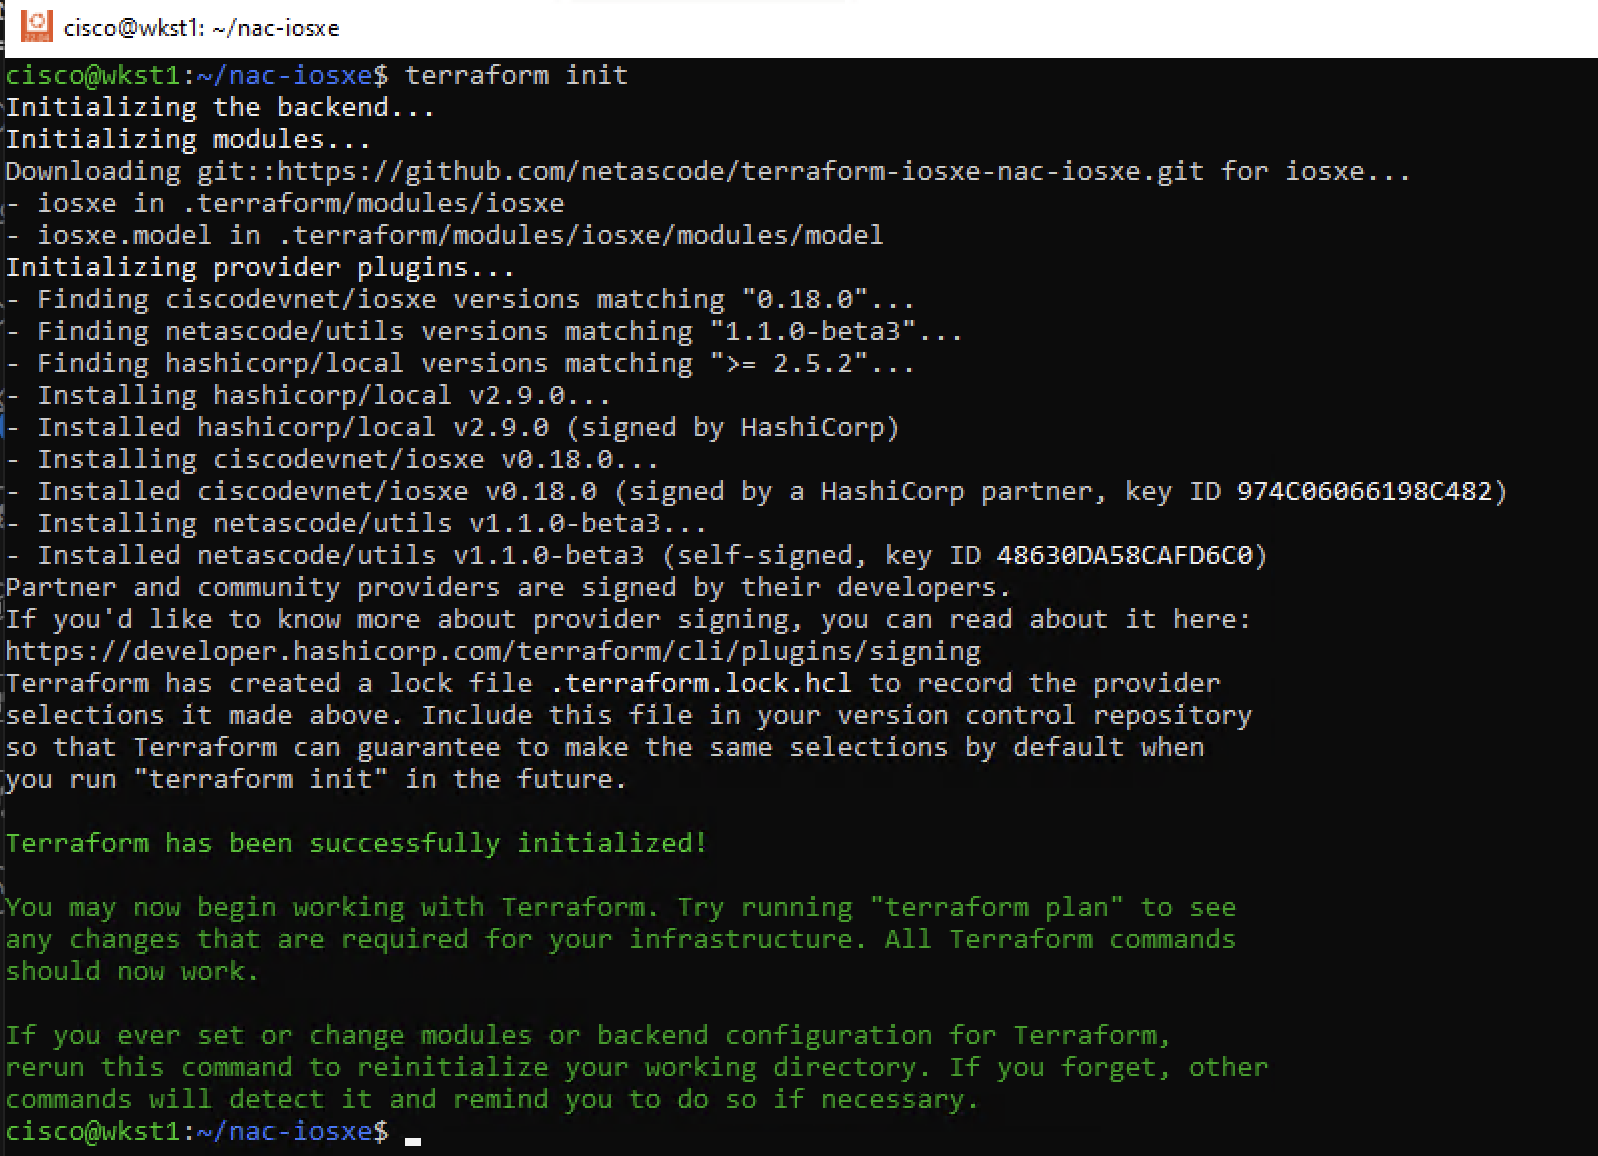
What the terraform init output tells you (annotated)
First-time Terraform users can find the init output intimidating because Terraform is chatty - it narrates everything it does. Here's a typical healthy run, annotated:
Initializing the backend...             ← Reading backend config from main.tf.

Initializing modules...                 ← Found `module "iosxe"` in main.tf.
Downloading git::https://github.com/
  netascode/terraform-iosxe-nac-iosxe.
  git for iosxe...                      ← Cloning the Network as Code module from GitHub.
- iosxe in .terraform/modules/iosxe     ← Stored locally under .terraform/.
- iosxe.model in .terraform/modules/
  iosxe/modules/model                   ← Submodule that builds the data model.

Initializing provider plugins...        ← Now downloading the providers
                                          the Network as Code module declares.
- Finding ciscodevnet/iosxe versions
  matching "0.18.0"...
- Finding netascode/utils versions
  matching "1.1.0-beta3"...
- Finding hashicorp/local versions
  matching ">= 2.5.2"...
- Installing ciscodevnet/iosxe
  v0.18.0...
- Installed ciscodevnet/iosxe v0.18.0
  (signed by a HashiCorp partner)       ← Signature-verified. Good.
- Installing netascode/utils
  v1.1.0-beta3...
- Installed netascode/utils
  v1.1.0-beta3 (self-signed)            ← Helper provider for YAML merging.
- Installing hashicorp/local v2.9.0...
- Installed hashicorp/local v2.9.0
  (signed by HashiCorp)                 ← Writes rendered files to disk.

Terraform has created a lock file
  .terraform.lock.hcl                   ← Next init will pin these versions.

Terraform has been successfully
  initialized!                          ← 🎉 You're ready to run `plan`.
Things that look scary but are normal:
- "Downloading git::https://..." - Terraform is pulling the Network as Code module
fresh. Happens every
initunless the module's already cached. - "Finding ... versions matching" - version-constraint resolution. Lines like "Reusing previous version of ciscodevnet/iosxe" on subsequent runs mean the lock file is doing its job.
- "self-signed" - the
netascode/utilsprovider is published by the NaC community, not HashiCorp or a verified partner. This is expected. - "Terraform has created a lock file" - this is good.
.terraform.lock.hclpins provider versions. Commit it alongsidemain.tfin a real project.
Things that actually mean something's wrong:
- "Could not download module" - internet access broken, or the module URL is wrong, or the referenced ref/tag doesn't exist.
- "Failed to install provider" - provider registry unreachable or the
version constraint can't be satisfied. Re-run
terraform init; if it keeps failing, check the version constraints in the module source. - "Backend configuration changed" - not applicable for this lab (we use the default local backend), but in CI/CD projects with remote state you'll see this if someone reconfigured the backend and you need to migrate state.
Internet Connection Required
As shown in this lab, the terraform init step requires an active internet connection to download the necessary modules from GitHub. In production environments, you may want to set up a private module registry or use a local mirror to avoid dependency on external connectivity.
Initialization Only Once
You only need to run terraform init once per project. To add or update modules later, you can run it again to download any additional dependencies.
To upgrade to a newer version of a module or provider in a production environment, you would update the version reference in your main.tf (e.g. change ?ref=v0.12.3 to ?ref=v0.13.0), then run terraform init -upgrade to pull the new version. However, in this lab environment, there is no need to change version references or run terraform init -upgrade.
Step 6: Preview changes with Terraform plan
Before applying any changes to the lab devices, preview what Terraform will do:
What Terraform plan does:
- Reads your
data/*.yamlconfiguration files - Connects to your IOS XE devices (using credentials from environment variables)
- Checks the current state of all previously applied resources
- This is skipped on the first run since no resources have been created yet
- Compares desired state (YAML) vs. current state (device configuration)
- Shows you what will be added, changed, or deleted
Expected output:
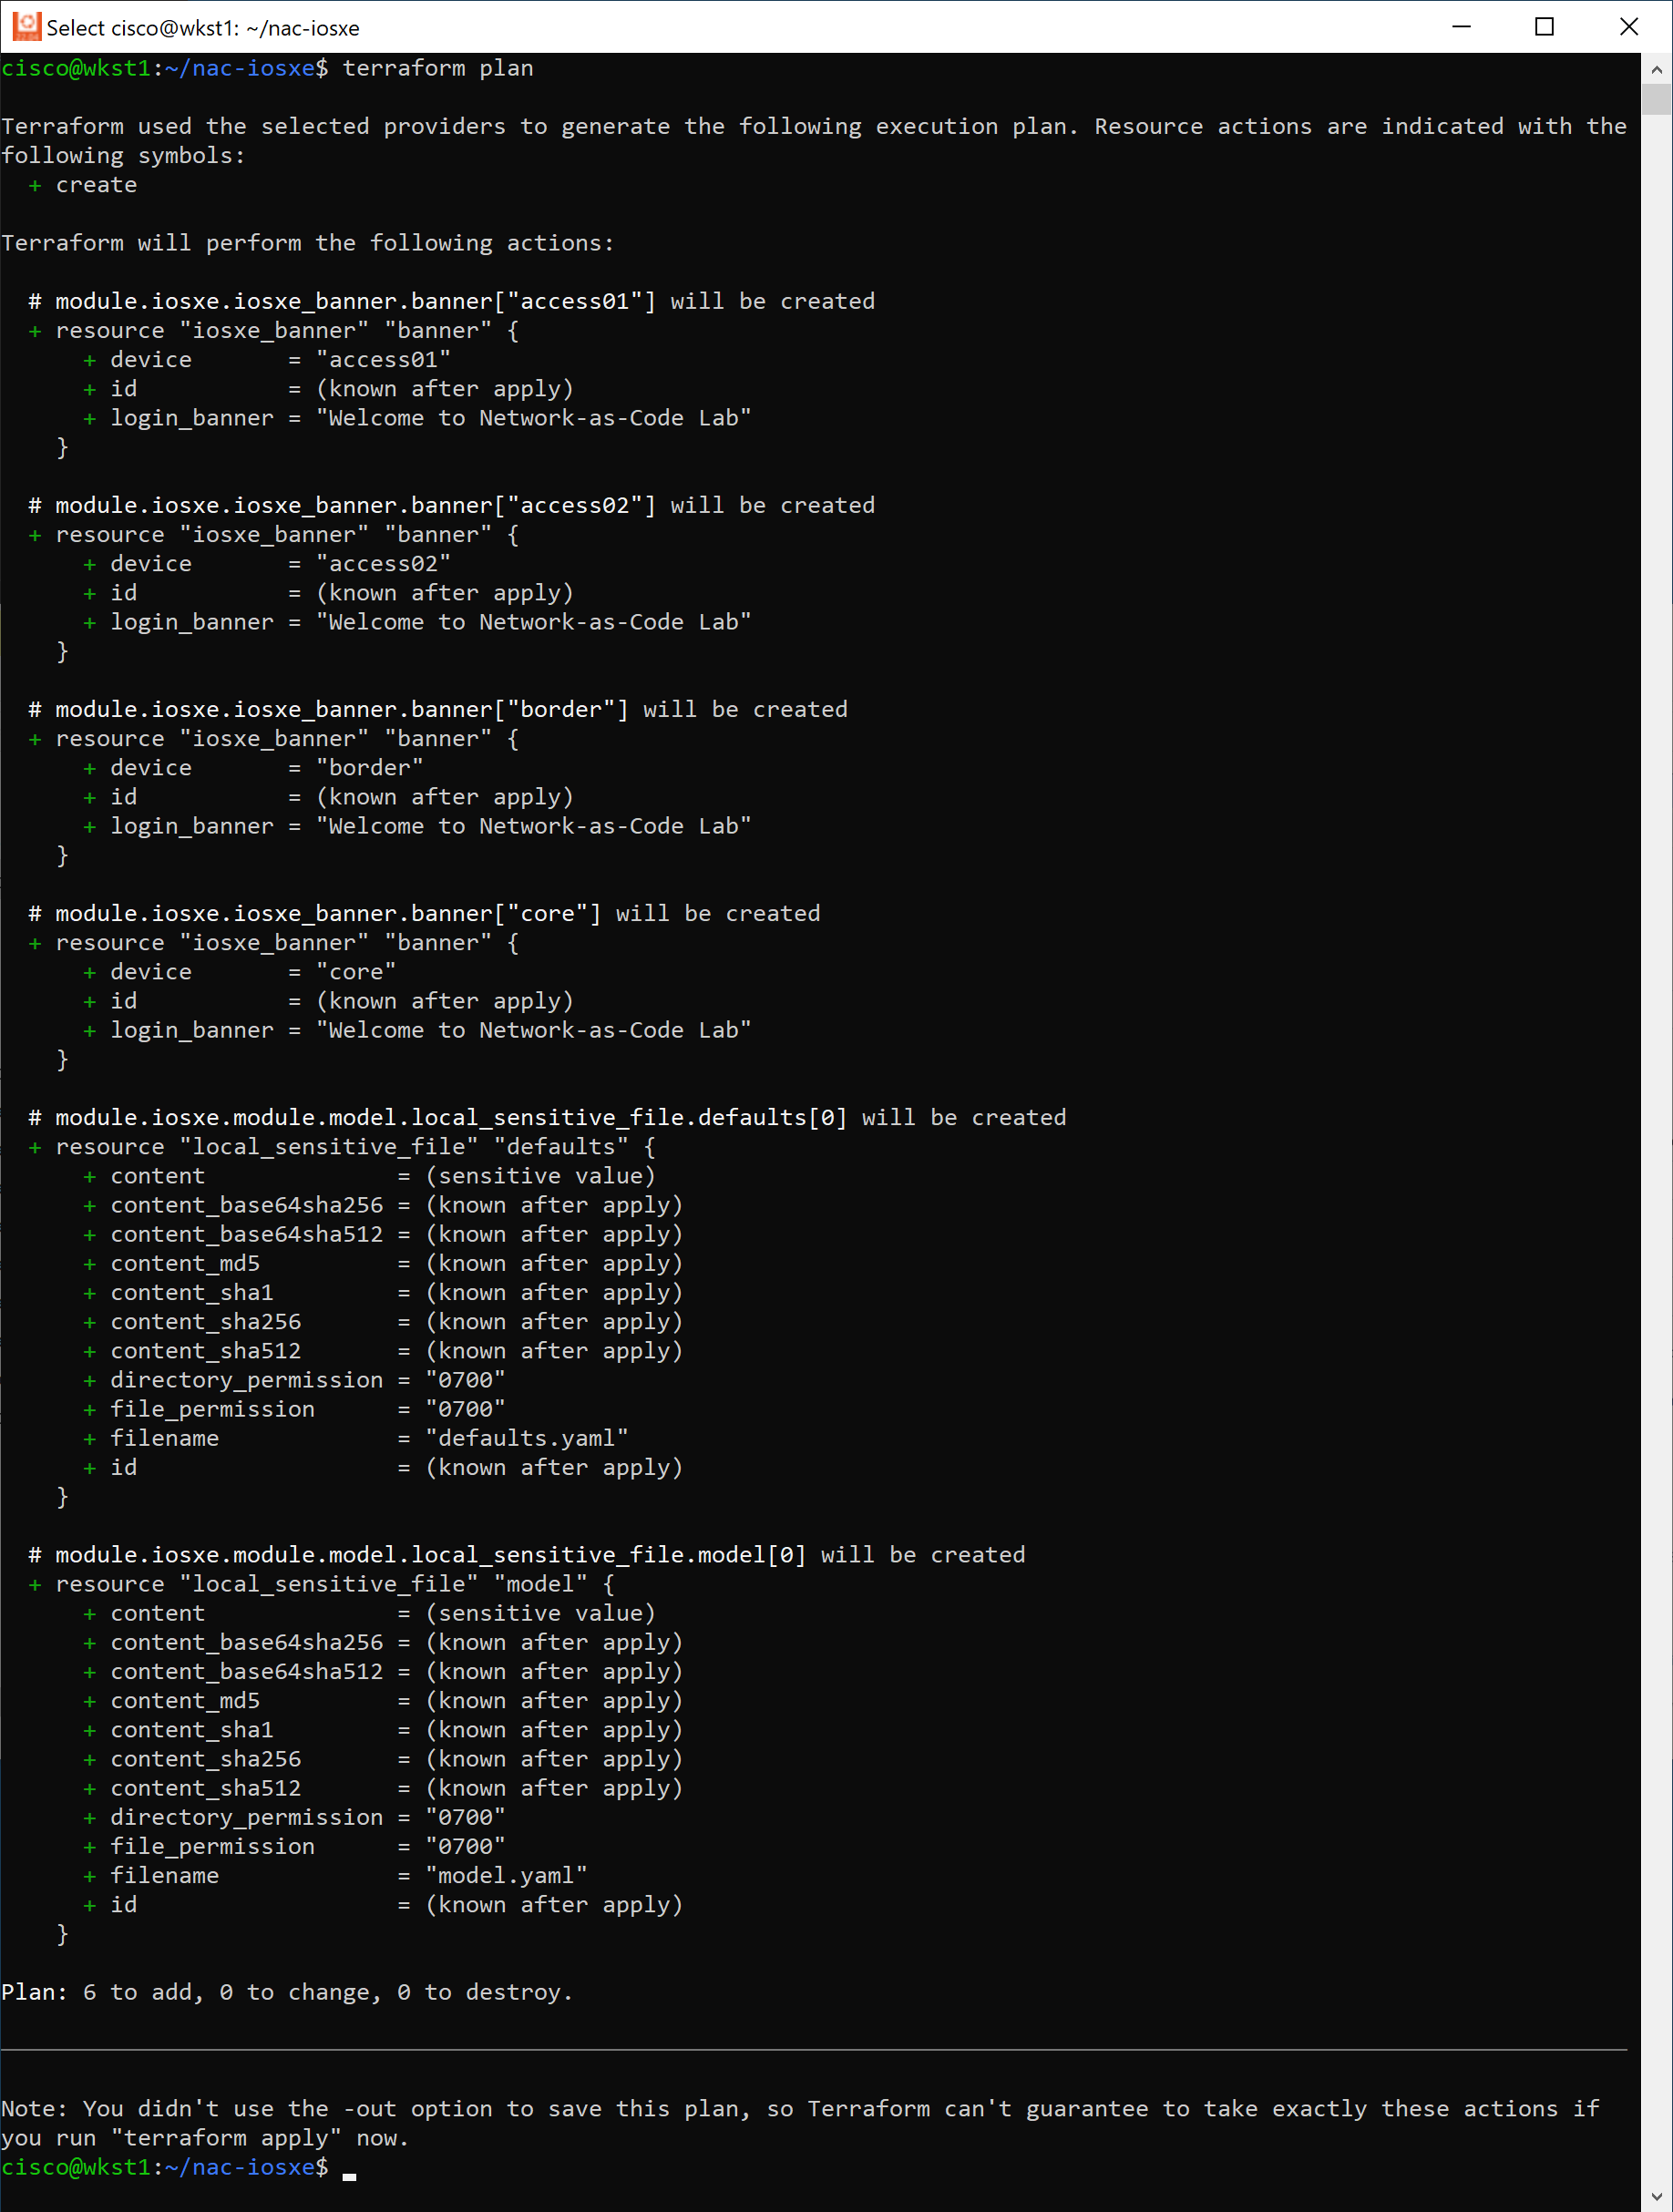
Review the plan carefully to ensure Terraform will make the changes you expect. This is your safety check!
In this case, you will configure the login banner on all four devices. Terraform will create a resource for each banner on each device. This is indicated by the + signs in the plan output.
What are the local_sensitive_file resources in the plan?
You'll also see Terraform planning to create local_sensitive_file.model and local_sensitive_file.defaults. These are not device configurations - they're local files the NaC module writes to disk based on the write_model_file and write_default_values_file settings in your main.tf. The module uses local_sensitive_file (rather than plain local_file) because the merged model may contain device credentials or other sensitive data that shouldn't appear in Terraform's log output. The resulting files (model.yaml and defaults.yaml) are useful for debugging variable substitution and as input to nac-test (Task 11), but they don't affect what gets pushed to the devices.
Step 7: Apply configuration to devices
If the plan looks good, apply the configuration:
Terraform will show you the plan again and ask for confirmation:
...
Plan: 6 to add, 0 to change, 0 to destroy.

Do you want to perform these actions?
  Terraform will perform the actions described above.
  Only 'yes' will be accepted to approve.

  Enter a value:
Type yes and press Enter to proceed.
What happens during apply:
- Terraform opens a NETCONF session to each device over SSH (TCP/830)
- Uses the Network as Code modules and Terraform IOS XE provider to translate your YAML configuration into YANG data and writes it to the device's
candidatedatastore over NETCONF - Issues
<commit>so the candidate config is atomically swapped intorunning - Applies the commands to the devices
- Tracks the applied state in
terraform.tfstatefile
Expected output:
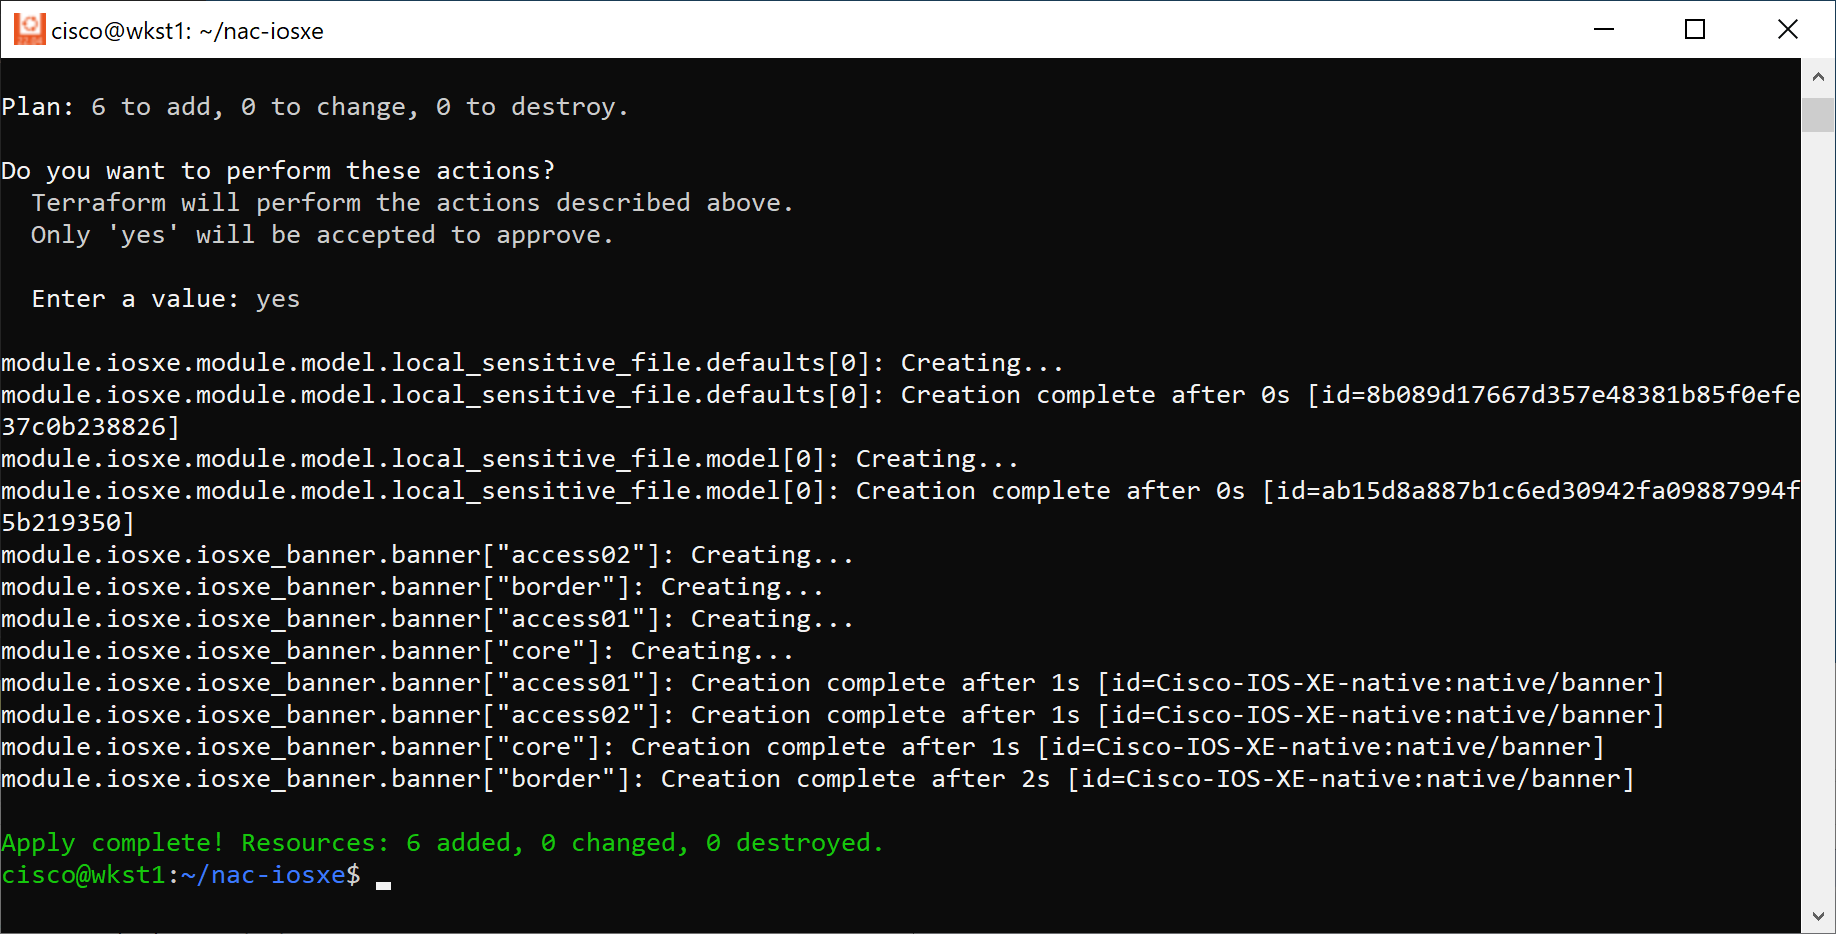
Automate approval with -auto-approve
To skip the confirmation prompt, add the -auto-approve flag:
Useful in CI/CD pipelines (Tasks 13-15) where the job runs unattended. The plan + apply still happen; only the "Do you want to proceed? yes/no" prompt is skipped.
…but not everywhere
Do not run terraform apply -auto-approve against production
devices from a developer laptop. The interactive "yes/no" prompt
is the last line of defence against a plan that accidentally
proposes destroying a loopback, re-shutting an interface, or
deleting every route-map because someone renamed a YAML key.
In a CI/CD pipeline the equivalent safeguard is different and
higher-leverage: protected branches + merge-request review
gates (Task 15). -auto-approve is safe inside a pipeline
because the pipeline itself can only run after a reviewed merge
to the target branch.
Rule of thumb: interactive shell → always confirm. Pipeline job
behind a reviewed merge → -auto-approve is fine.
Skipping the Plan Step
As shown above, terraform apply first generates and displays the plan before asking for confirmation to proceed with the changes.
This makes it possible to skip the previous redundant terraform plan step when performing terraform apply manually.
However, when automating with CI/CD pipelines, you can rather save the plan output to a file and supply it to terraform apply for non-interactive execution.
Want the config to survive a device reboot? Set save_config = true
By default, Network as Code writes to the running configuration only. If the device reboots, anything Terraform pushed is lost unless it was explicitly saved to startup-config. This is usually fine in the lab (devices don't reboot mid-session), but it's a real production footgun.
The module exposes a flag for this:
module "iosxe" {
  source      = "git::https://github.com/netascode/terraform-iosxe-nac-iosxe.git"
  # ... other arguments ...
  save_config = true     # persist to startup-config after every apply
}
With save_config = true, the module instantiates an iosxe_commit resource that executes write memory (via RESTCONF/NETCONF) after config apply - so subsequent reboots boot with the configuration intact.
For this lab you can leave it at the default (false) - the lab devices don't reboot. For your own devices at home, turn it on before you walk away from the terminal.
Step 8: Verify the global configuration
After Terraform completes successfully, verify the banner was applied to all devices. Because you used global configuration, the banner should be deployed to all four switches automatically.
Open Solar-PuTTY and connect to each switch:
- Open Solar-PuTTY from your desktop
- Connect to the core switch first
- Verify that the pre-authentication banner appears upon ssh connection (shown below)
- Repeat for border router, then the access01 and access02 switches
Upon successful config deployment, you should see the following banner message:
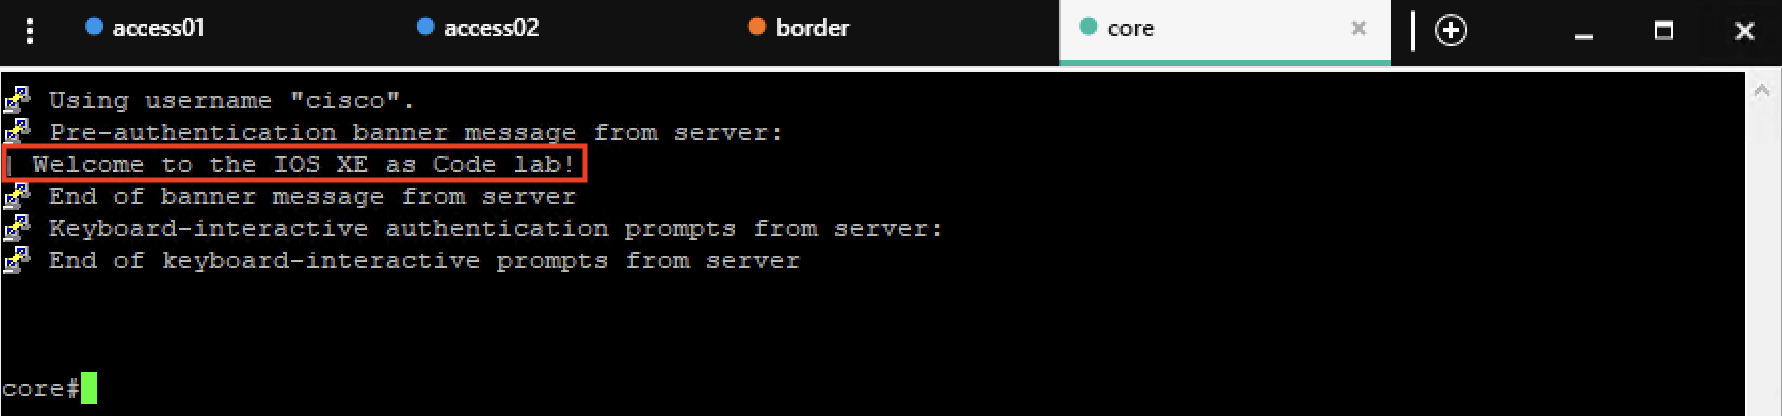
Additionally, you can also verify the banner configuration by examining the running configuration. Once connected to each switch, run the following command:
core#show run | include banner
banner login ^CWelcome to the IOS XE as Code lab!^C
core#
The ^C characters represent control characters used by IOS XE to delimit the banner text. The important part is that you see your configured text in the output.
What you should observe:
- ✅ The banner appears on the core switch (198.18.130.10)
- ✅ The banner appears on the border switch (198.18.130.20)
- ✅ The banner appears on the access01 switch (198.18.130.11)
- ✅ The banner appears on the access02 switch (198.18.130.12)
Check all four in one shot (WSL one-liner)
If you don't want to open Solar-PuTTY four times, this loop hits every managed device and prints the banner line from each running config. Paste it into your WSL terminal:
for ip in 198.18.130.10 198.18.130.20 198.18.130.11 198.18.130.12; do
  echo "--- $ip ---"
  sshpass -p cisco ssh -o StrictHostKeyChecking=no -o UserKnownHostsFile=/dev/null \
    nac_admin@$ip "show run | include banner"
done
You should see banner login ^CWelcome to the IOS XE as Code lab!^C
four times - one per device. If any device prints no banner line,
that apply didn't land; re-run terraform apply to retry.
sshpass is already pre-installed on the lab VM; no extra setup.
You've just deployed your first Network as Code configuration using Terraform!
Notice how you defined the banner once in the global section, and it was automatically applied to all four devices. This is the power of Network as Code!
Terraform Command Reference
Here's a quick reference of the most common Terraform commands:
| Command | Purpose |
|---|---|
terraform init |
Initialize project and download modules |
terraform plan |
Preview changes without applying them |
terraform apply |
Apply configuration to devices |
terraform apply -auto-approve |
Apply without confirmation prompt |
terraform destroy |
Remove all managed resources |
terraform show |
Display current state |
terraform validate |
Check configuration syntax |
Terraform state
After running terraform apply, Terraform creates a terraform.tfstate file that tracks:
- What resources have been created
- Current configuration of each resource
- Device connection details
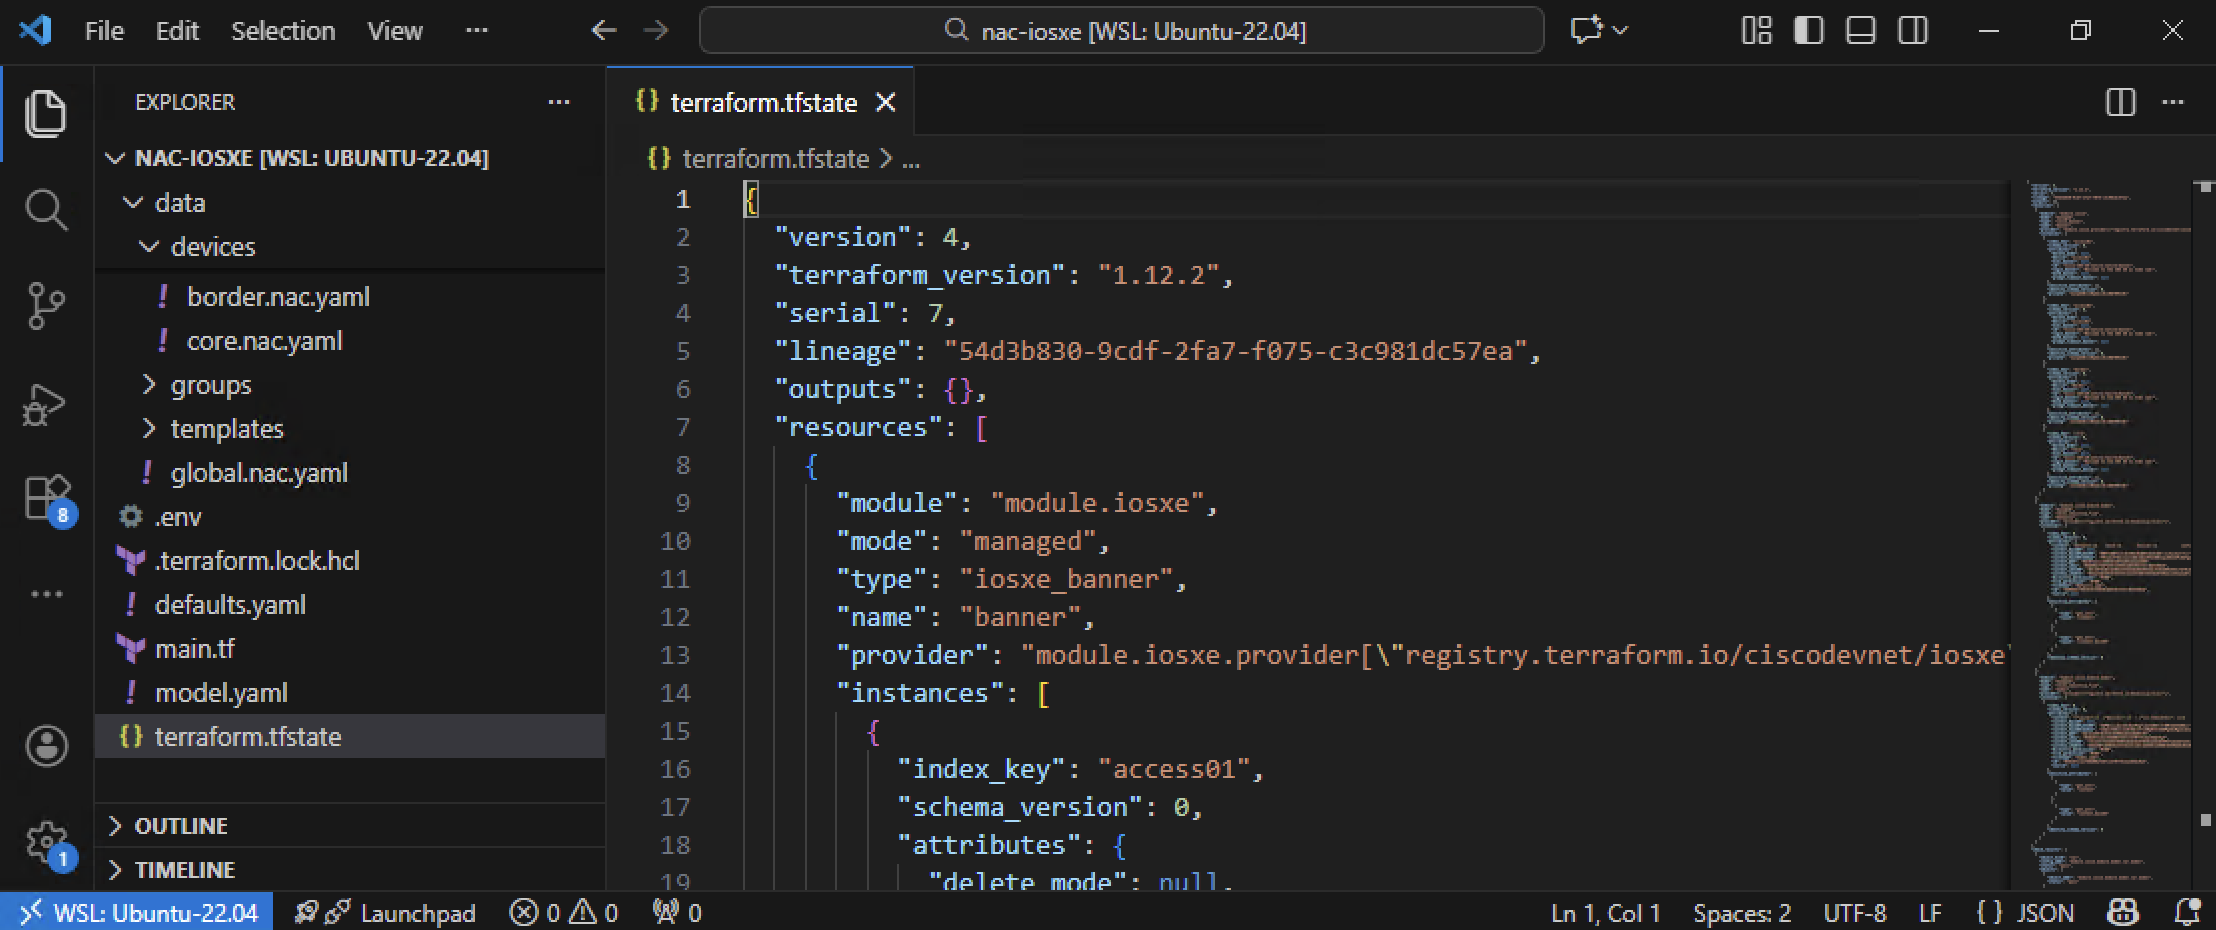
Important
The state file is sensitive and critical for Terraform to manage your infrastructure. Don't manually edit or delete it!
State File Location
This lab uses the default local state file (terraform.tfstate) stored in your project directory.
While this is easy to use for learning and small projects, it's not suitable for production environments. In real-world scenarios, consider using remote state backends like Terraform Cloud, AWS S3, Azure Blob Storage, HTTP backends, Postgres databases, etc. to securely store and share state files.
For more information, refer to the Terraform documentation here.
Troubleshooting common issues
Error: Failed to connect to device
Solution: Verify your device host address is correct and the device is reachable.
Error: Invalid credentials
Solution: Check that your environment variables are set correctly with env | grep IOSXE. If they're not set, run source .env again
Module not found
Solution: Run terraform init again to download the required modules
How to read a Terraform + IOS XE provider error
Most failures you'll see during terraform apply follow the same shape.
Learning the anatomy once means every future error is readable. Here's a
real example, annotated:
Error: Client Error                                         ← (1) error category
                                                               (Client/Server/Provider)
  with module.iosxe.iosxe_banner.banner[0],                 ← (2) Terraform resource
  on .terraform/modules/iosxe/iosxe/banner.tf line 5,         identifier + source file
  in resource "iosxe_banner" "banner":
   5: resource "iosxe_banner" "banner" {

Failed to commit (iosxe_banner.banner[0]),                  ← (3) operation that failed
  got error: NETCONF RPC error from 198.18.130.10:830:        and which device
    bad-element: banner                                     ← (4) device-side detail -
    error-message: 'banner' is not a valid element            this is what the device
    error-severity: error                                     actually said back
Four parts, always in this order:
- Error category -
Client Errormeans your input or config is wrong;Server Errormeans the device rejected something;Provider Errormeans the Terraform provider itself had a bug. Category tells you whose problem it is. - Terraform resource identifier - which specific resource Terraform was trying to operate on. Match this to your YAML to find the source.
- Operation and target device -
Failed to commit/Failed to create/Failed to delete, plus the device IP. Tells you exactly which device to investigate. - Device-side detail - the actual NETCONF/RESTCONF error payload from the device. This is what the IOS XE box said back when Terraform tried to push the config. 90% of the time this line names the offending element or value explicitly.
Working error messages right-to-left (detail -> device -> resource ->
category) usually gives you the root cause in under a minute. For very
noisy errors, re-run with TF_LOG=DEBUG terraform apply to see the
full NETCONF XML payload the provider sent - often the fastest way to
spot a subtle field mismatch.
What you've accomplished
Congratulations! You've successfully:
- ✅ Created YAML configuration files
- ✅ Initialized Terraform with the Network as Code module
- ✅ Previewed changes with
terraform plan - ✅ Applied configuration to your network devices with
terraform apply - ✅ Verified the banner on your devices
Why that plan ran so fast - Terraform vs. stateless tools
Now that you've seen plan and apply in action, here's why the
workflow feels different from tools you may have used before:
Terraform maintains a local state file (terraform.tfstate) that
records what it has configured on each device. That changes the
math for every operation.
| Capability | Terraform (stateful) | Stateless tools (e.g. Ansible) |
|---|---|---|
| Detecting drift | Diffs state vs. YAML - instant, no device calls | Must connect to every device and read config before comparing |
| Idempotency | Native - pushes only what changed | Per-module; depends on each module being written correctly |
| Dry-run (preview) | terraform plan, architecturally read-only |
--check mode, opt-in per module; coverage varies |
| Audit trail | State file + plan output record exactly what changed when | Run logs only; no authoritative record of current state |
| Network traffic | Low - no reads when nothing changed | Full read on every run regardless of whether anything needs to change |
| Rollback primitive | Revert YAML, re-run apply, state tracks the revert |
Re-run a previous playbook, hope it's still idempotent |
Practical effect: when nothing in your YAML changed, terraform plan
reports "No changes" in seconds without touching the network. Ansible
in the same scenario still SSHs every device to re-read config before
it can reach the same conclusion. Try it: run terraform plan again
right now - the second run is orders of magnitude faster than the
first because state already matches intent.
What's next?
In the next task, you'll learn how to use device groups to apply configurations to multiple devices efficiently.
← Previous: Task 02 - Editing YAML files · Next: Task 04 - Device group configuration