Task 10 - Pre-checks with schema validation
Estimated Time to Complete: ~15 minutes
You've been creating Network as Code YAML files and deploying them with Terraform. How do you ensure your YAML is correctly structured and contains valid data before hitting a device?
Pre-change validation catches errors at the YAML layer - before terraform plan ever opens a connection to a switch. It's the same principle as compiling code before running it: fail fast, fail cheap, fail with a clear error message.
What you'll learn
By the end of this task you will have:
- Installed
nac-validateand run it against yourdata/directory - Read a schema-validation error message and mapped it back to the offending YAML key
- Understood the difference between syntactic validation (what
nac-validatedoes by default) and semantic validation (custom rules)
First, what is Network as Code actually validating?
Before nac-validate runs, it's useful to see what it's validating against. Network as Code doesn't look at your individual YAML files in isolation - it builds a merged data model by combining every YAML in data/ according to precedence (Global → Group → Device), resolving variables and template references, then producing one entry per device:
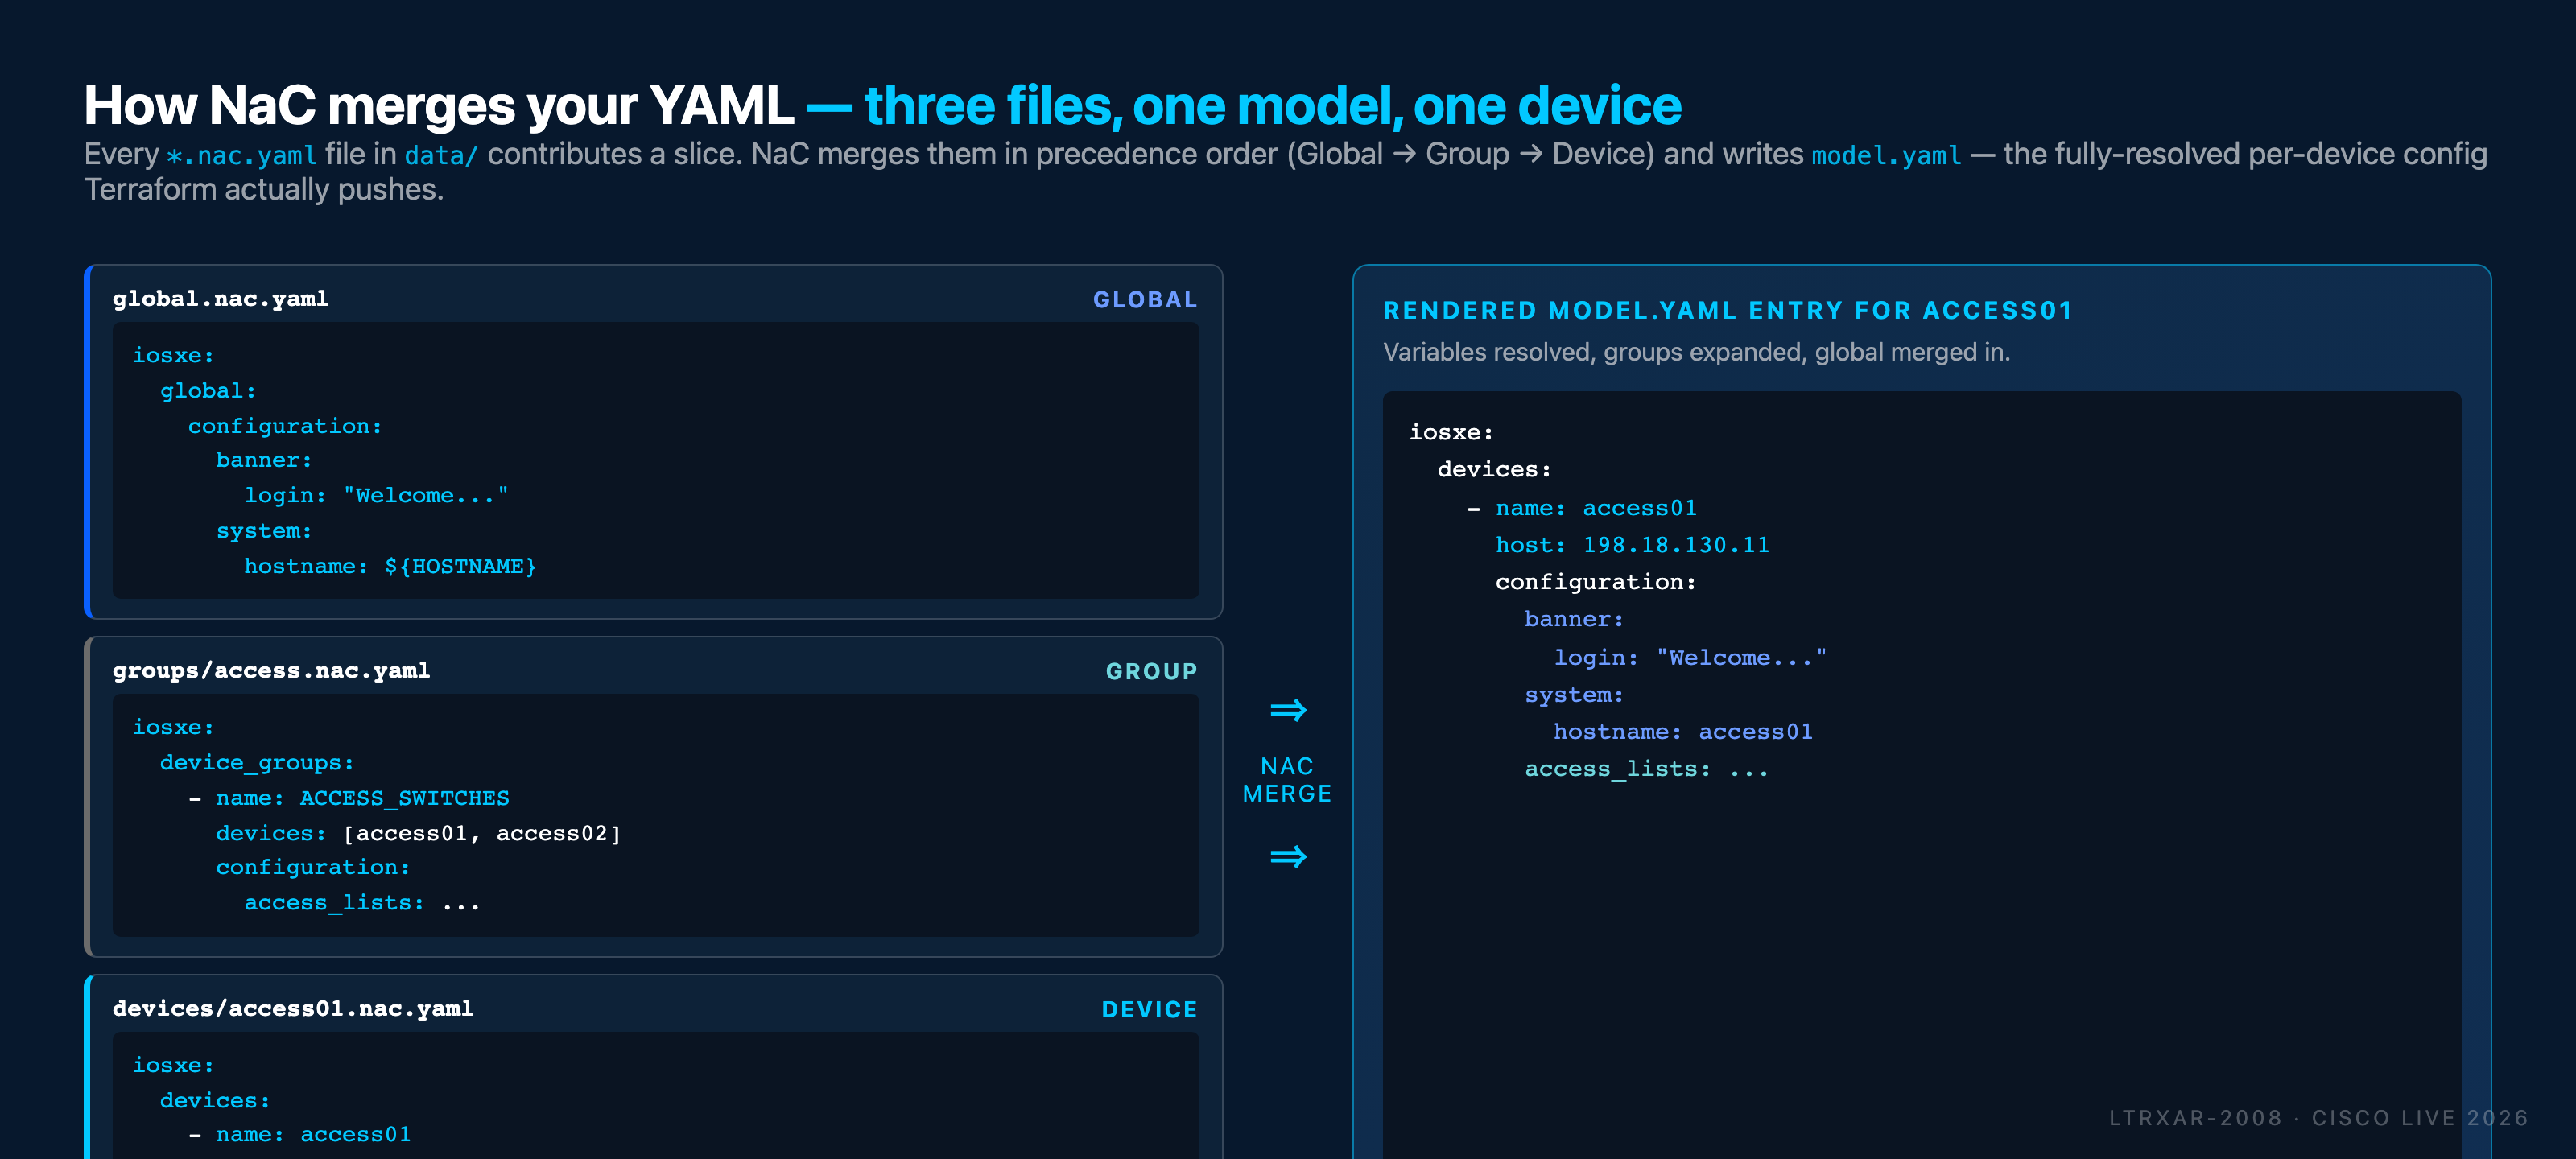
That merged model is what Terraform ultimately sends to each device (you've seen it written to model.yaml after each terraform apply). Schema validation checks the merged result - so an error might come from a bad key in a global file that only affects one group's rendered output. nac-validate tells you exactly which file and which path in the merged model caused the problem.
What is schema validation?
Schema validation verifies that your YAML configuration files:
- Follow the correct structure (proper indentation, key names, nesting)
- Contain valid data types (strings, integers, booleans)
- Use valid values (IP addresses in correct format, enums like
permit/deny) - Include all required fields
- Don't include unsupported attributes
This is similar to how a compiler checks code before running it, catching errors at "build time" rather than "run time".
The nac-validate tool
The nac-validate tool checks your YAML files against a schema definition. The schema acts as a contract that defines what attributes are allowed, what data types are expected, what values are valid, and which fields are mandatory vs. optional. This is called syntactic validation.
The tool can also perform semantic validation based on custom rules. These rules can check that the configuration is correct (e.g. by verifying references or conflicting IDs), enforce policies based on config best practices or check customer requirements (e.g. a custom naming convention). You'll exercise both modes in this task: schema-based syntactic validation first, then a custom semantic rule at the end.
The schema file
The complete schema for IOS XE Network as Code is documented on the Cisco NetAsCode website. For this lab, Appendix II contains only a subset of the schema relevant to the configurations you have deployed, including: global settings, devices, device groups, templates, banner, access lists, IP hosts, VLANs, BGP routing, and system settings. You can also find a copy of the schema in the WSL filesystem in the ~/schema/ directory.
Create the schema file in your project:
Copy the ~/schema/.schema.yaml schema file to your ~/nac-iosxe/ working directory using the command below in the WSL terminal:
Alternative: Manually Create the Schema File
If you need to, you can copy the schema content from Appendix II manually.
First, create the file using the touch command in your WSL Ubuntu terminal:
Then use VS Code to copy-paste the schema content into the file.
- Open VS Code and navigate to your
nac-iosxefolder - Open the
.schema.yamlfile you just created - Copy the complete schema content from Appendix II
- Paste it into the file and save
Your project structure should now include:
/home/cisco/nac-iosxe/
│
├── data/
│   ├── devices/access01.nac.yaml # Task02: access01 registration
│   ├── devices/access02.nac.yaml # Task02: access02 registration
│   ├── devices/border.nac.yaml   # Task02 + Task08 (optional): border + BGP
│   ├── devices/core.nac.yaml     # Task02 + Task05: core + Loopback0
│   ├── global.nac.yaml          # Task03 + Task06: banner + hostname
│   ├── groups/access.nac.yaml    # Task04 + Task07 (optional): ACL + VLAN template
│   ├── templates/bgp.nac.yaml           # Task08: BGP file template definition (optional)
│   ├── templates/logging.nac.yaml       # Task09: Logging alias CLI template (optional)
│   └── templates/vlan.nac.yaml          # Task07: VLAN model template (optional)
├── tftpl/
│   └── bgp.yaml.tftpl                  # Task08: BGP template file (optional)
├── .env
├── .schema.yaml                        # ← New schema file
├── defaults.yaml                       # Generated by Terraform (default values)
├── main.tf
├── model.yaml                          # Generated by Terraform (merged config)
└── rules/                              # Created later in this task (semantic validation)
    └── no_permit_any.py                # Custom nac-validate rule
How defaults get applied - precedence order
defaults.yaml shows the effective defaults at merge time. Those values come from three possible sources, merged in this precedence order (later wins):
- Module built-in defaults - shipped inside the Network as Code module itself. You don't see or edit them.
- Your own defaults file - optional YAML you place in
data/matching thedefaults:schema root. Overrides module built-ins. - Per-device / per-group / global values in your intent YAML - explicit values in
config-*.nac.yamlfiles. Override both default tiers.
The formal rule is documented at netascode.cisco.com/docs/guides/concepts/default_values/. Practical implication: if something in model.yaml isn't what you expected, defaults.yaml is the first place to look - a module built-in may be setting the value you thought was empty.
Install the nac-validate tool
First, install the nac-validate tool using pip in your WSL Ubuntu terminal:
Run schema validation
Navigate to your project directory:
Run validation:
Command breakdown:
nac-validate- The validation tool-s .schema.yaml- Specifies the schema file to validate againstdata/- The directory containing your YAML configuration files
Successful validation
If your YAML files are correct, the command will return without any output - you'll just get your prompt back:
cisco@wkst1:~/nac-iosxe$ nac-validate -s .schema.yaml data/
cisco@wkst1:~/nac-iosxe$
No output means success. To confirm what nac-validate actually checked, re-run with verbose logging:
cisco@wkst1:~/nac-iosxe$ nac-validate -s .schema.yaml -v DEBUG data/
DEBUG - Loading schema
DEBUG - Validate file: data/global.nac.yaml
DEBUG - Validate file: data/devices/core.nac.yaml
DEBUG - Validate file: data/devices/border.nac.yaml
DEBUG - Validate file: data/devices/access01.nac.yaml
DEBUG - Validate file: data/devices/access02.nac.yaml
DEBUG - Validate file: data/groups/access.nac.yaml
cisco@wkst1:~/nac-iosxe$
Each file in data/ was loaded, parsed, and validated against the schema. This confirms that:
- ✅ Your YAML syntax is correct
- ✅ All attributes match the schema
- ✅ Data types are correct
- ✅ Values are valid (e.g., IP addresses are properly formatted)
Validation error examples
Let's intentionally introduce errors to see how validation catches them.
Example 1: invalid IP address
If you accidentally typed an invalid IP like 198.51.100.1010 in data/devices/core.nac.yaml (the Loopback0 address from Task 05):
...
configuration:
  interfaces:
    loopbacks:
      - id: 0
        ipv4:
          address: 198.51.100.1010  # Invalid - octet > 255
          address_mask: 255.255.255.255
Running nac-validate -s .schema.yaml data/ would produce:
ERROR - Syntax error 'data/devices/core.nac.yaml':
iosxe.devices.[name=core].configuration.interfaces.loopbacks.[id=0].ipv4.address: '198.51.100.1010' is not a ip.
Example 2: wrong attribute name
If you misspelled an attribute like banner as banners in data/global.nac.yaml:
...
global:
  configuration:
    banners:  # Should be "banner" (singular)
      login: |
        ...
Running nac-validate -s .schema.yaml data/ would produce:
ERROR - Syntax error 'data/global.nac.yaml':
iosxe.global.configuration.banners: Unexpected element
Example 3: invalid enum value
If you used an invalid action in an ACL in data/groups/access.nac.yaml:
...
access_lists:
  standard:
    - name: AccessLayerACL
      entries:
        - sequence: 10
          action: allow  # Should be "permit" or "deny"
          prefix: 10.0.0.0
          prefix_mask: 0.0.0.255
        ...
Running nac-validate -s .schema.yaml data/ would produce:
ERROR - Syntax error 'data/groups/access.nac.yaml':
iosxe.device_groups.[name=ACCESS_SWITCHES].configuration.access_lists.standard.[name=AccessLayerACL].entries.[sequence=10].action: 'allow' not in ('deny', 'permit')
If everything is correct, you'll get your prompt back with no output. If there are errors, the tool will tell you exactly what's wrong and where.
IMPORTANT: Fix and Re-validate
Correct the introduced typos in your YAML files and run nac-validate -s .schema.yaml data/ again to confirm that all files are now correct. Don't continue until you have fixed the typos.
Common validation errors and fixes
| Error Message | Cause | Fix |
|---|---|---|
Required field missing |
Missing a mandatory attribute | Add the required field to your YAML |
Unexpected element |
Attribute name is misspelled or not supported | Check spelling against schema.yaml |
mapping values are not allowed here |
Potentially incorrect indentation | Correct the YAML syntax as per schema.yaml |
... not in enum(...) |
Using invalid value for a field | Use one of the allowed values from the error message |
... is not a regex match |
String does not match expected pattern | Ensure string format matches schema requirements |
... is not a int |
Value is not an integer | Change value to an integer |
... is not a list |
Expected a list but got something else | Use YAML list format ([] or - before each item) |
Integrating validation into your workflow
Best practice workflow:
- Edit your YAML files in VS Code
- Run
nac-validateto check for errors - Fix any errors reported
- Run
terraform planto preview changes - Run
terraform applyto deploy
By validating before running Terraform, you catch configuration errors immediately without attempting to connect to devices. This saves time and prevents partial deployments of invalid configurations.
CI/CD Integration
In Task13 - Run CI/CD Pipeline, you'll see how schema validation is automatically integrated into the GitLab CI/CD workflow. The pipeline runs nac-validate as part of the automated process, ensuring that every configuration change is validated before deployment - without manual intervention.
Semantic validation - write and run a custom rule
Schema validation (everything above) is syntactic: does the YAML match the shape of the data model? nac-validate can also do semantic validation - rules that answer "does this configuration make sense in context?".
Cisco CX ships a rule pack covering common semantic checks:
- Key attributes are unique (no duplicate device names, no overlapping ACL sequence numbers, etc.).
- IP routing is enabled when a routing protocol (BGP, OSPF, EIGRP, IS-IS) is configured.
- VLAN IDs referenced from an interface exist in the VLAN database.
You can also write your own. Rules are Python classes named Rule that implement a match classmethod receiving the merged data model (the inventory dict) and returning a list of error strings (empty list = pass). Let's write one and run it against your project.
Step 1: Create the rules/ directory
In your WSL Ubuntu terminal, create a rules/ folder under your project:
nac-validate discovers rules by scanning a directory you point it at - any .py file containing a Rule class is loaded.
Step 2: Create the rule file
Create the file in your WSL terminal:
Open rules/no_permit_any.py in VS Code and paste the following:
class Rule:
    id = "101"
    description = "Standard ACLs must not have 'permit any' entries"
    severity = "HIGH"

    @classmethod
    def match(cls, inventory):
        results = []

        for scope_key in ("devices", "device_groups"):
            for item in inventory.get("iosxe", {}).get(scope_key, []):
                name = item.get("name", "unknown")
                acls = (
                    item.get("configuration", {})
                    .get("access_lists", {})
                    .get("standard", [])
                )
                for acl in acls:
                    for entry in acl.get("entries", []):
                        if entry.get("action") == "permit" and entry.get("any"):
                            results.append(
                                f"iosxe.{scope_key}[{name}].configuration"
                                f".access_lists.standard[{acl['name']}]"
                                f".entries[{entry['sequence']}] - "
                                f"'permit any' is a security risk"
                            )
        return results
What this rule does:
id,description,severity- metadatanac-validateprints when the rule fails.match()- walks every device and device-group, looks at any standard ACL, and flags any entry whoseactionispermitAND whoseanyflag istrue. Each flagged entry becomes one error string.
Step 3: Run the rule against your clean YAML
Back in your WSL terminal, run nac-validate with the -r flag pointing at rules/:
Your existing AccessLayerACL only permits specific subnets (10.0.0.0/24 and 20.0.0.0/24 from Task 04) - no permit any anywhere - so the rule passes silently:
cisco@wkst1:~/nac-iosxe$ nac-validate -s .schema.yaml -r rules/ data/
cisco@wkst1:~/nac-iosxe$
Empty output = both syntactic and semantic checks passed. Good - but a rule that never fails isn't very satisfying. Let's make it fire.
Step 4: Trigger a violation
Open data/groups/access.nac.yaml in VS Code and add a third entry to AccessLayerACL that the rule will flag:
access_lists:
  standard:
    - name: AccessLayerACL
      entries:
        # ... your existing sequence 10 and 20 entries above ...
        - sequence: 30
          action: permit
          any: true
Save the file and re-run validation:
This time the rule fires:
cisco@wkst1:~/nac-iosxe$ nac-validate -s .schema.yaml -r rules/ data/
ERROR - Semantic error: 101 - HIGH - iosxe.device_groups[ACCESS_SWITCHES].configuration.access_lists.standard[AccessLayerACL].entries[30] - 'permit any' is a security risk
Reading the error left to right:
101andHIGHare theidandseverityyou set on the Rule class.- The path
iosxe.device_groups[ACCESS_SWITCHES].configuration.access_lists.standard[AccessLayerACL].entries[30]points exactly at the offending YAML node, the same way schema errors do. - The trailing message is the string your rule's
match()method returned.
Step 5: Revert the violation
Remove the three lines you just added (the sequence: 30 entry) so your YAML matches the lab's intent again, save the file, and confirm validation is clean:
cisco@wkst1:~/nac-iosxe$ nac-validate -s .schema.yaml -r rules/ data/
cisco@wkst1:~/nac-iosxe$
Why this pattern matters
Schema validation tells you "this YAML is shaped correctly". Semantic rules tell you "this YAML is shaped correctly and doesn't violate our network policy". The two layers stack: in a real CI pipeline you'd run both on every merge request, with the semantic rule pack curated to your org's standards (no permit any, naming conventions, AS-number ranges, mandatory description fields, etc.).
Where to find the full schema
The lab's .schema.yaml is a curated subset covering just the data-model paths exercised across Tasks 03-09. The full schema - with every supported IOS XE configuration option - is published at netascode.cisco.com/docs/data_models/iosxe/overview/.
Need the schema subset used in this lab?
See Appendix II for the full .schema.yaml you copied in earlier. It's a useful reference if you want to know what keys are valid without running into them via error messages.
Reference
For more details on the nac-validate tool, see the official documentation here.
What you've accomplished
In this task, you have:
- ✅ Understood the importance of pre-change validation
- ✅ Learned about schema-based validation
- ✅ Installed and used the nac-validate tool
- ✅ Validated your YAML configuration files
- ✅ Understood common validation errors and how to fix them
- ✅ Written a custom semantic rule and seen it both pass and flag a real violation
- ✅ Integrated validation into your Network as Code workflow
You now have a safety check in place to catch configuration errors before they reach your network devices. This is a critical DevOps practice that prevents misconfigurations and improves reliability.
What's next
Task 11 is optional - it automates post-change verification with
Robot Framework tests rendered from your intent. If you do Task 11, run
it before Task 12 (Task 12's terraform destroy wipes the configs
Task 11 checks). If you're skipping the post-checks demo, go straight to
Task 12 - Cleanup.
← Previous: Task 06 - Variables · Next: Task 11 - Post-checks