Task 01 - SSH to the lab devices
Estimated Time to Complete: ~10 minutes
Before you deploy any Network as Code configuration, you'll confirm baseline connectivity to the IOS XE lab devices and see what's already on them. You'll use Solar-PuTTY to SSH into each device, verify the running configuration, and identify the minimal "seed" config that makes Terraform-driven automation possible.
What you'll learn
- How to connect to IOS XE devices using Solar-PuTTY
- How to verify device information with basic
showcommands - What minimal configuration is required to enable NETCONF automation
This lab uses NETCONF
IOS XE as Code uses NETCONF for both configuration and verification in this lab:
- Terraform pushes configuration over NETCONF - it's transactional (all-or-nothing), uses a candidate datastore, and produces rich error reporting.
nac-test(Optional Task 11) queries the device over NETCONF - the generated Robot tests read operational state for post-deployment verification.
Why NETCONF's "transactional" property matters
What's a NETCONF datastore?
A NETCONF datastore is just a named container for configuration - think of it as a git branch for your device's config. A device exposes multiple datastores; the two that matter here are candidate (writable scratch space) and running (the live configuration actually driving the forwarding plane). You propose changes to candidate, then <commit> them into running atomically. If anything fails mid-way, <discard-changes> throws the proposal away and running is untouched.
NETCONF separates the change you're describing (candidate datastore) from the config actually driving traffic (running datastore). Terraform writes to candidate, asks the device to validate, then issues commit - which atomically swaps candidate into running. If the commit fails at any point, discard-changes throws the proposed config away and the device keeps running exactly the same config it was running before.
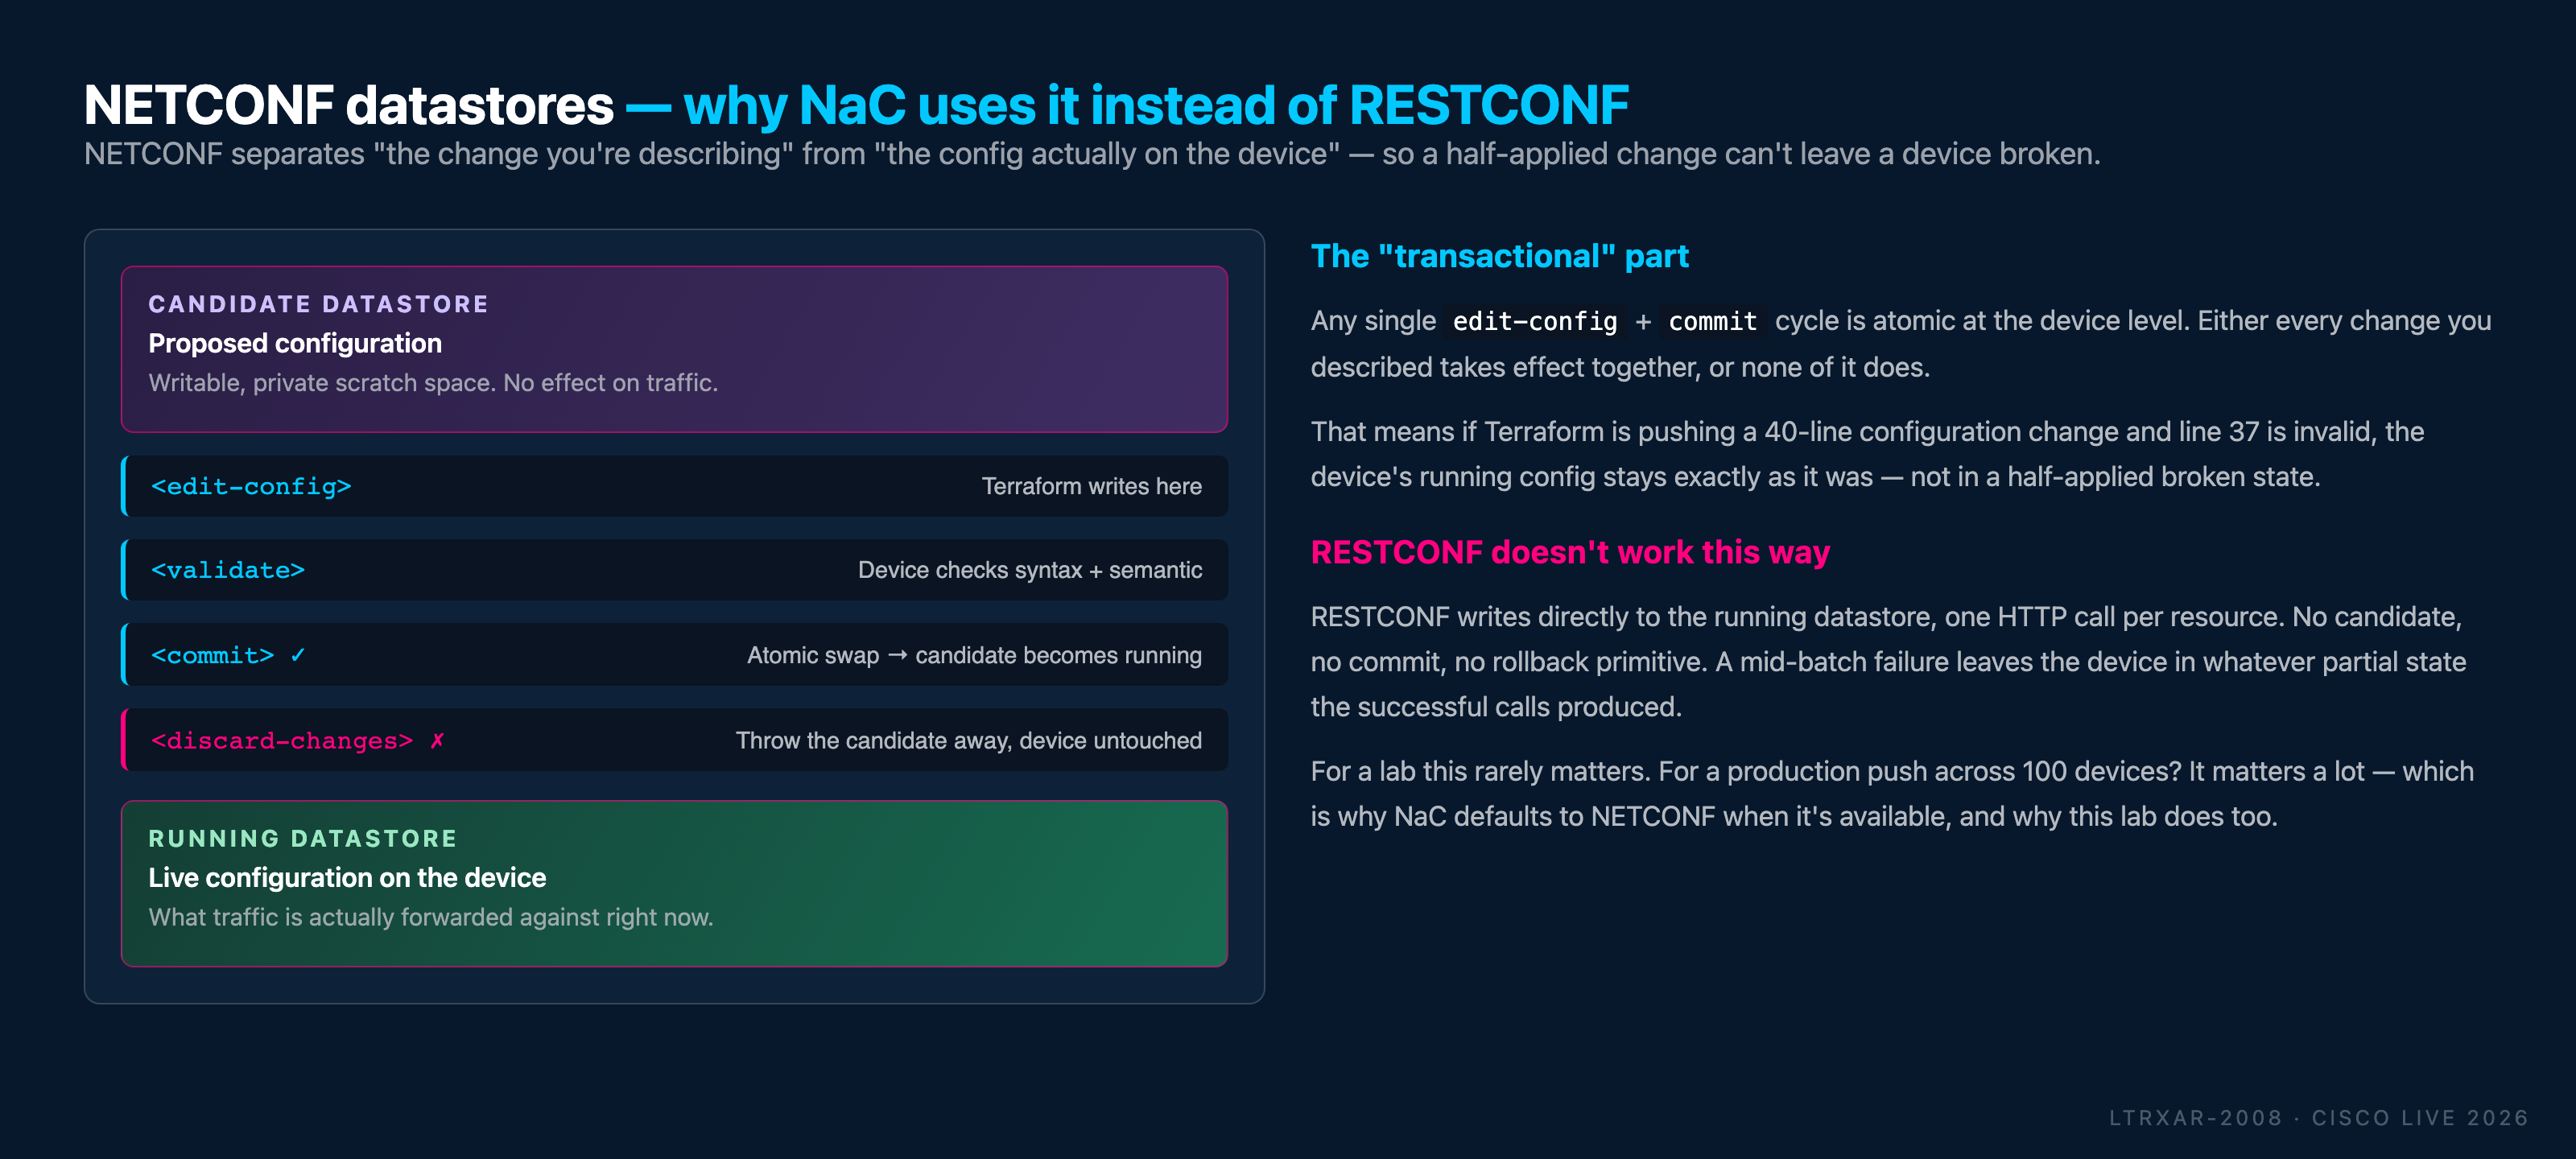
That's the whole "transactional" story in one picture: a broken apply can't leave a device half-configured, because "half-configured" isn't a state NETCONF allows. RESTCONF has no equivalent - it writes directly to running, one HTTP call per resource. A mid-batch failure leaves whatever the successful calls produced.
Open Solar-PuTTY
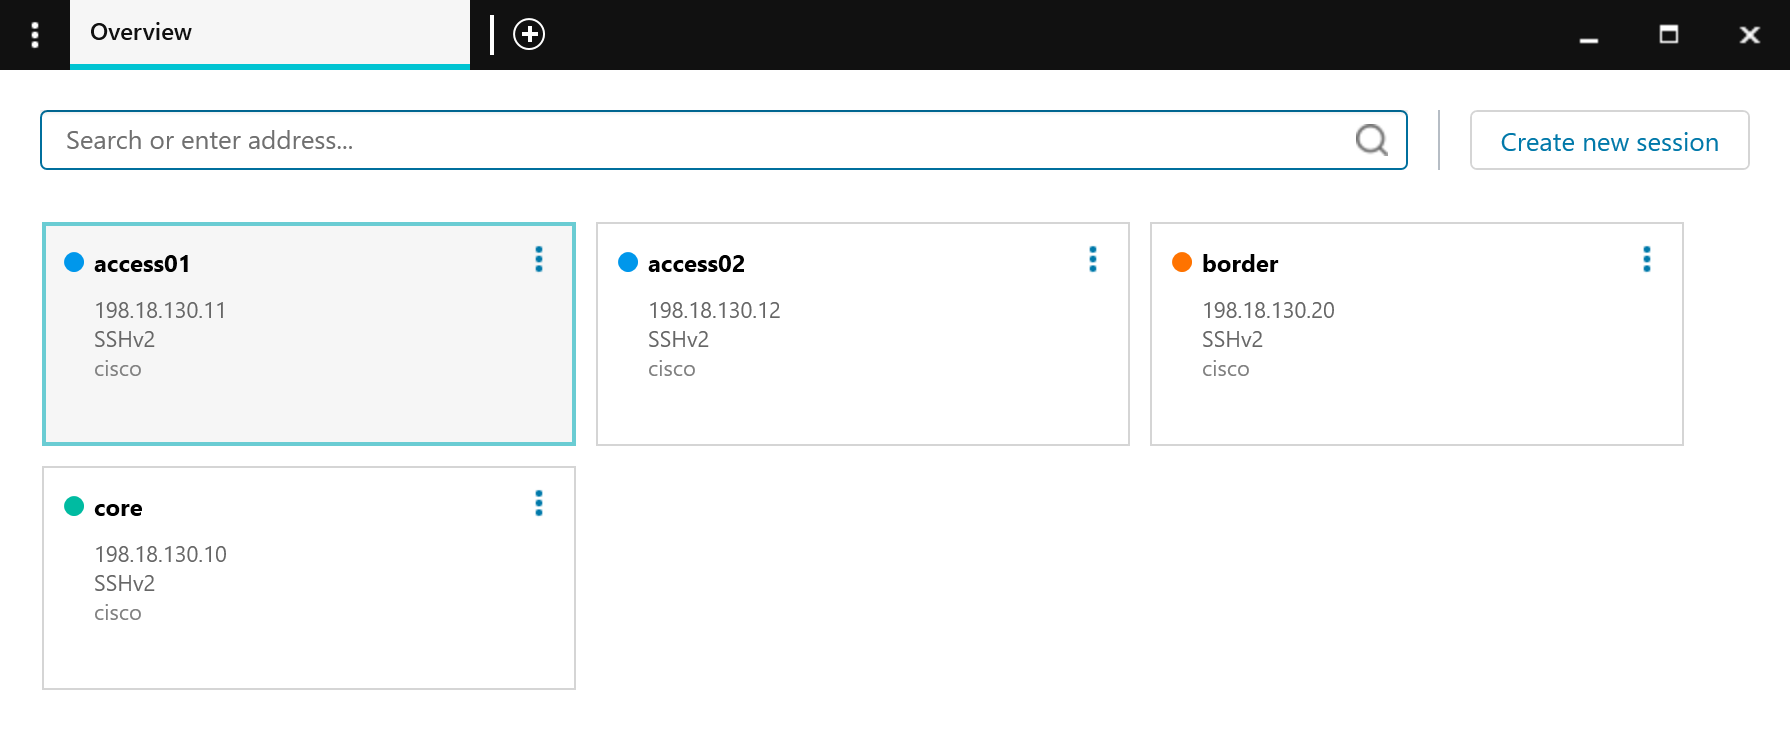
Solar-PuTTY is an enhanced SSH client with a tabbed interface for managing multiple device connections. It's pre-installed on the Win10 VM.
- Double-click the Solar-PuTTY icon on the Win10 VM desktop.
- You'll see the Solar-PuTTY interface with the lab devices already listed.
Connect to the lab devices
Credentials are pre-configured for all devices - just double-click the device name and you're in.
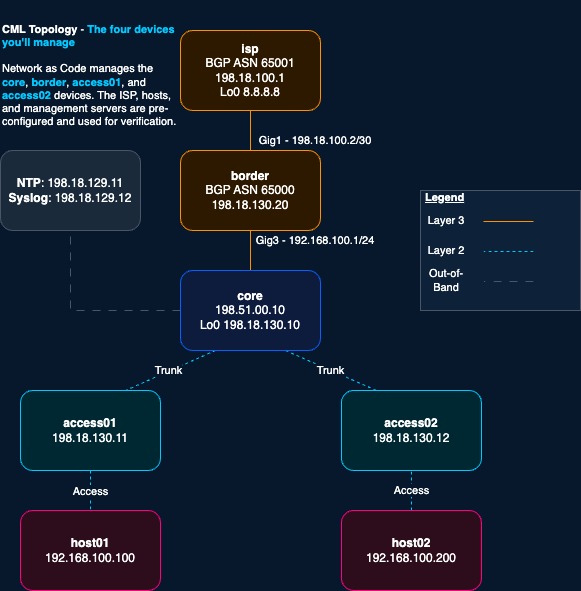
| Device | Role | Management IP |
|---|---|---|
| core | Core switch | 198.18.130.10 |
| border | Border router | 198.18.130.20 |
| access01 | Access switch | 198.18.130.11 |
| access02 | Access switch | 198.18.130.12 |
Additional devices in the topology
The lab also includes an isp router, host01 / host02 end-hosts, and ntp-server / syslog-server VMs. These are pre-configured for connectivity testing and are not managed via Network as Code in this lab. The NTP and Syslog servers are reachable via the management interface of each lab device (they're omitted from the diagram above for clarity).
Reference any time
The Topologies page (top navigation bar) has the full topology diagram, device IPs, and credentials for quick reference.
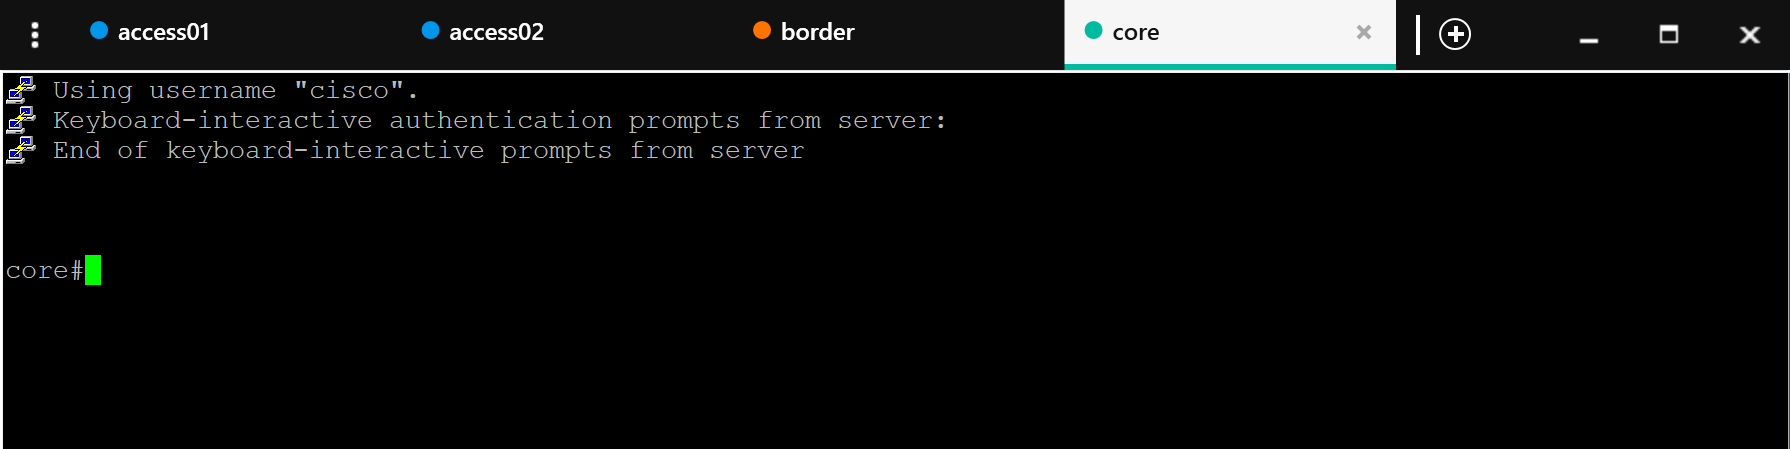
To connect: double-click the core device. Solar-PuTTY logs you in automatically.
Verify device information
Once you're on the device, run:
Copy/paste from this guide
Every fenced command block has a copy icon in its top-right corner. Click it, then right-click inside Solar-PuTTY to paste.
You should see output confirming:
- IOS XE version (e.g., 17.x)
- Platform -
Cisco IOS XE Software, Version 17.xwithCatalyst 9000orC8000Vhardware line - Uptime and system details
This is a virtual Catalyst 9000 switch running IOS XE in CML.
Review the current configuration
The running configuration is intentionally minimal. The devices are a clean slate for you to configure via Terraform - but you'll see a few essential lines that make that automation possible.
Look for:
What each line does
| Line | Purpose |
|---|---|
username nac_admin privilege 15 secret cisco |
Dedicated admin user that Terraform (and nac-test) authenticates as. Separating human and automation accounts is a core security practice. |
netconf-yang |
Enables the NETCONF-over-SSH server on TCP/830. This is the channel Terraform uses to push YANG-modelled configuration and nac-test uses to verify operational state. |
Repeat show version and show run on access01, access02, and border. All four devices should look the same: minimal config plus the seed automation plumbing above.
What to observe across all devices
- Every device has a near-empty running configuration - ready for Network as Code to take over.
- Every device has the
nac_adminuser provisioned and NETCONF enabled for configuration and verification. - The candidate datastore capability is not yet enabled - you'll turn it on as one of the first steps in Task 03 before pointing Terraform at the devices.
- No device has any of the configuration you're about to deploy (banners, ACLs, VLANs, BGP, etc.).
Enabling NETCONF manually (mostly done - one piece pending)
The lab devices already have the base NETCONF subsystem (netconf-yang) and the nac_admin user provisioned for you. The one piece intentionally left unconfigured is the candidate datastore - the netconf-yang feature candidate-datastore line. You'll enable that yourself in Task 03 - Step 3 so you see the command flow at least once; the rest of this section is reference for what to do on your own devices when you apply this pattern outside the lab.
Commands to enable NETCONF on your own devices
configure terminal
 username nac_admin privilege 15 secret cisco
 netconf-yang
 netconf-yang feature candidate-datastore
end
write memory
After enabling netconf-yang, give the subsystem ~60 seconds to initialize before pointing Terraform at the device.
The netconf-yang feature candidate-datastore command is the one that activates the candidate/commit/discard-changes flow shown in the datastore diagram above. Without it, NETCONF on IOS XE falls back to a simpler mode that writes directly to running - which works for single-RPC changes but loses the "all-or-nothing across many RPCs" guarantee. Enabling the candidate datastore is what makes device_transaction = true on the module useful (see Task 03).
In this lab, the first three lines (username, netconf-yang) are already applied to every device. Only netconf-yang feature candidate-datastore is left for you to run during Task 03.
You'll verify NETCONF reachability from WSL Ubuntu in Task 03 using a quick ssh -s handshake against port 830, then enable the candidate datastore feature on each device.
What you've accomplished
- ✅ Connected to all four IOS XE devices via Solar-PuTTY
- ✅ Verified device information with
show version - ✅ Reviewed the minimal running configuration
- ✅ Identified the configuration lines that enable Network as Code automation (
username nac_admin …andnetconf-yang) - ✅ Confirmed all devices are ready for Network as Code deployment
In the next task, you'll start creating the YAML configuration files that describe your desired network state.
← Previous: Getting Started · Next: Task 02 - Editing YAML Files