Task 11 - Post-checks with nac-test (Optional)
Estimated Time to Complete: ~15 minutes
Before you start
This task depends on configs applied in Tasks 03-06 (banner, ACL,
Loopback0) plus .schema.yaml from Task 10 - Schema Validation
and a recent terraform apply so model.yaml reflects your current
intent. Do not run this task after Task 12 - terraform destroy
wipes every config Task 11 expects to verify, and the tests will
return empty/failing results through no fault of your setup.
After Terraform applies a change, how do you confirm the configuration actually landed correctly on the devices? For one device, show running-config works. For a fleet, manual spot-checks don't scale - and running-config can't even tell you about operational state (BGP neighbor established, interface line-protocol up, VLAN database populated, etc.).
nac-test automates post-change validation by rendering Robot Framework tests directly from your intent YAML, then running them against the live devices. The test cases describe what you asked for; the framework confirms what actually happened.
- Robot Framework - a keyword-driven test framework; test cases are readable and easy to extend.
- Pabot - a parallel executor for Robot that runs suites simultaneously. Fast enough to run against many devices during a CI pipeline.
The key insight: you don't write tests by hand. nac-test renders them from the merged model.yaml NaC already produces - so the tests always match the intent.
Short on time? The most valuable part of this task is Step 7
Steps 1-6 walk through the happy path: render the tests, run them,
see them pass. Step 7 is where nac-test earns its keep - you'll
deliberately desync intent from device state and watch the tests
catch it. If you only have 10 minutes, skim Steps 1-4, skip the
report walkthrough in Steps 5-6, and make sure you do Step 7.
What you'll learn
By the end of this task you will have:
- Installed
nac-testand copied the pre-builttests/scaffolding into your project - Rendered a Robot Framework test suite directly from your intent YAML and
model.yaml - Read the generated HTML + JUnit test reports
Use case: validating the ACL on access switches
In Task 4 you deployed AccessLayerACL to access01 and access02 via a device group. You'll validate that it landed correctly.
Lab scope vs production
Production Network as Code deployments ship 100+ Robot test templates covering every configuration type. This task demonstrates the workflow with one (access_lists.robot) - once you see the pattern, the rest is more of the same.
The deployed intent (from data/groups/access.nac.yaml):
---
iosxe:
  device_groups:
    - name: ACCESS_SWITCHES
      devices:
        - access01
        - access02
      configuration:
        access_lists:
          standard:
            - name: AccessLayerACL
              entries:
                - sequence: 10
                  action: permit
                  prefix: 10.0.0.0
                  prefix_mask: 0.0.0.255
                - sequence: 20
                  action: permit
                  prefix: 20.0.0.0
                  prefix_mask: 0.0.0.255
Step 1: Copy the test files into your project
The lab WSL image ships with a pre-built tests/ directory under ~/tests/. Copy it into your project:
Your project now has:
~/nac-iosxe/
├── data/                              # (your YAML intent from earlier tasks)
├── tests/
│   ├── filters/
│   │   └── url_encode.py              # Jinja2 filter - encodes special characters
│   └── templates/
│       ├── iosxe_common.resource      # Robot keywords shared across suites
│       ├── lib/
│       │   └── UtilsLib.py            # NETCONF connection + XML assertion keywords
│       └── config/
│           └── access_lists.robot     # Jinja2 template → rendered Robot suite
├── model.yaml                         # (generated by `terraform apply`)
└── ...
The contents of access_lists.robot are shown in Appendix III for reference.
Step 2: Have the model file ready
You will use the model.yaml file generated in the previous tasks as input to nac-test.
If the model.yaml file is missing
Before running nac-test, you need to run Terraform to generate the merged model file (model.yaml) that nac-test uses for rendering tests. If you haven't run the terraform commands below yet, do so now in your WSL Ubuntu terminal:
yes to confirm the deployment.
This generates two files in your project directory:
model.yaml- The merged YAML data model (all your configuration files combined)defaults.yaml- The default values used by the module
Step 3: Install nac-test
Install the nac-test tool using pip in your WSL Ubuntu terminal:
Step 4: Run nac-test
Once you have the model files and test templates in place, run the nac-test command in your WSL Ubuntu terminal:
nac-test \
  --data ./model.yaml \
  --data ./defaults.yaml \
  --templates ./tests/templates \
  --filters ./tests/filters \
  --output /mnt/c/Users/admin/Desktop/TestResults
What this command does:
- Loads data - Reads the merged model and defaults generated by Terraform
- Loads filters - Loads custom Jinja2 filters from
./tests/filters - Renders templates - Each template in
./tests/templatesis rendered with your configuration data - Executes tests - Pabot runs all test suites in parallel
- Creates reports - Generates reports in the specified output directory
Output location
The test results are saved to your Windows Desktop (C:\Users\admin\Desktop\TestResults) for easy access. You can open the HTML reports directly in your browser.
Outside the lab? The /mnt/c/Users/admin/... path is lab-pod-specific
The --output /mnt/c/Users/admin/Desktop/TestResults path works because the lab's shared Win10 VM is provisioned with an admin user, WSL mounts C: under /mnt/c, and Desktop is in a fixed location. If you re-run this command against your own machine, substitute the path:
- On your own WSL setup - replace
adminwith your Windows username:/mnt/c/Users/<YOU>/Desktop/TestResults. Runcmd.exe /c echo %USERNAME%from the WSL prompt if you're not sure. - On native Linux / macOS - pick any regular Linux path, e.g.
~/nac-test-resultsor./tests/results(the pattern Task 14 uses when wiringnac-testinto the GitLab pipeline).
The tool itself doesn't care - --output just needs a writable directory.
Step 5: Review the generated Robot test
After running nac-test, check the generated test file:
This is the TestResults folder on the Windows 10 desktop. You can open the file with VS Code, notepad, or view the generated test file using your WSL Ubuntu terminal:
The access_lists.robot file contains tests automatically generated from your intent configuration:
*** Settings ***
Documentation   Verify Access Lists Configuration
Suite Setup     Run Only Once   Get Configs
Resource        ../iosxe_common.resource
Default Tags    config   iosxe   access_lists

*** Test Cases ***

Get Config access01
    ${config}=   Get Parallel Value For Key   access01_config
    Set Suite Variable   ${config}

Verify Standard Access List AccessLayerACL Device access01
    ${acl}=   Set Variable   data/native/ip/access-list/standard[name='AccessLayerACL']
    Should Be Equal Value Xml String   ${config}   ${acl}/name   AccessLayerACL
    ${entry}=   Set Variable   ${acl}/access-list-seq-rule[sequence='10']
    Should Be Equal Value Xml String   ${config}   ${entry}/remark
    Should Be Equal Value Xml String   ${config}   ${entry}/permit/std-ace/ipv4-address-prefix   10.0.0.0
    Should Be Equal Value Xml String   ${config}   ${entry}/permit/std-ace/mask   0.0.0.255
    Should Be Equal Value Xml Bool   ${config}   ${entry}/permit/std-ace/any
    Should Be Equal Value Xml String   ${config}   ${entry}/permit/std-ace/host-address
    Should Be Equal Value Xml Bool   ${config}   ${entry}/permit/std-ace/log
    ${entry}=   Set Variable   ${acl}/access-list-seq-rule[sequence='20']
    Should Be Equal Value Xml String   ${config}   ${entry}/remark
    Should Be Equal Value Xml String   ${config}   ${entry}/permit/std-ace/ipv4-address-prefix   20.0.0.0
    Should Be Equal Value Xml String   ${config}   ${entry}/permit/std-ace/mask   0.0.0.255
    Should Be Equal Value Xml Bool   ${config}   ${entry}/permit/std-ace/any
    Should Be Equal Value Xml String   ${config}   ${entry}/permit/std-ace/host-address
    Should Be Equal Value Xml Bool   ${config}   ${entry}/permit/std-ace/log

Get Config access02
    ${config}=   Get Parallel Value For Key   access02_config
    Set Suite Variable   ${config}

Verify Standard Access List AccessLayerACL Device access02
    ...
Lines with no expected value
Assertions where the expected value is blank (e.g. remark, host-address) are no-ops - the keyword returns immediately when the value is empty. They appear because the Jinja2 template renders every possible field; only the fields you defined in YAML actually perform a check.
Step 6: Review the test results
The terminal output from nac-test, that you ran earlier in Step 4, shows the test execution:
cisco@wkst1:~/nac-iosxe$ nac-test \
  --data ./model.yaml \
  --data ./defaults.yaml \
  --templates ./tests/templates \
  --filters ./tests/filters \
  --output /mnt/c/Users/admin/Desktop/TestResults
Robot Framework remote server at 127.0.0.1:36883 started.
Storing .pabotsuitenames file
2025-12-31 17:10:34.305712 [PID:25936] [0] [ID:0] EXECUTING TestResults.Config.Access Lists
2025-12-31 17:10:36.720046 [PID:25936] [0] [ID:0] PASSED TestResults.Config.Access Lists in 2.4 seconds
{'command': ['robot'], 'verbose': False, 'help': False, 'version': False, 'testlevelsplit': False, 'pabotlib': True, 'pabotlibhost': '127.0.0.1', 'pabotlibport': 0, 'processes': 4, 'processtimeout': None, 'artifacts': ['png'], 'artifactstimestamps': True, 'artifactsinsubfolders': False, 'shardindex': 0, 'shardcount': 1, 'chunk': False, 'no-rebot': False, 'argumentfiles': []}
2 tests, 2 passed, 0 failed, 0 skipped.
===================================================
Output:  /mnt/c/Users/admin/Desktop/TestResults/output.xml
XUnit:   /mnt/c/Users/admin/Desktop/TestResults/xunit.xml
Log:     /mnt/c/Users/admin/Desktop/TestResults/log.html
Report:  /mnt/c/Users/admin/Desktop/TestResults/report.html
Stopping PabotLib process
Robot Framework remote server at 127.0.0.1:36883 stopped.
PabotLib process stopped
Total testing: 2.40 seconds
Elapsed time:  3.41 seconds
cisco@wkst1:~/nac-iosxe$
Output artifacts:
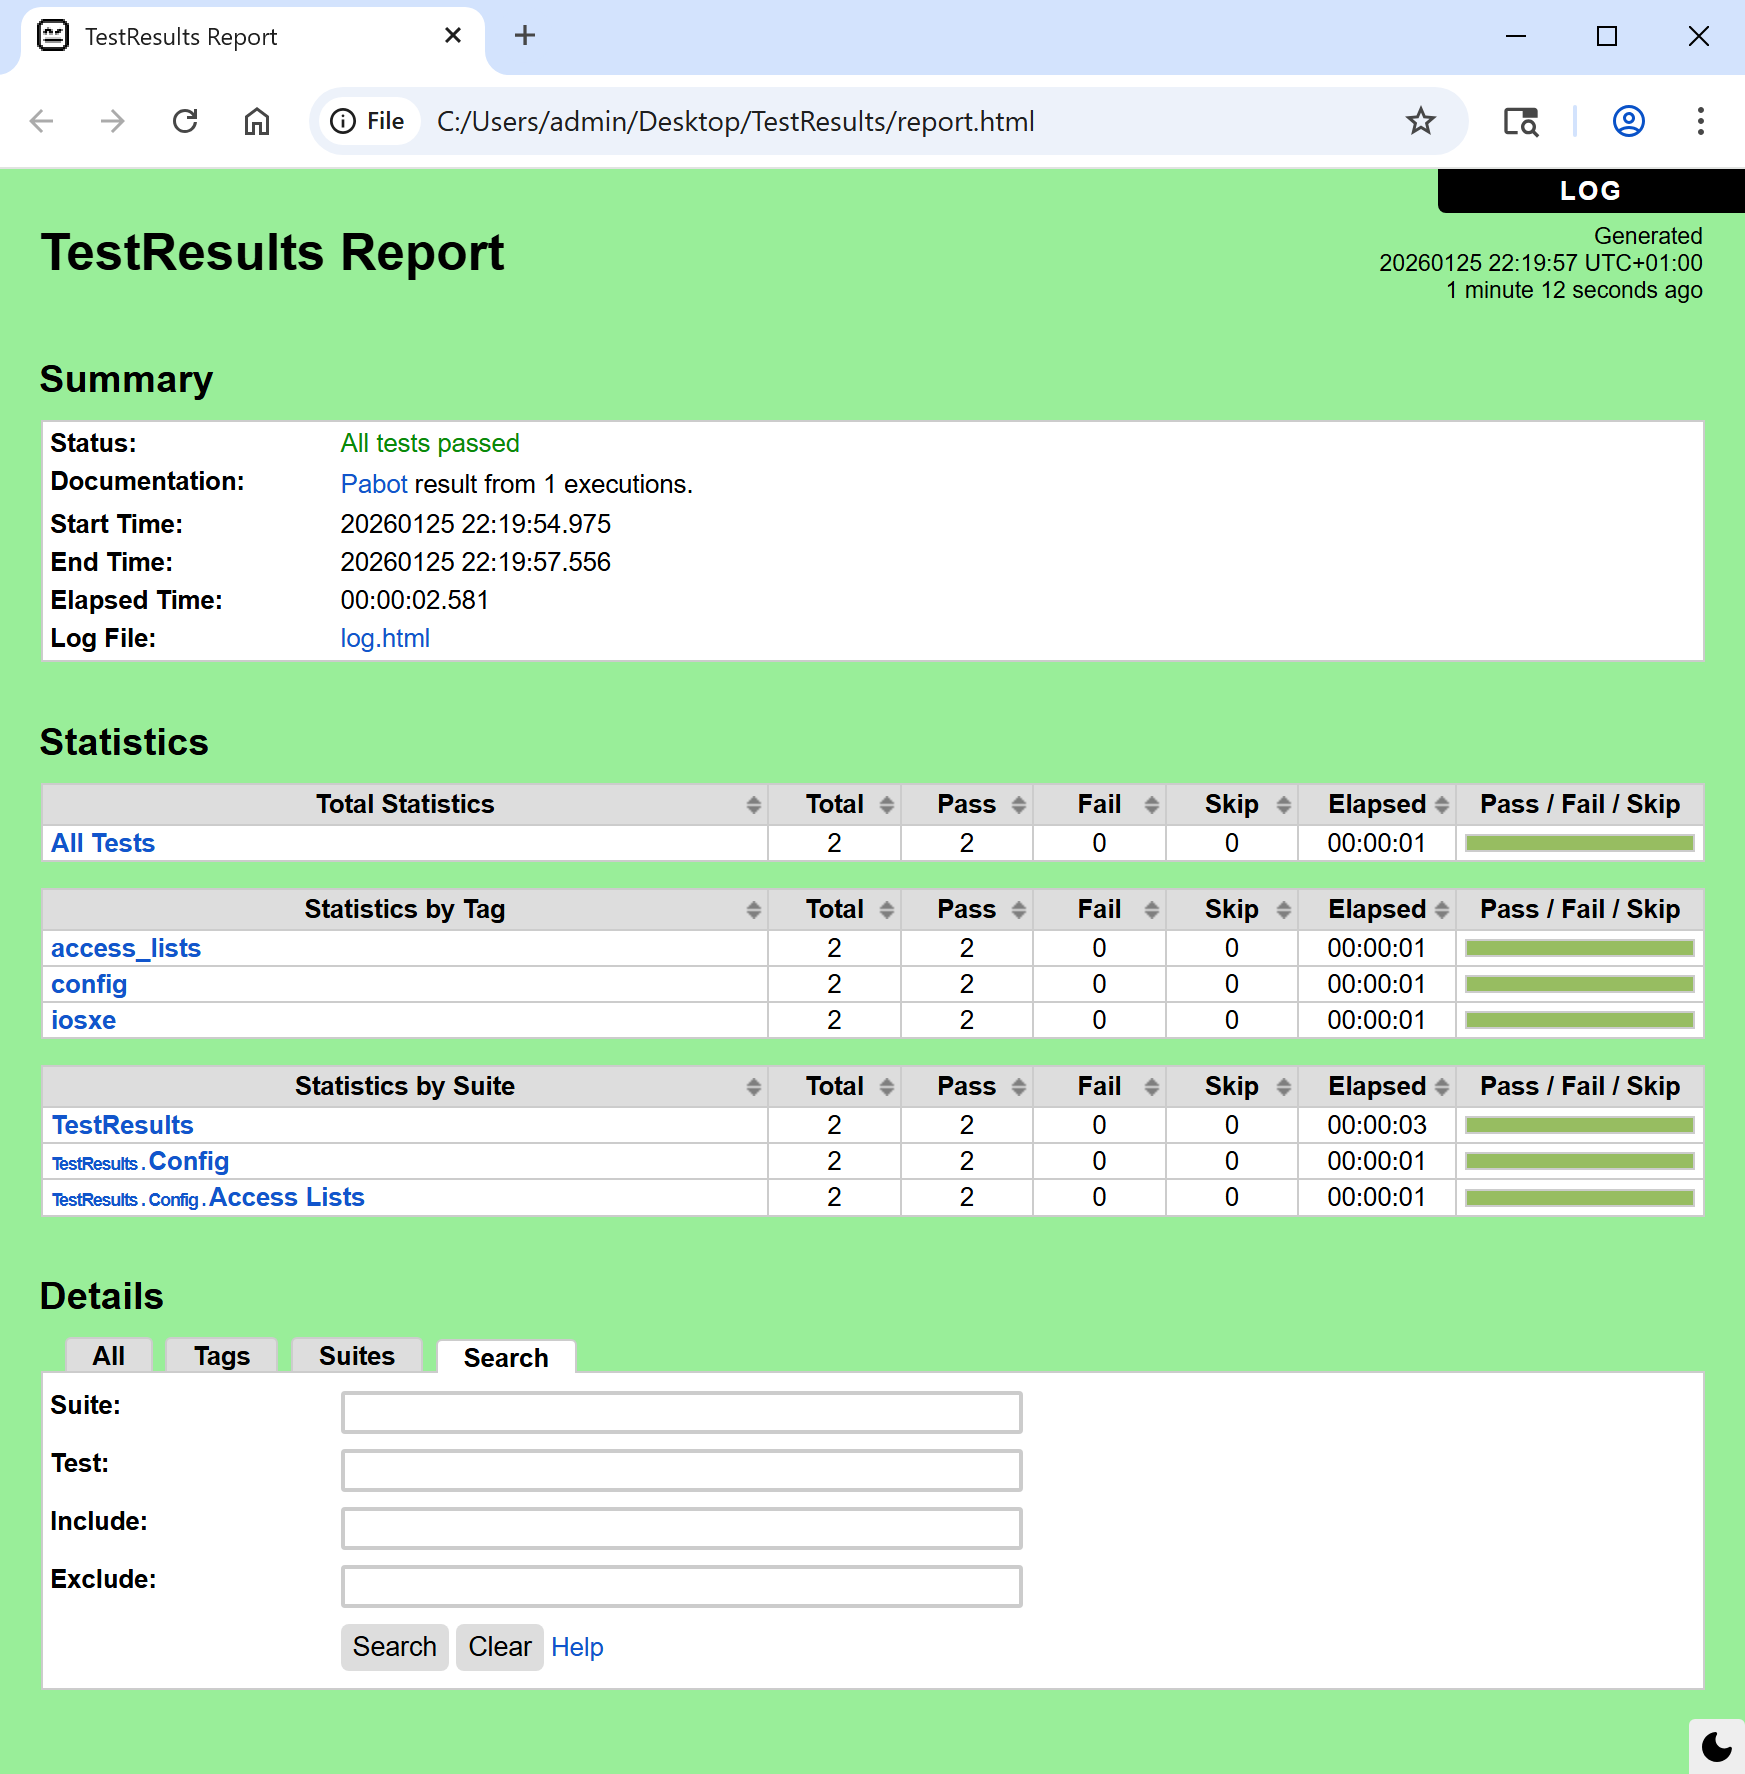
output.xml- Test results in Robot Framework formatxunit.xml- Results in xUnit format for CI/CD integrationlog.html- Detailed execution logreport.html- Human-readable summary report
Open the report in a browser to see the visual results. Navigate to your Desktop and open the TestResults folder, then double-click report.html:
Log Details
The log.html file contains detailed step-by-step execution information, including request and response data for each test case. This is useful for troubleshooting any test failures or understanding the test flow in depth.
Step 7: See a test fail (then fix it)
The previous run passed because the device state matched the intent. To see the real value of post-checks, you'll create a situation where they DON'T match - simulating configuration drift.
What is configuration drift?
Drift happens when a device's running config diverges from the declared intent. Common causes: a manual CLI change during troubleshooting, a device reboot that doesn't fully restore config, a NETCONF commit that silently drops a leaf, or another automation tool overwriting what Terraform pushed. Post-checks catch all of these.
Simulate drift by manually removing an ACL entry from access01:
Open Solar-PuTTY and connect to access01 (198.18.130.11). Then remove sequence 10 from the ACL:
The intent (model.yaml) still says sequence 10 should exist, but access01 no longer has it. This is drift.
Run nac-test again:
nac-test \
  --data ./model.yaml \
  --data ./defaults.yaml \
  --templates ./tests/templates \
  --filters ./tests/filters \
  --output /mnt/c/Users/admin/Desktop/TestResults
This time, the tests fail:
...
2 tests, 1 passed, 1 failed, 0 skipped.
===================================================
The test for access01 expected sequence 10 (prefix: 10.0.0.0) to exist because it's in the intent - but the device no longer has it. The test for access02 still passes because that device wasn't touched. This is exactly what nac-test catches: a mismatch between what you WANT on the device and what's ACTUALLY there.
Now fix the drift with Terraform and re-run:
nac-test \
  --data ./model.yaml \
  --data ./defaults.yaml \
  --templates ./tests/templates \
  --filters ./tests/filters \
  --output /mnt/c/Users/admin/Desktop/TestResults
...
2 tests, 2 passed, 0 failed, 0 skipped.
===================================================
Tests pass again - terraform apply detected the missing ACE and re-pushed it to access01.
The real-world takeaway
In production, drift happens silently. A network engineer fixes a P1 outage with a manual CLI change, a device reboots and loses an uncommitted config, or a NETCONF commit ACKs but silently ignores a leaf. nac-test catches all of these by comparing what's actually on the wire against your source-of-truth intent. Run it after every terraform apply, and schedule it periodically to catch out-of-band drift.
What you've accomplished
- ✅ Copied the pre-built
tests/directory into your project - ✅ Ran
nac-testto render and execute Robot Framework tests from your intent YAML - ✅ Reviewed the auto-generated
access_lists.robotsuite - ✅ Interpreted the HTML report and JUnit results
- ✅ Observed a test failure when device state didn't match intent, then resolved it
CI/CD integration
In Task 14 you'll wire nac-test into the GitLab pipeline so every deployment auto-verifies itself - no manual step.
← Previous: Task 10 - Schema validation · Next: Task 12 - Cleanup