Task 06 - Variables
Estimated Time to Complete: ~15 minutes
In this task you'll use variables in your Network as Code configurations. Variables let you define a value once (at the global, group, or device level) and reference it everywhere it's needed, so you can keep shared settings in one place while letting each device override only what's unique to it.
What you'll learn
By the end of this task you will have:
- Used
${VARIABLE_NAME}placeholders inside a global configuration - Defined a global variable (
${SITE}) that every device inherits - Defined a per-device variable (
${HOSTNAME}) that resolves differently on each device
Variables in Network as Code
Variables in Network as Code work similarly to variables in programming languages. You define a variable with a value at one level (device, device group, or global), and then reference it elsewhere using the ${VARIABLE_NAME} syntax. When the Network as Code module processes your configuration, it substitutes the variable references with their actual values.
Benefits of using variables:
- Consistency: Define a value once, use it everywhere
- Maintainability: Change a value in one place, it updates everywhere it's used
- Reusability: Same configuration template can be used with different variable values
- Device-specific customization: Each device can have its own variable values while sharing configuration structure
Use case: dynamic hostname in banner and system hostname config
In this example, you'll touch two different pieces of configuration on each device: the hostname and the login banner.
-
You'll define the
HOSTNAMEvariable per device. -
You'll use that variable to set the system hostname in the global configuration.
-
You'll update the login banners on each device to display its own hostname. Instead of creating separate banner configurations for each device, you'll use the same global banner configuration with the
HOSTNAMEvariable. -
Let Network as Code substitute the variable automatically in both the system hostname and banner configuration
The power of variables
One banner template, multiple device-specific outputs!
One place to define the hostname variable per device, used in multiple configuration sections.
Step 1: Update the global configuration file
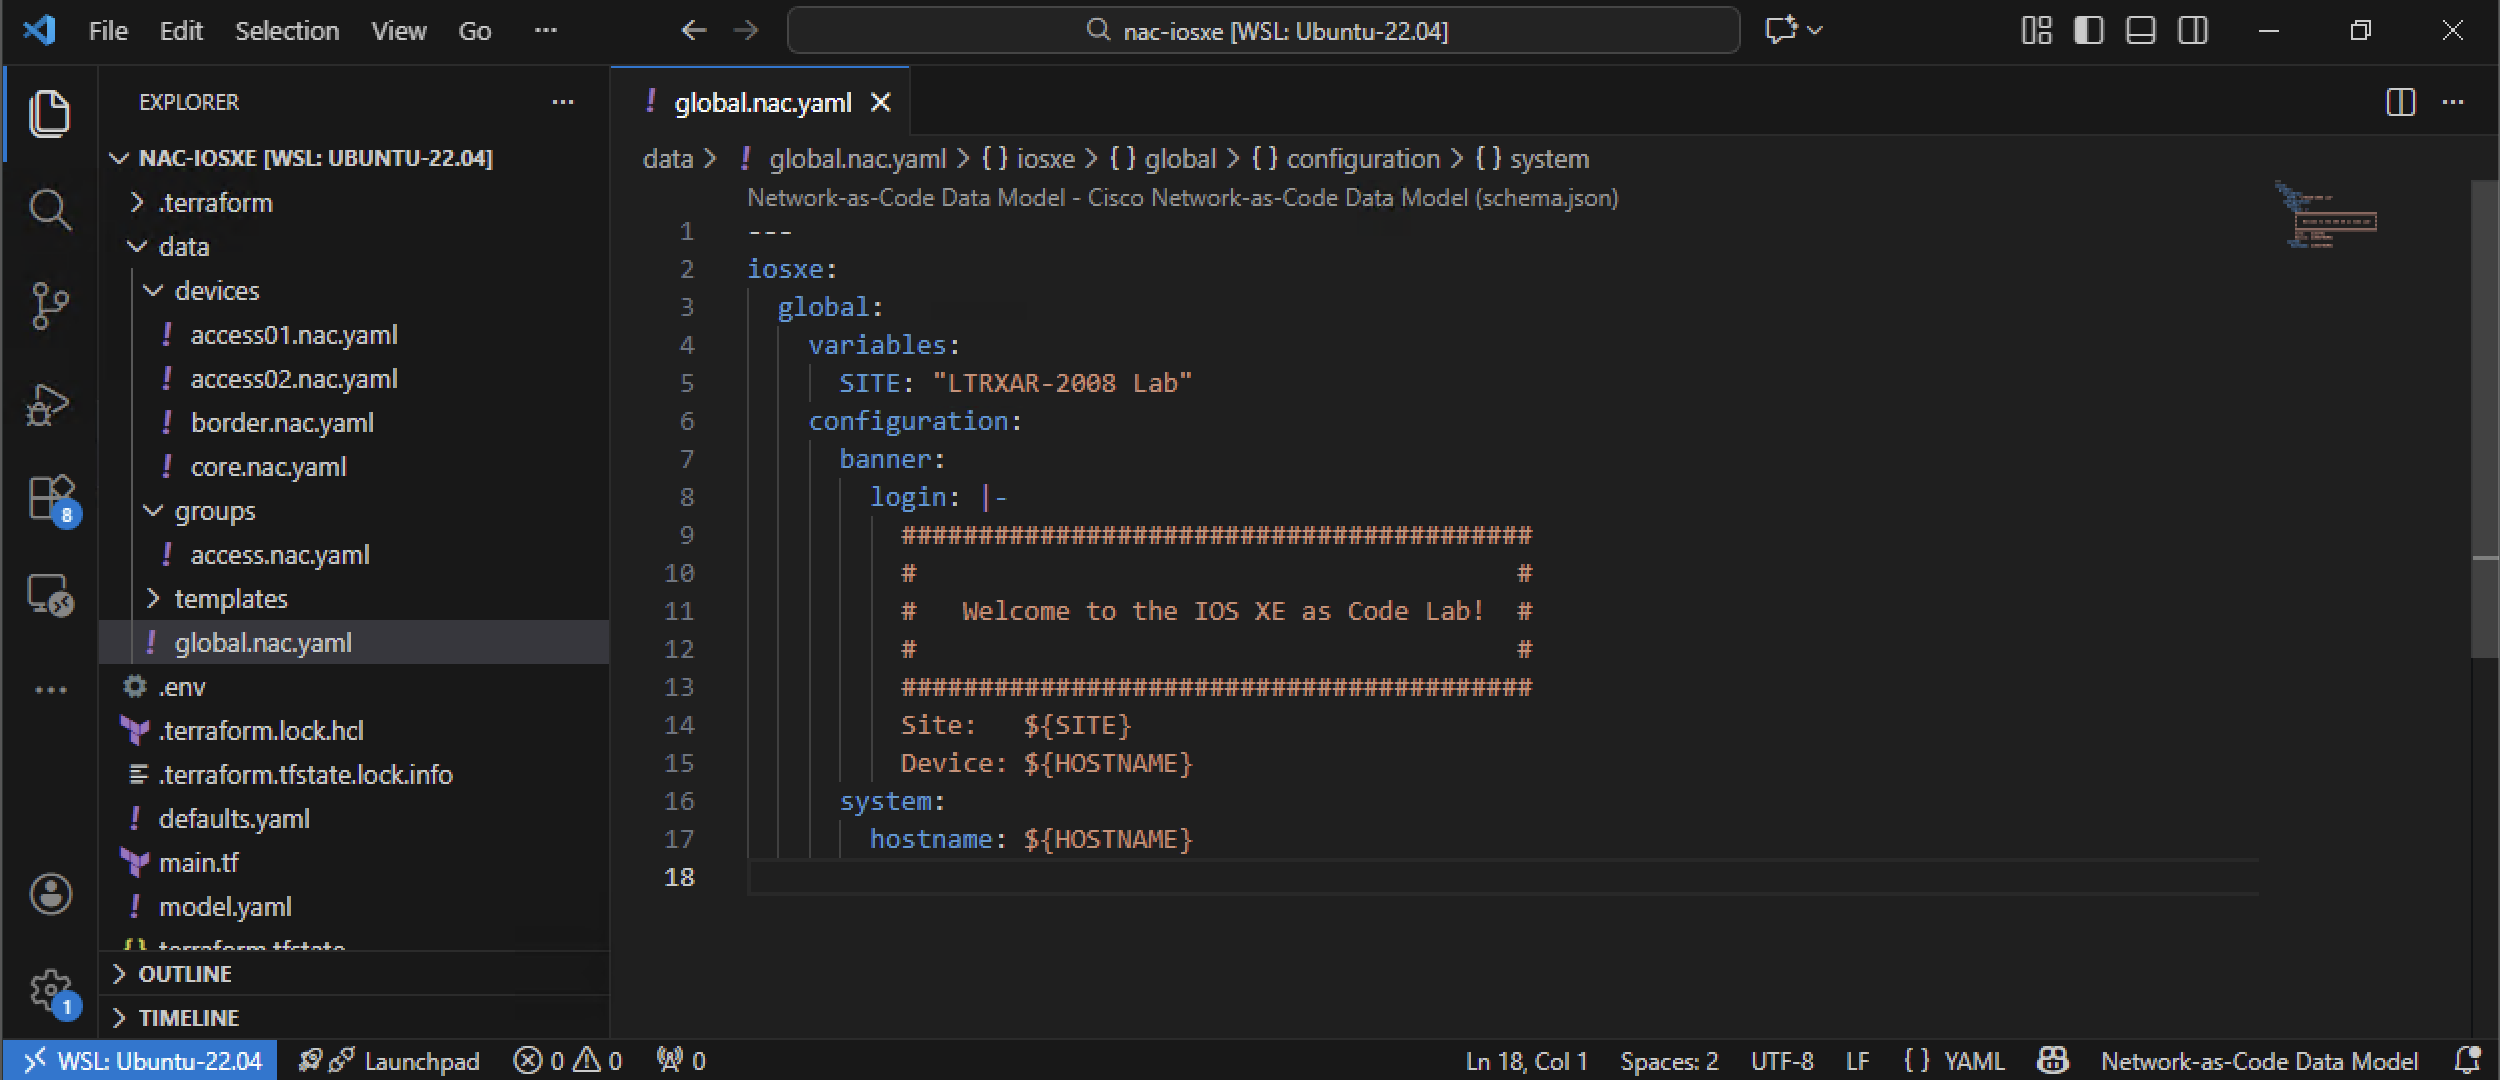
First, update the global configuration to use a variable in the banner. Open data/global.nac.yaml in VS Code and update it with the following content:
---
iosxe:
  global:
    variables:
      SITE: "LTRXAR-2008 Lab"
    configuration:
      banner:
        login: |-
          #########################################
          #                                       #
          #   Welcome to the IOS XE as Code Lab!  #
          #                                       #
          #########################################
          Site:   ${SITE}
          Device: ${HOSTNAME}
      system:
        hostname: ${HOSTNAME}
Two kinds of variable reference at work here:
${SITE}- defined globally (at theiosxe.global.variableslevel). Every device inherits the same value unless a device explicitly overrides it. This is how you keep organization-wide constants (site name, location, lab ID, DNS domain) in exactly one place.${HOSTNAME}- referenced globally, but you'll define it per-device in Step 2 so each device resolves it to its own value.
Banner config:
banner: login:- the login banner shown on SSH connect.|-- YAML block-scalar indicator; preserves newlines and indentation inside the string while removing the trailing newline.
System config:
system: hostname:- sets the IOS XEhostnameCLI to the resolved value of${HOSTNAME}.
Variable syntax
Variables use the ${VARIABLE_NAME} syntax. Names are case-sensitive: ${HOSTNAME} and ${hostname} are different variables. The lab uses uppercase by convention - it makes variables visually distinct from the surrounding YAML, and is a common pattern across Network as Code data models.
The image below illustrates the updated global configuration in VS Code:
YAML Formatting
When pasting multi-line strings in YAML (like this banner), ensure the indentation is correct. The | character indicates a multi-line string, and the following lines should be indented properly to be part of that string.
To learn more about the multi-line string (block scalar) YAML syntax, refer to yaml-multiline.info.
Step 2: Define variables at device level
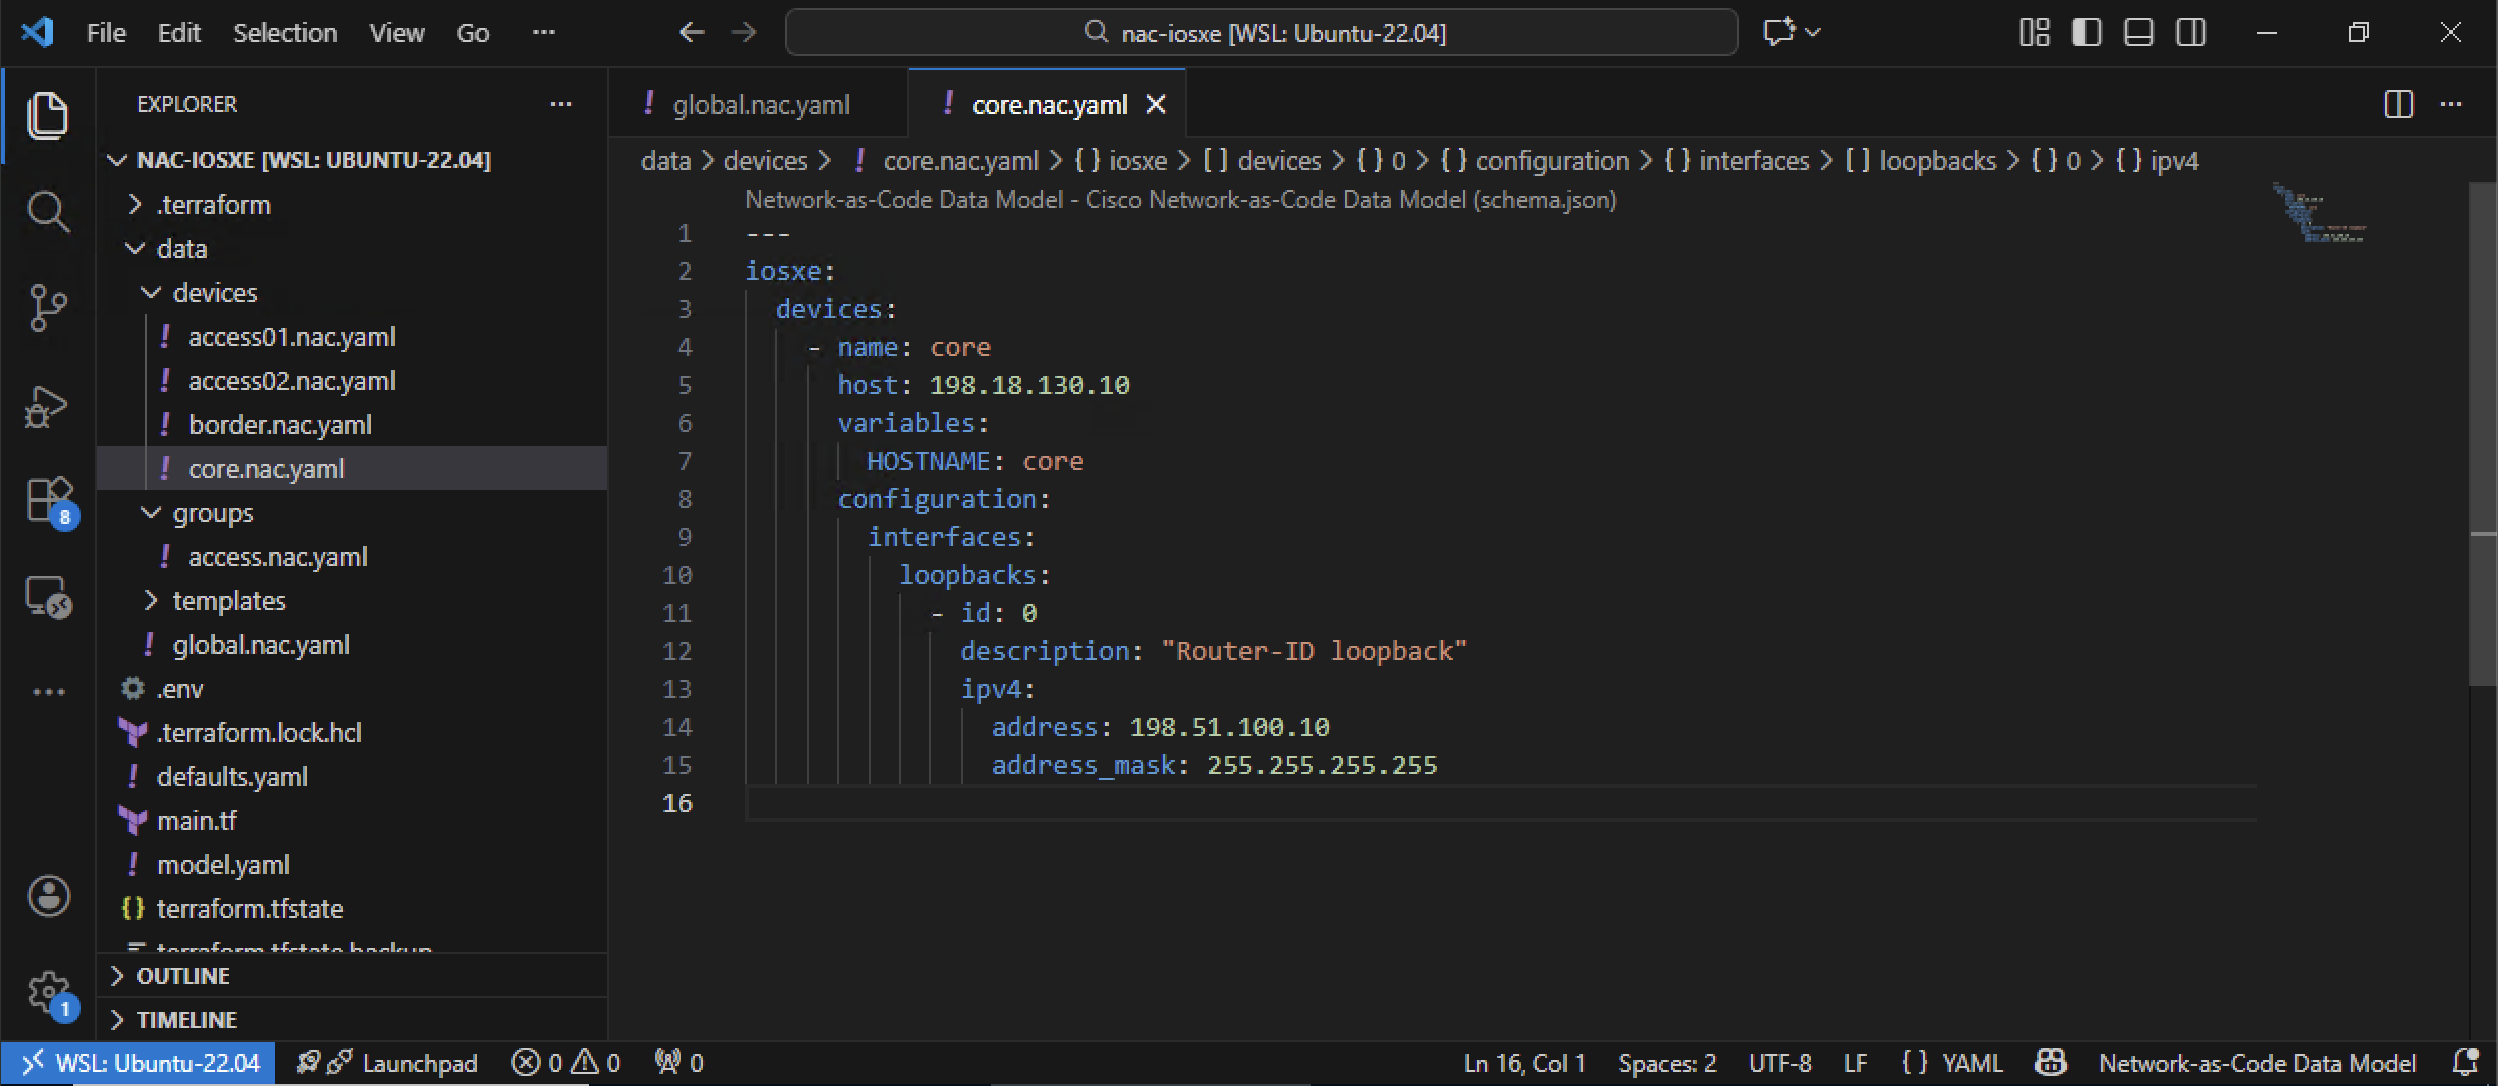
Now you need to define the HOSTNAME variable for each device. Open data/devices/core.nac.yaml in VS Code and update it with the following content:
---
iosxe:
  devices:
    - name: core
      host: 198.18.130.10
      variables:
        HOSTNAME: core
      configuration:
        interfaces:
          loopbacks:
            - id: 0
              description: "Router-ID loopback"
              ipv4:
                address: 198.51.100.10
                address_mask: 255.255.255.255
What's new:
variables:- section where you define device-specific variables.HOSTNAME: core- sets${HOSTNAME}tocorefor this device only. Thesystem.hostnameandbanner.logininglobal.nac.yamlwill resolve to this value when the merged model is rendered forcore.
The image below illustrates the device configuration with variables in VS Code:
Step 3: Add variables to other devices
Now add the HOSTNAME variable to the other device configuration files.
Update data/devices/border.nac.yaml:
---
iosxe:
  devices:
    - name: border
      host: 198.18.130.20
      variables:
        HOSTNAME: border
Update data/devices/access01.nac.yaml:
---
iosxe:
  devices:
    - name: access01
      host: 198.18.130.11
      variables:
        HOSTNAME: access01
Update data/devices/access02.nac.yaml:
---
iosxe:
  devices:
    - name: access02
      host: 198.18.130.12
      variables:
        HOSTNAME: access02
Name and hostname
The name attribute under devices identifies the device in Network as Code. The HOSTNAME variable value you set is what will be used in the system hostname and banner configuration. They can be the same or different, depending on your design.
How variable substitution works
When Terraform processes your configuration, it performs variable substitution at each level, for each device.
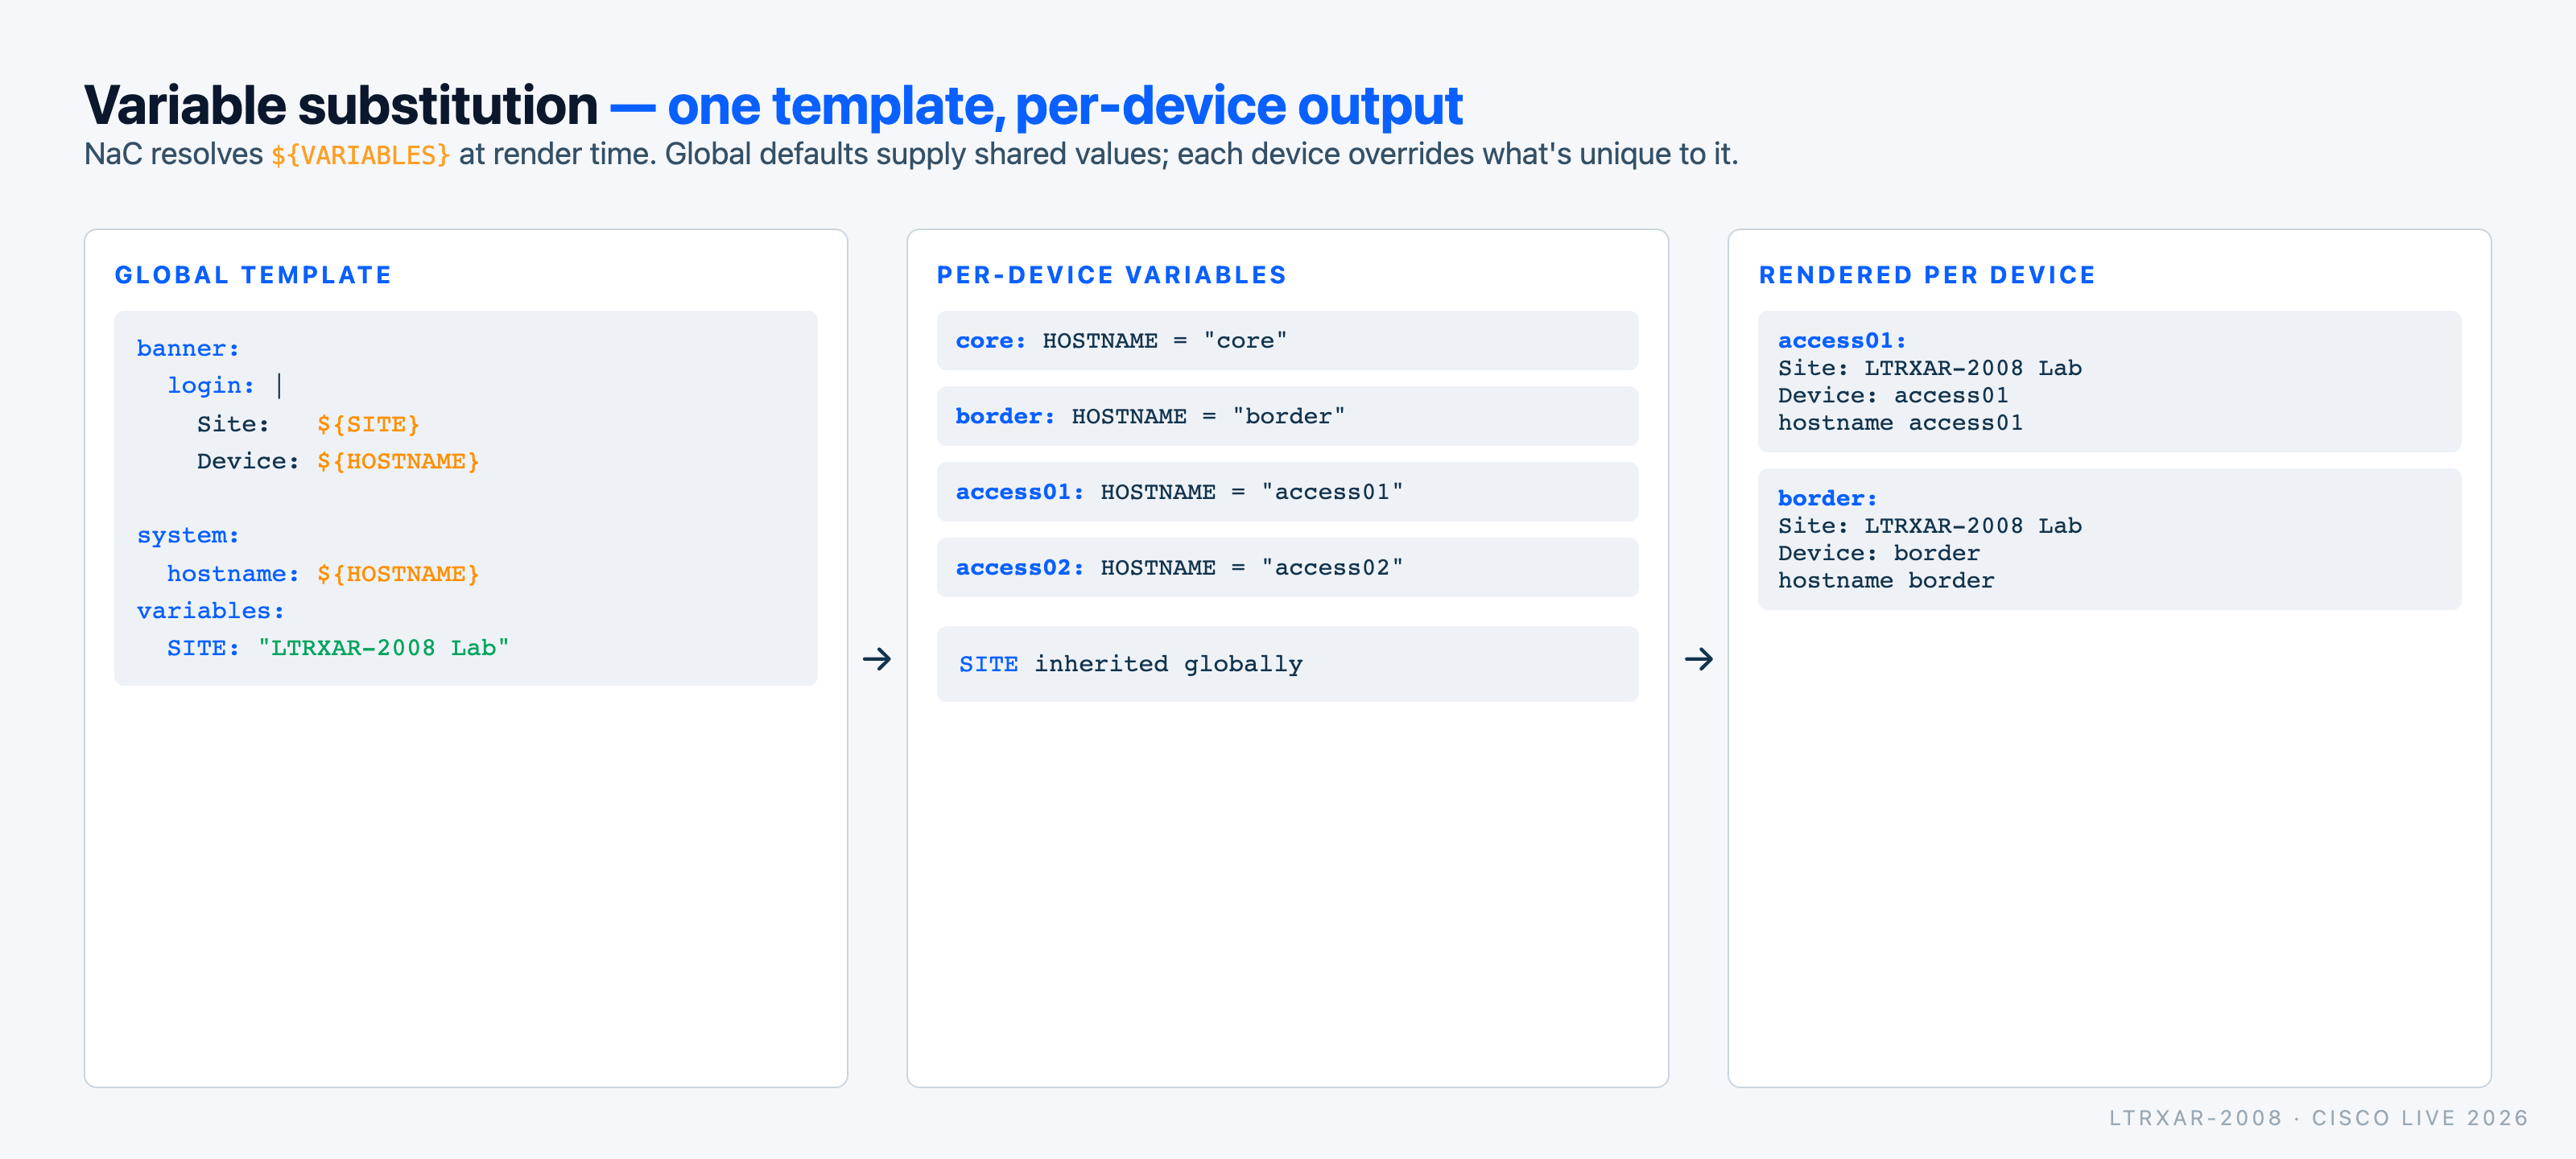
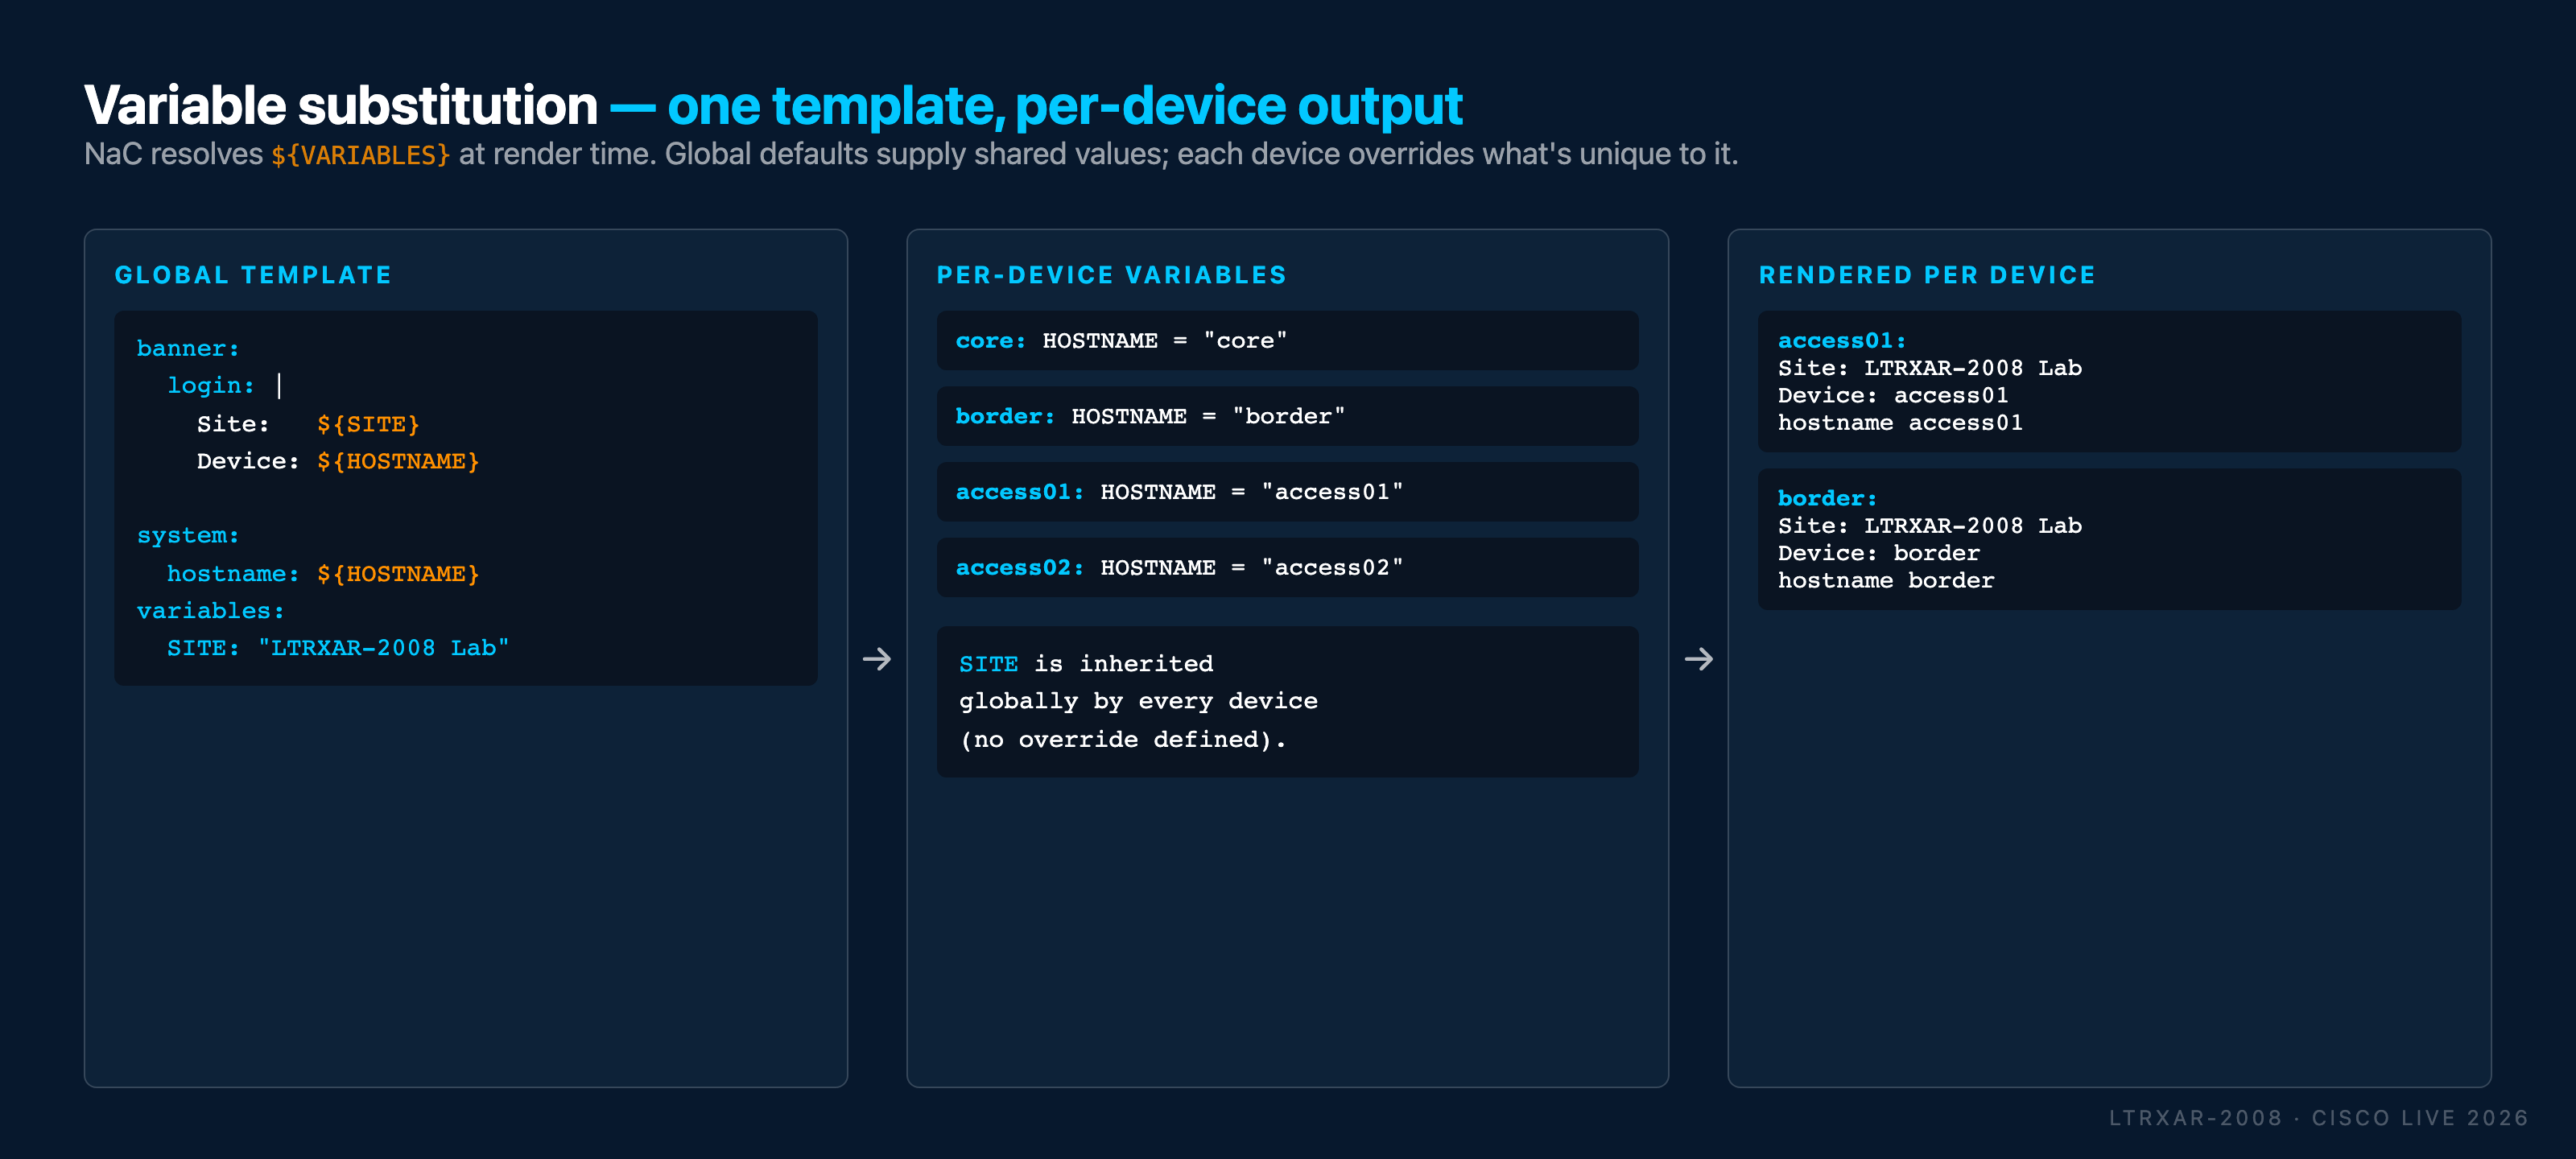
What access01 actually ends up with after substitution
After you run terraform apply in Step 4, open model.yaml. The
access01 entry will have every ${HOSTNAME} reference already
replaced with the literal string - no variable markers remain in the
final model:
iosxe:
  devices:
    - name: access01
      host: 198.18.130.11
      configuration:
        banner:
          login: |
            ######################################
            #                                    #
            #   Welcome to Network as Code Lab!  #
            #                                    #
            ######################################
            Device: access01               # ← ${HOSTNAME} resolved
        system:
          hostname: access01               # ← ${HOSTNAME} resolved
Substitution happens once, at merge time, before the Terraform
provider ever opens a connection to a device. By the time anything
hits NETCONF, the payload is fully-resolved concrete YAML - no
${...} strings ever travel to the device. The model.yaml file
is the authoritative record of "what was actually sent."
Running access02, core, and border through the same logic
produces hostname: access02, hostname: core, and hostname:
border respectively - same template, four different results.
Variable precedence
Variables can be defined at multiple levels. When the same variable is defined at different levels, the more specific level takes precedence:
- Device variables (highest precedence) - Override everything
- Device group variables (medium precedence) - Override global
- Global variables (lowest precedence) - Default values
This allows you to define default values globally and override them per device or device group when needed.
Variable Precedence Example
The config below is only an example, you do not need to add this in your lab.
Step 4: Apply configuration
Open your WSL Ubuntu terminal and navigate to your project directory:
Optionally, preview the changes Terraform will make:
In the plan output, look for four separate hostname changes - one per device - even though you only edited one banner template in global.nac.yaml. That's variable substitution producing four distinct renders from one source, which is the whole point of this task.
Apply the configuration:
When prompted, typeyes to confirm the deployment.
Step 5: Verify variable substitution
After Terraform completes successfully, verify the configuration was applied correctly on each device.
Use Solar-PuTTY to connect and verify:
- Open Solar-PuTTY from your desktop
- Connect to the core switch
- Verify the updated hostname and banner
- Repeat for other switches (border, access01, access02) to see their specific hostnames
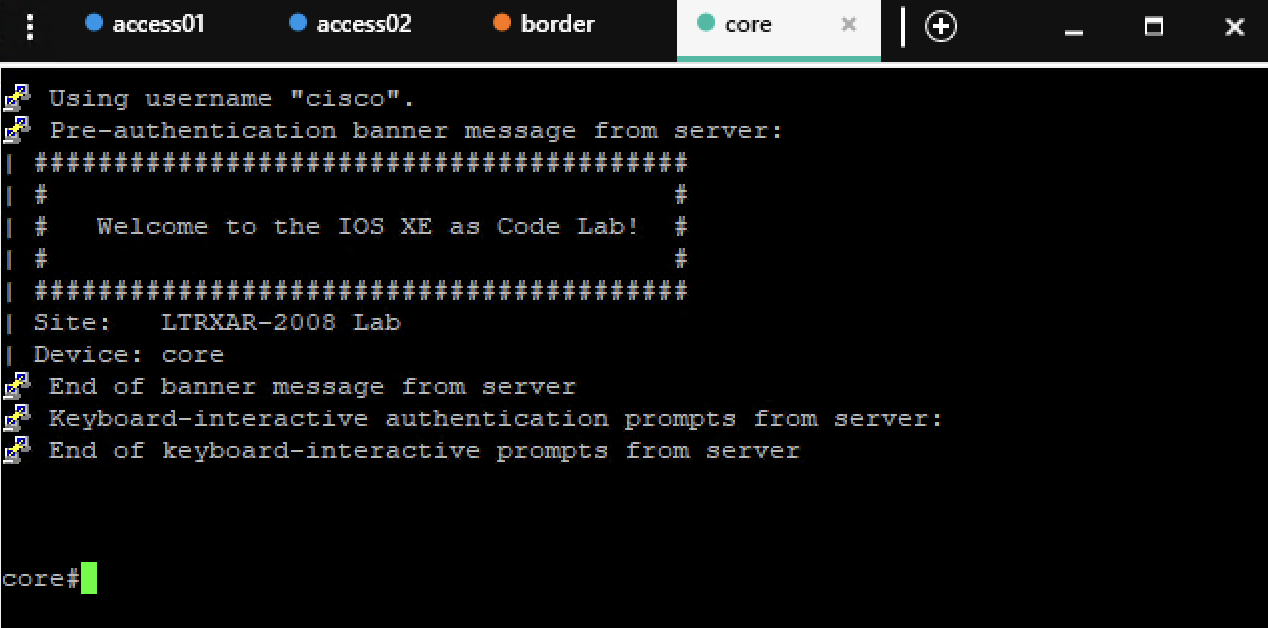
Each device shows its own hostname in the banner, demonstrating that the same template produced device-specific results.
Review the model.yaml file
After running terraform apply, open model.yaml in VS Code to see how variables are resolved. Each device appears with its variable values already substituted into the rendered configuration - this is the final form Terraform sends to the devices.
Common variable use cases
Variables are powerful for many scenarios beyond hostnames (device identity). Here are some common use cases:
| Use Case | Variable Example | Benefit |
|---|---|---|
| Network segments | ${MGMT_VLAN}, ${DATA_VLAN} |
Easy VLAN changes across devices |
| IP addressing | ${LOOPBACK_IP}, ${GATEWAY} |
Device-specific IP configuration |
| Credentials | ${SNMP_COMMUNITY} |
Centralized credential management |
| Thresholds | ${LOG_LEVEL}, ${TIMEOUT} |
Environment-specific tuning |
Environment variables
Environment variables can also be used in Network as Code configurations. They are defined outside of the configuration files and can be referenced using the syntax below:
Environment Variable Example
The config below is only an example, you do not need to add this in your lab.
In the example above, the ENABLE_SECRET environment variable is referenced and used for the device's enable secret.
Security Best Practice
Using environment variables is good practice for sensitive information like passwords.
What you've accomplished
In this task, you have:
- ✅ Learned how variables work in Network as Code configurations
- ✅ Updated the global configuration to use a variable placeholder
- ✅ Defined device-specific variable values
- ✅ Understood variable substitution and precedence rules
- ✅ Applied and verified variable-based configuration
What's next
Tasks 07-09 cover the three template types (model, file, cli) and
are optional - they demonstrate advanced patterns but aren't
prerequisites for any later task. If you're short on time, jump straight
to Task 10 - Schema validation. Otherwise,
continue with Task 07.
← Previous: Task 05 - Single device config · Next: Task 07 - Templates 'model'