Task 04 - Device group configuration
Estimated Time to Complete: ~15 minutes
In this task you'll apply configuration to a group of devices at once using device groups. An Access Control List (ACL) is the example - device groups let you apply the same configuration to every device that shares a role or location, without duplicating the YAML.
What you'll learn
By the end of this task you will have:
- Defined an
ACCESS_SWITCHESdevice group and its two member devices - Applied a standard ACL to the group via a single YAML file
- Confirmed the ACL landed on
access01+access02only (notcoreorborder)
Device groups
Device groups provide a mechanism for applying configurations to multiple devices without repeating the same settings for each device.
Device groups are particularly effective for:
- Role-based configuration: Grouping devices by function (access switches, core switches, border switches)
- Location-based configuration: Grouping devices by physical or logical location (data center, branch office)
- Service deployment: Rolling out consistent service configurations across multiple devices
- Security policies: Applying common ACLs or security settings to device groups
Use case: standard ACL for access switches
In this example, you'll create a device group called ACCESS_SWITCHES that includes the access01 and access02 switches. These switches need a standard ACL to permit traffic from specific network ranges (10.0.0.0/24 and 20.0.0.0/24) - a typical requirement for access layer devices controlling traffic from known networks.
The power of Device Groups: Scalability
Using device groups may appear unnecessary for just two access switches - in this example. However, consider a large network with more than 1,000 access switches. Utilizing device groups helps keep the configuration organized and scalable.
Step 1: Create the device group configuration file
First, create the file using your WSL Ubuntu terminal:
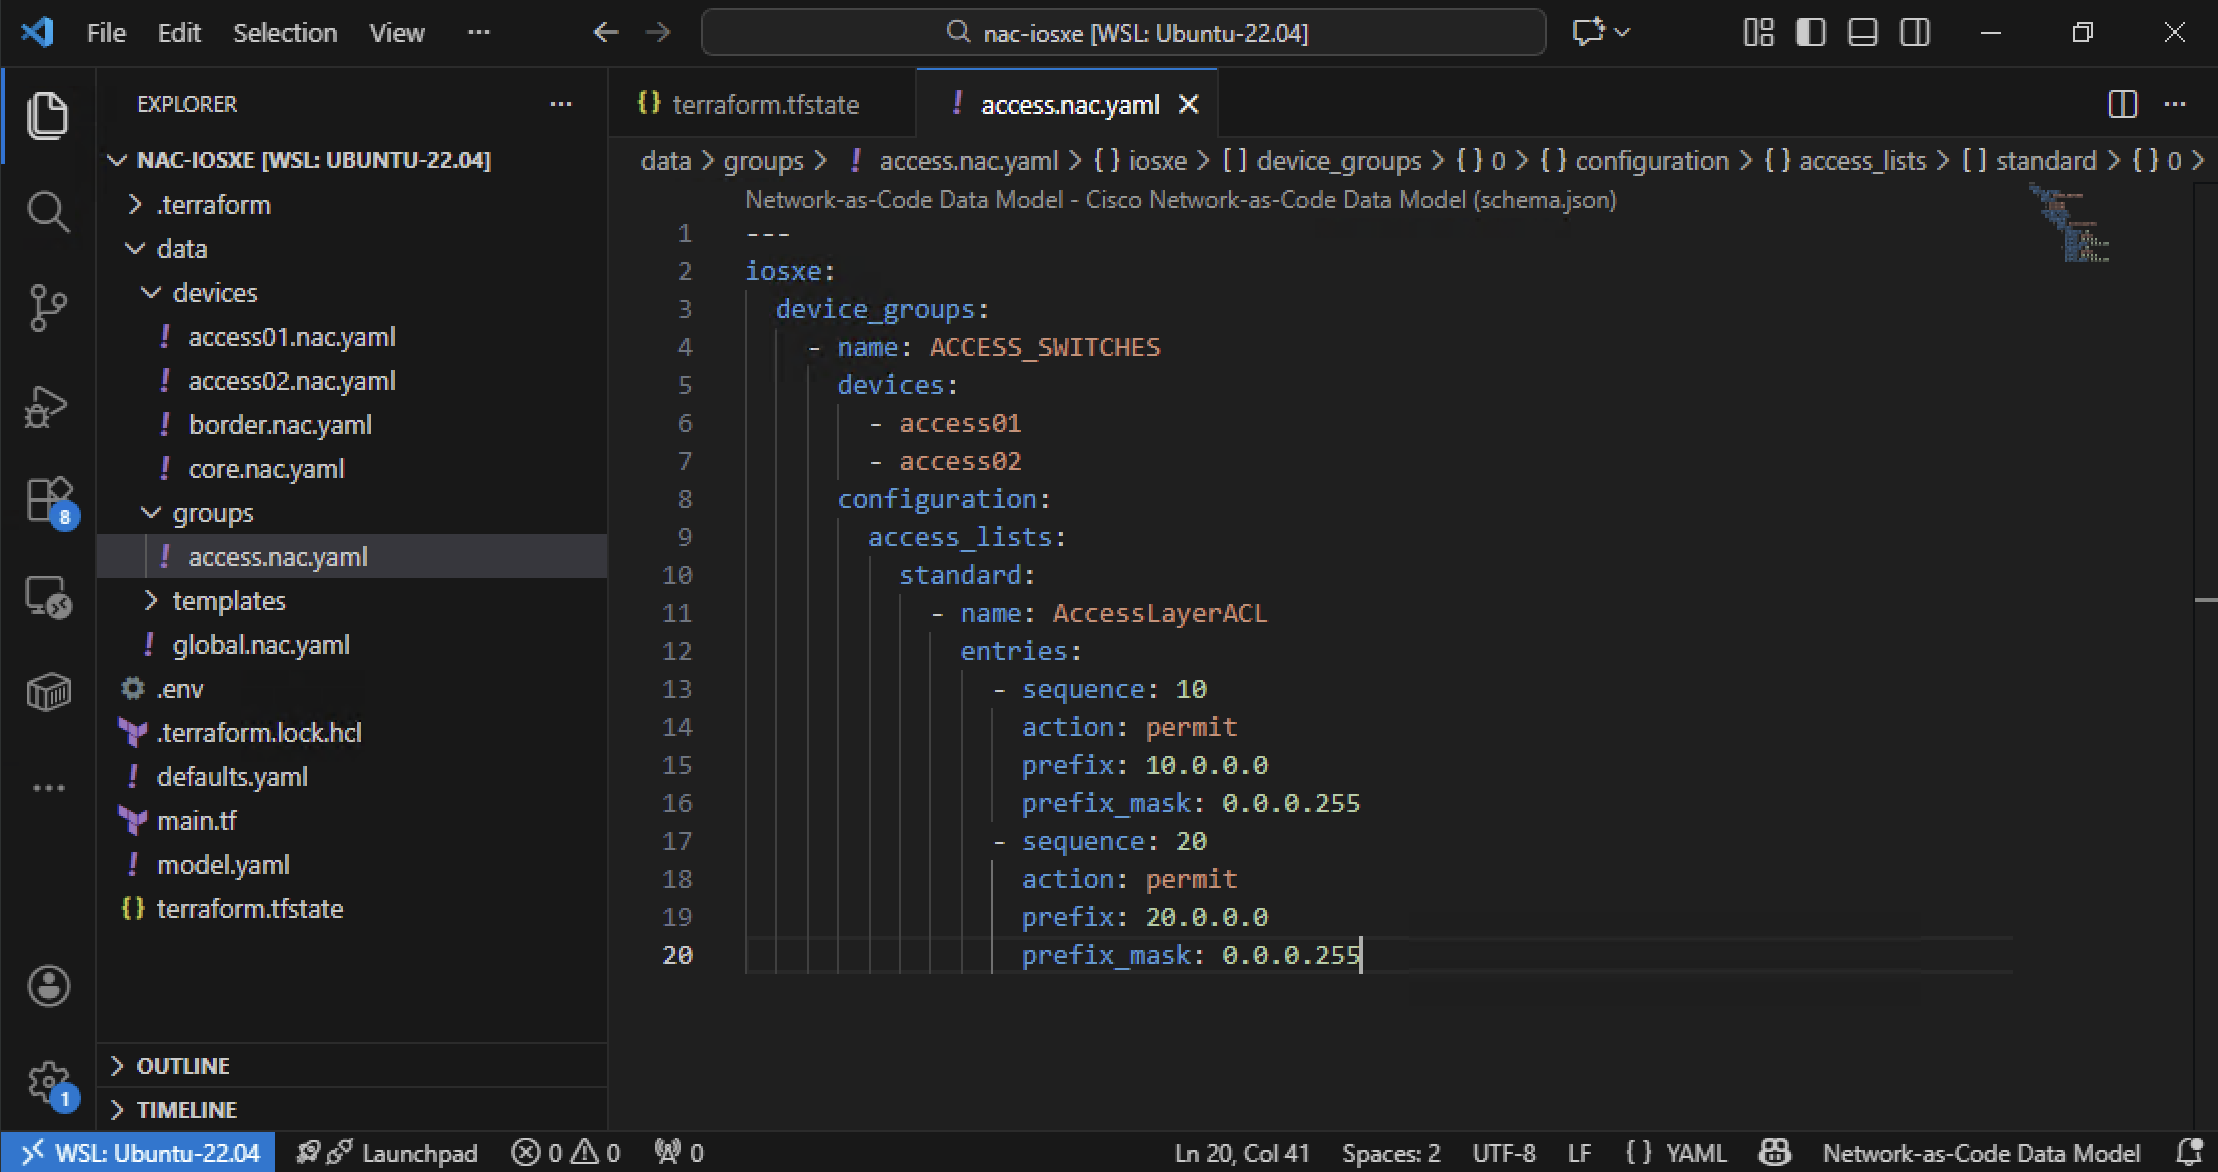
The file will appear in VS Code's Explorer panel. Click on groups/access.nac.yaml to open it and add the following content. Notice how the ACL is defined once in the device group and automatically applies to both access01 and access02 switches:
---
iosxe:
  device_groups:
    - name: ACCESS_SWITCHES
      devices:
        - access01
        - access02
      configuration:
        access_lists:
          standard:
            - name: AccessLayerACL
              entries:
                - sequence: 10
                  action: permit
                  prefix: 10.0.0.0
                  prefix_mask: 0.0.0.255
                - sequence: 20
                  action: permit
                  prefix: 20.0.0.0
                  prefix_mask: 0.0.0.255
The image below illustrates the ACL configuration in VS Code:
Configuration breakdown
Let's break down the key elements:
Device Group Section:
device_groups:- Defines one or more device groupsname: ACCESS_SWITCHES- The group name identifierdevices:- Lists member devices (access01,access02)configuration:- Contains settings applied to all group members
Alternative: You could also define group membership from devices
Try this at home!
You can also add a device to a device group from under the device configuration section by specifying the device_groups attribute. This is useful when you want to assign a device to multiple groups or prefer defining group membership alongside device-specific settings.
---
iosxe:
  devices:
    - name: example-device
      device_groups:
        - EXAMPLE_GROUP1
        - EXAMPLE_GROUP2
        - EXAMPLE_GROUP3
      configuration:
        # device-specific configuration here
        ...
The reference between the device and device group can be configured from both sides.
Access List Configuration:
access_lists:- Top-level ACL configurationstandard:- Specifies standard ACL type (filters based on source address only)name: AccessLayerACL- The ACL nameentries:- Individual ACL rules (processed in sequence order)
ACL Entry Details:
-
sequence 10: Permits traffic from the10.0.0.0/24networkaction: permit- Allows matching trafficprefix: 10.0.0.0- The network addressprefix_mask: 0.0.0.255- Wildcard mask (matches10.0.0.0through10.0.0.255)
-
sequence 20: Permits traffic from the20.0.0.0/24networkaction: permit- Allows matching trafficprefix: 20.0.0.0- The network addressprefix_mask: 0.0.0.255- Wildcard mask (matches20.0.0.0through20.0.0.255)
How device groups work
When Terraform processes this configuration:
- The global banner applies to all devices (border, core, access01, access02)
- The ACCESS_SWITCHES group's configuration (in our case the ACL AccessLayerACL) applies only to access01 and access02 switches
- If you later add device-specific configuration to the access01 device, it could override global or group settings (e.g., changing the banner)
This hierarchical approach ensures:
- No configuration duplication (ACL defined once, applied to multiple devices)
- Easy maintenance (update ACL in one place, changes apply to all group members)
- Scalability (add more switches by just adding them to the group's device list)
Step 2: Apply access-list configuration
Open your WSL Ubuntu terminal and navigate to your project directory. Run Terraform to deploy the ACL configuration to the device group:
terraform init not required
You do not need to run terraform init again, as the project has already been initialized in a previous task.
It is good practice to run terraform plan first to preview the changes that will be made. You could also skip this step as the plan is automatically generated during terraform apply.
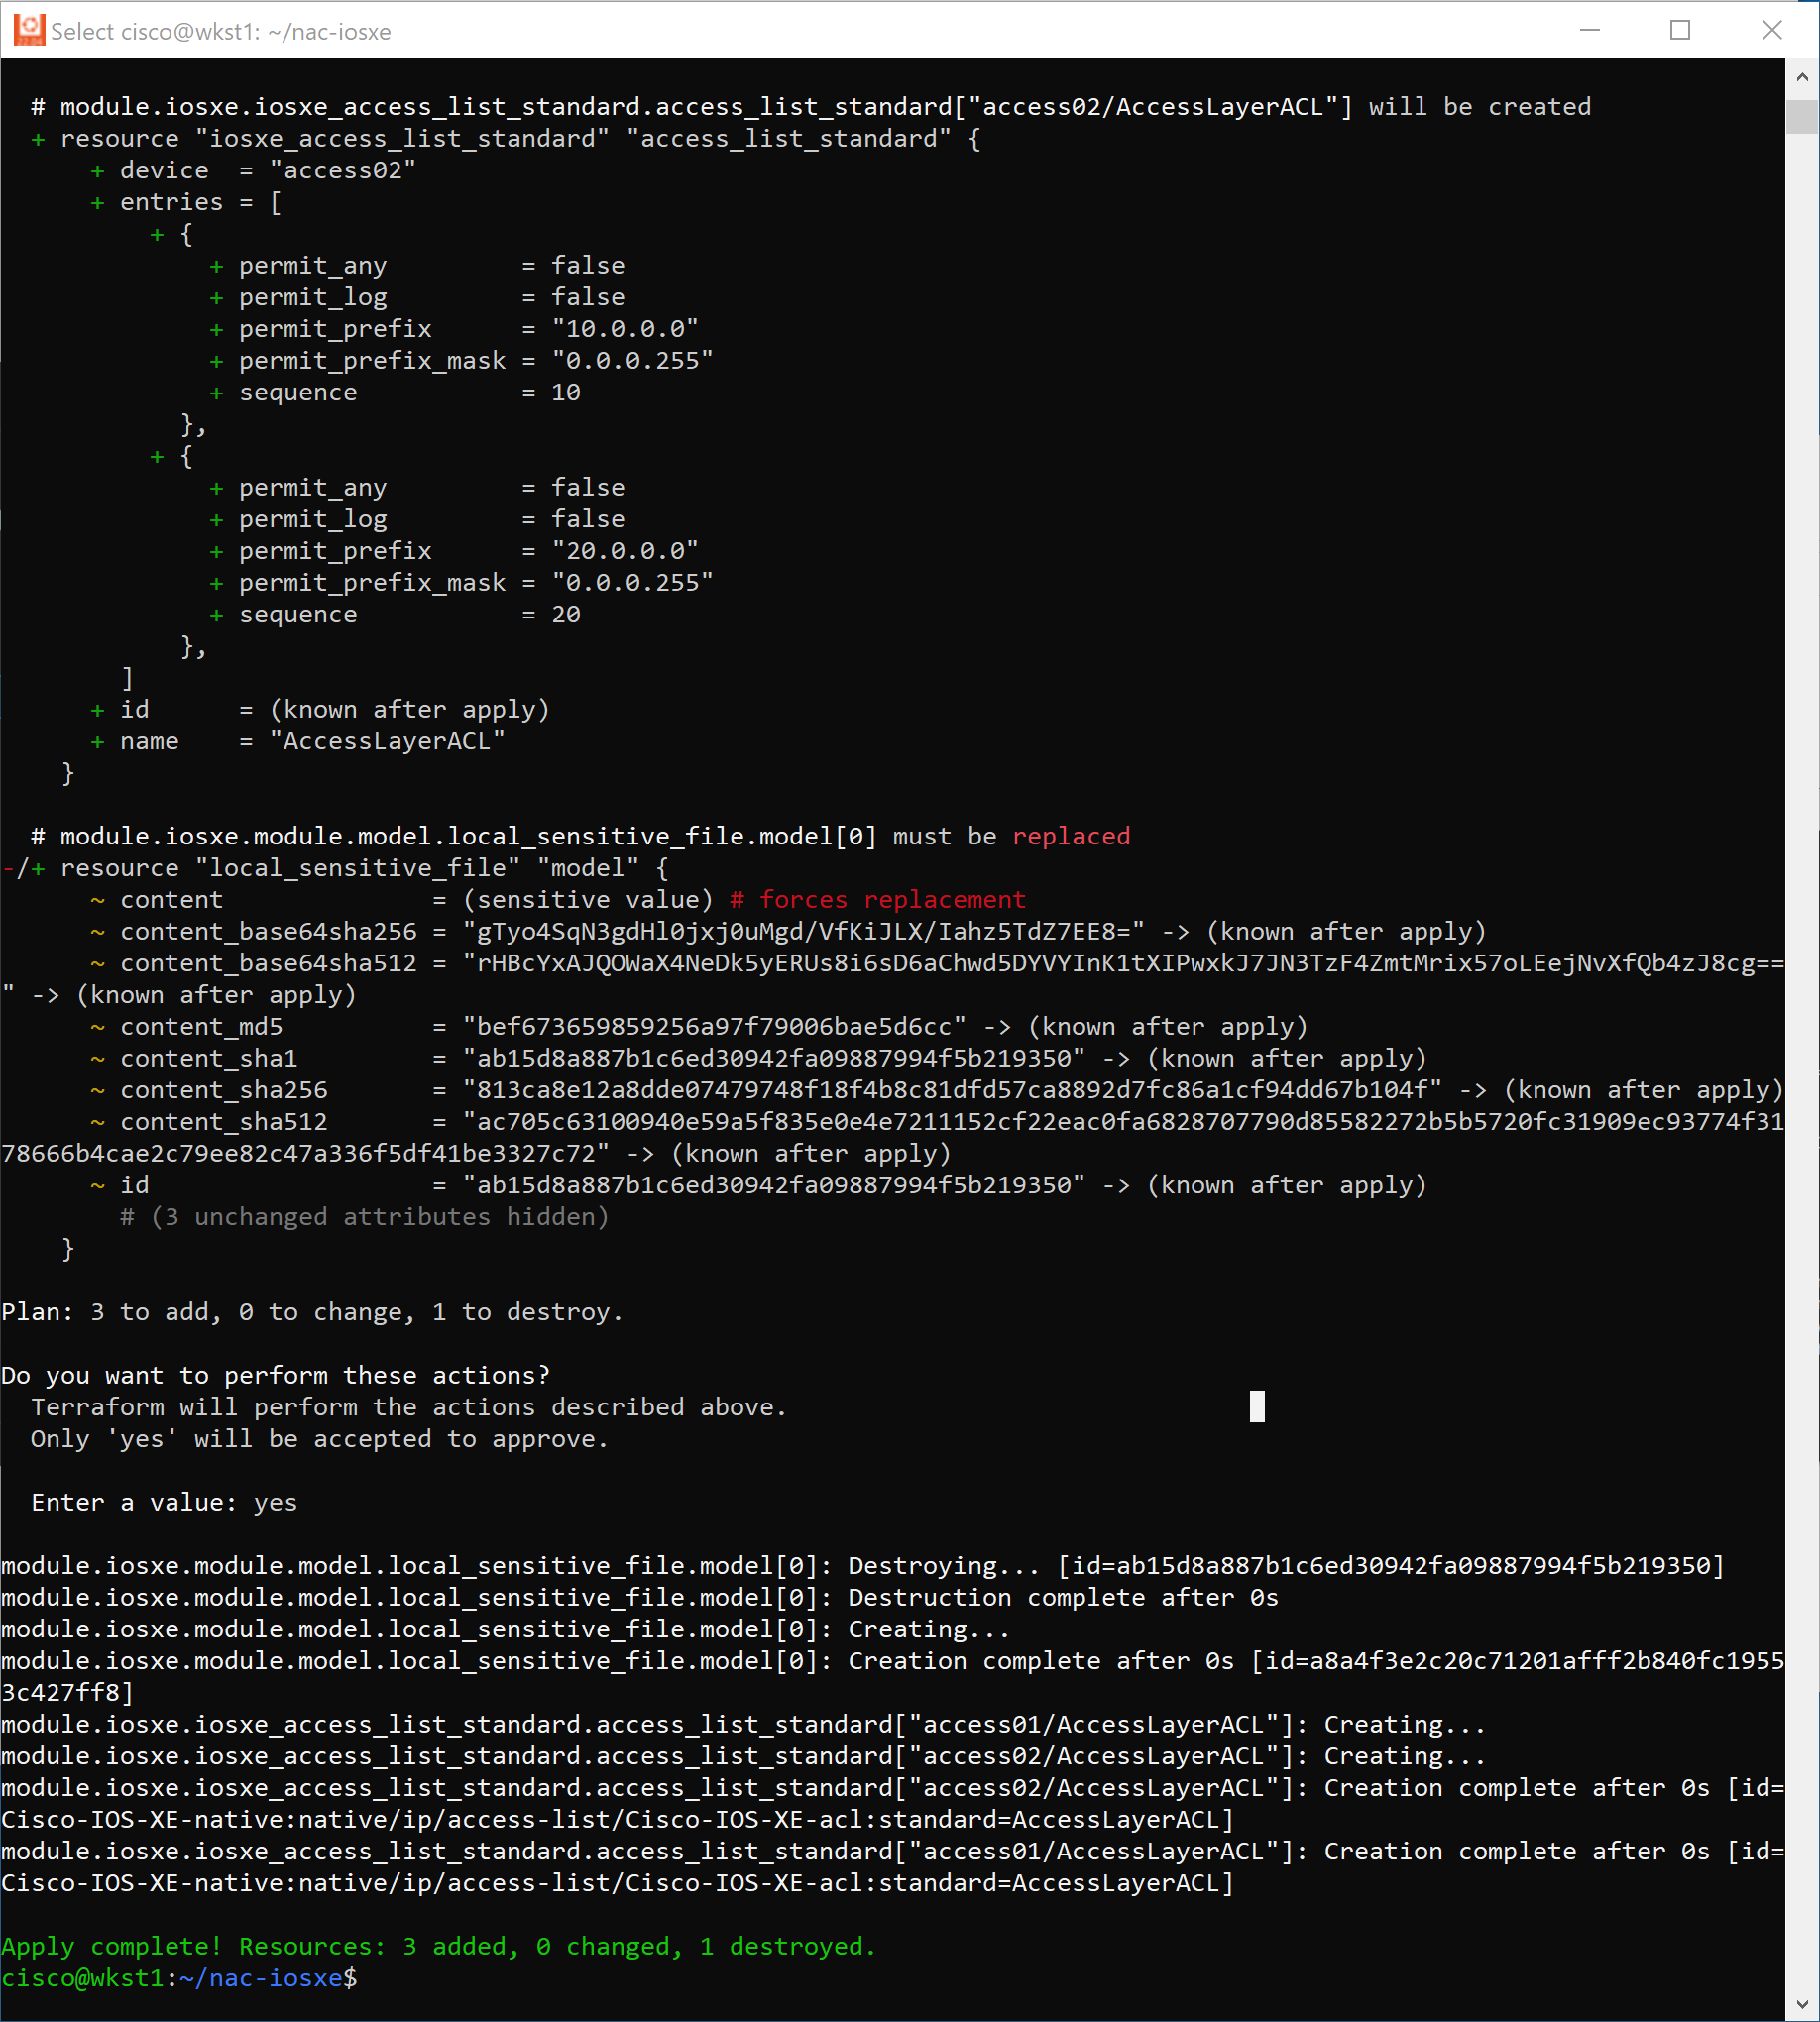
Now, run the following command to apply the configuration:
When prompted, type yes to confirm the deployment. Terraform will create the standard ACL on all devices in the ACCESS_SWITCHES group (access01 and access02).
Step 3: Verify device group configuration
After successfully running terraform apply, verify that the ACL was deployed only to the switches in the ACCESS_SWITCHES group.
Use Solar-PuTTY to connect and verify:
- Open Solar-PuTTY from your desktop
- Connect to the access01 switch
- Check if the ACL is present using the command below
- Repeat for the access02 switch
Use the following command on both access01 and access02 switches to verify the ACL:
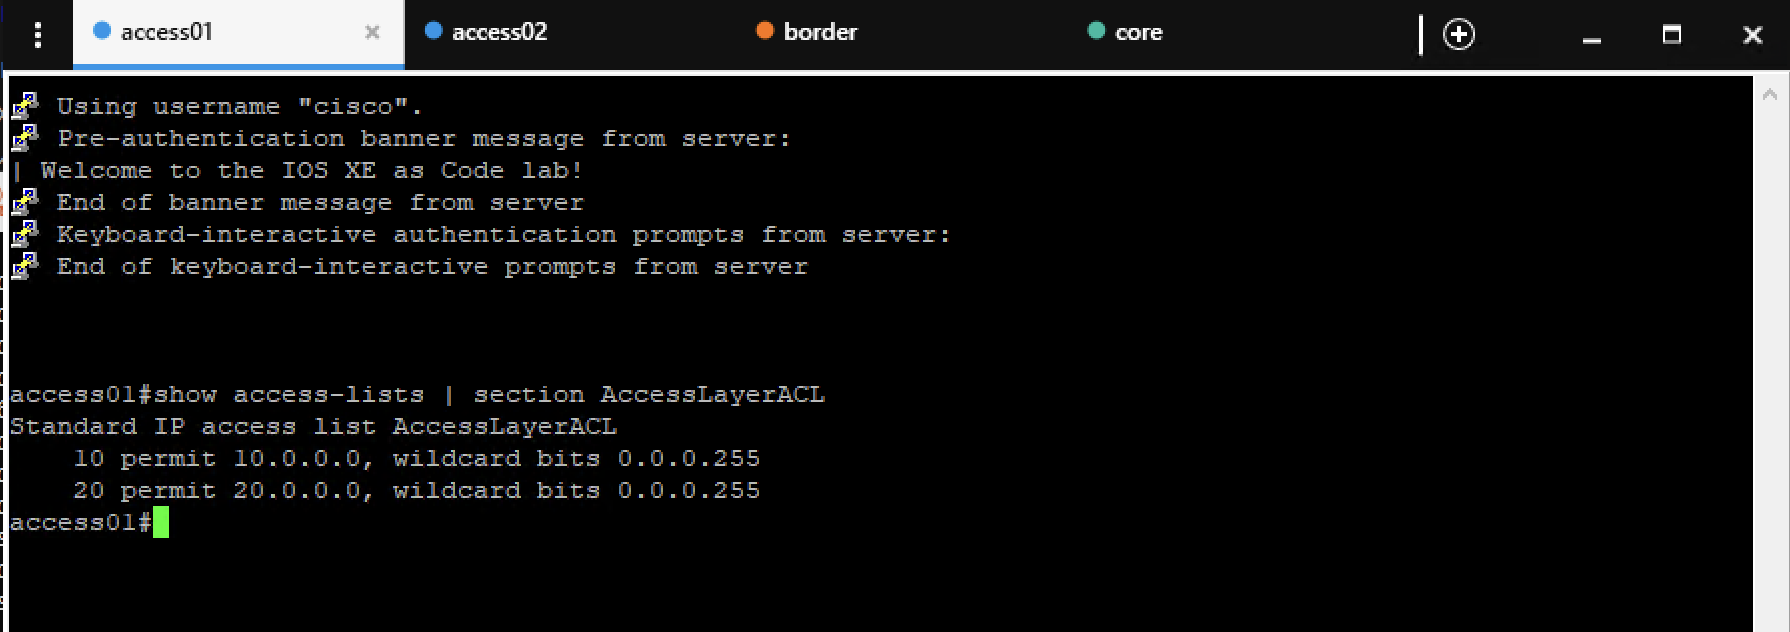
This confirms the standard ACL was successfully deployed to both access01 and access02 switches with both network permit entries.
Key observation
The ACL only appears on devices that are members of the ACCESS_SWITCHES group. If you check border or core switches (not in the group), they won't have this ACL, demonstrating the selective deployment capability of device groups.
Generated model file
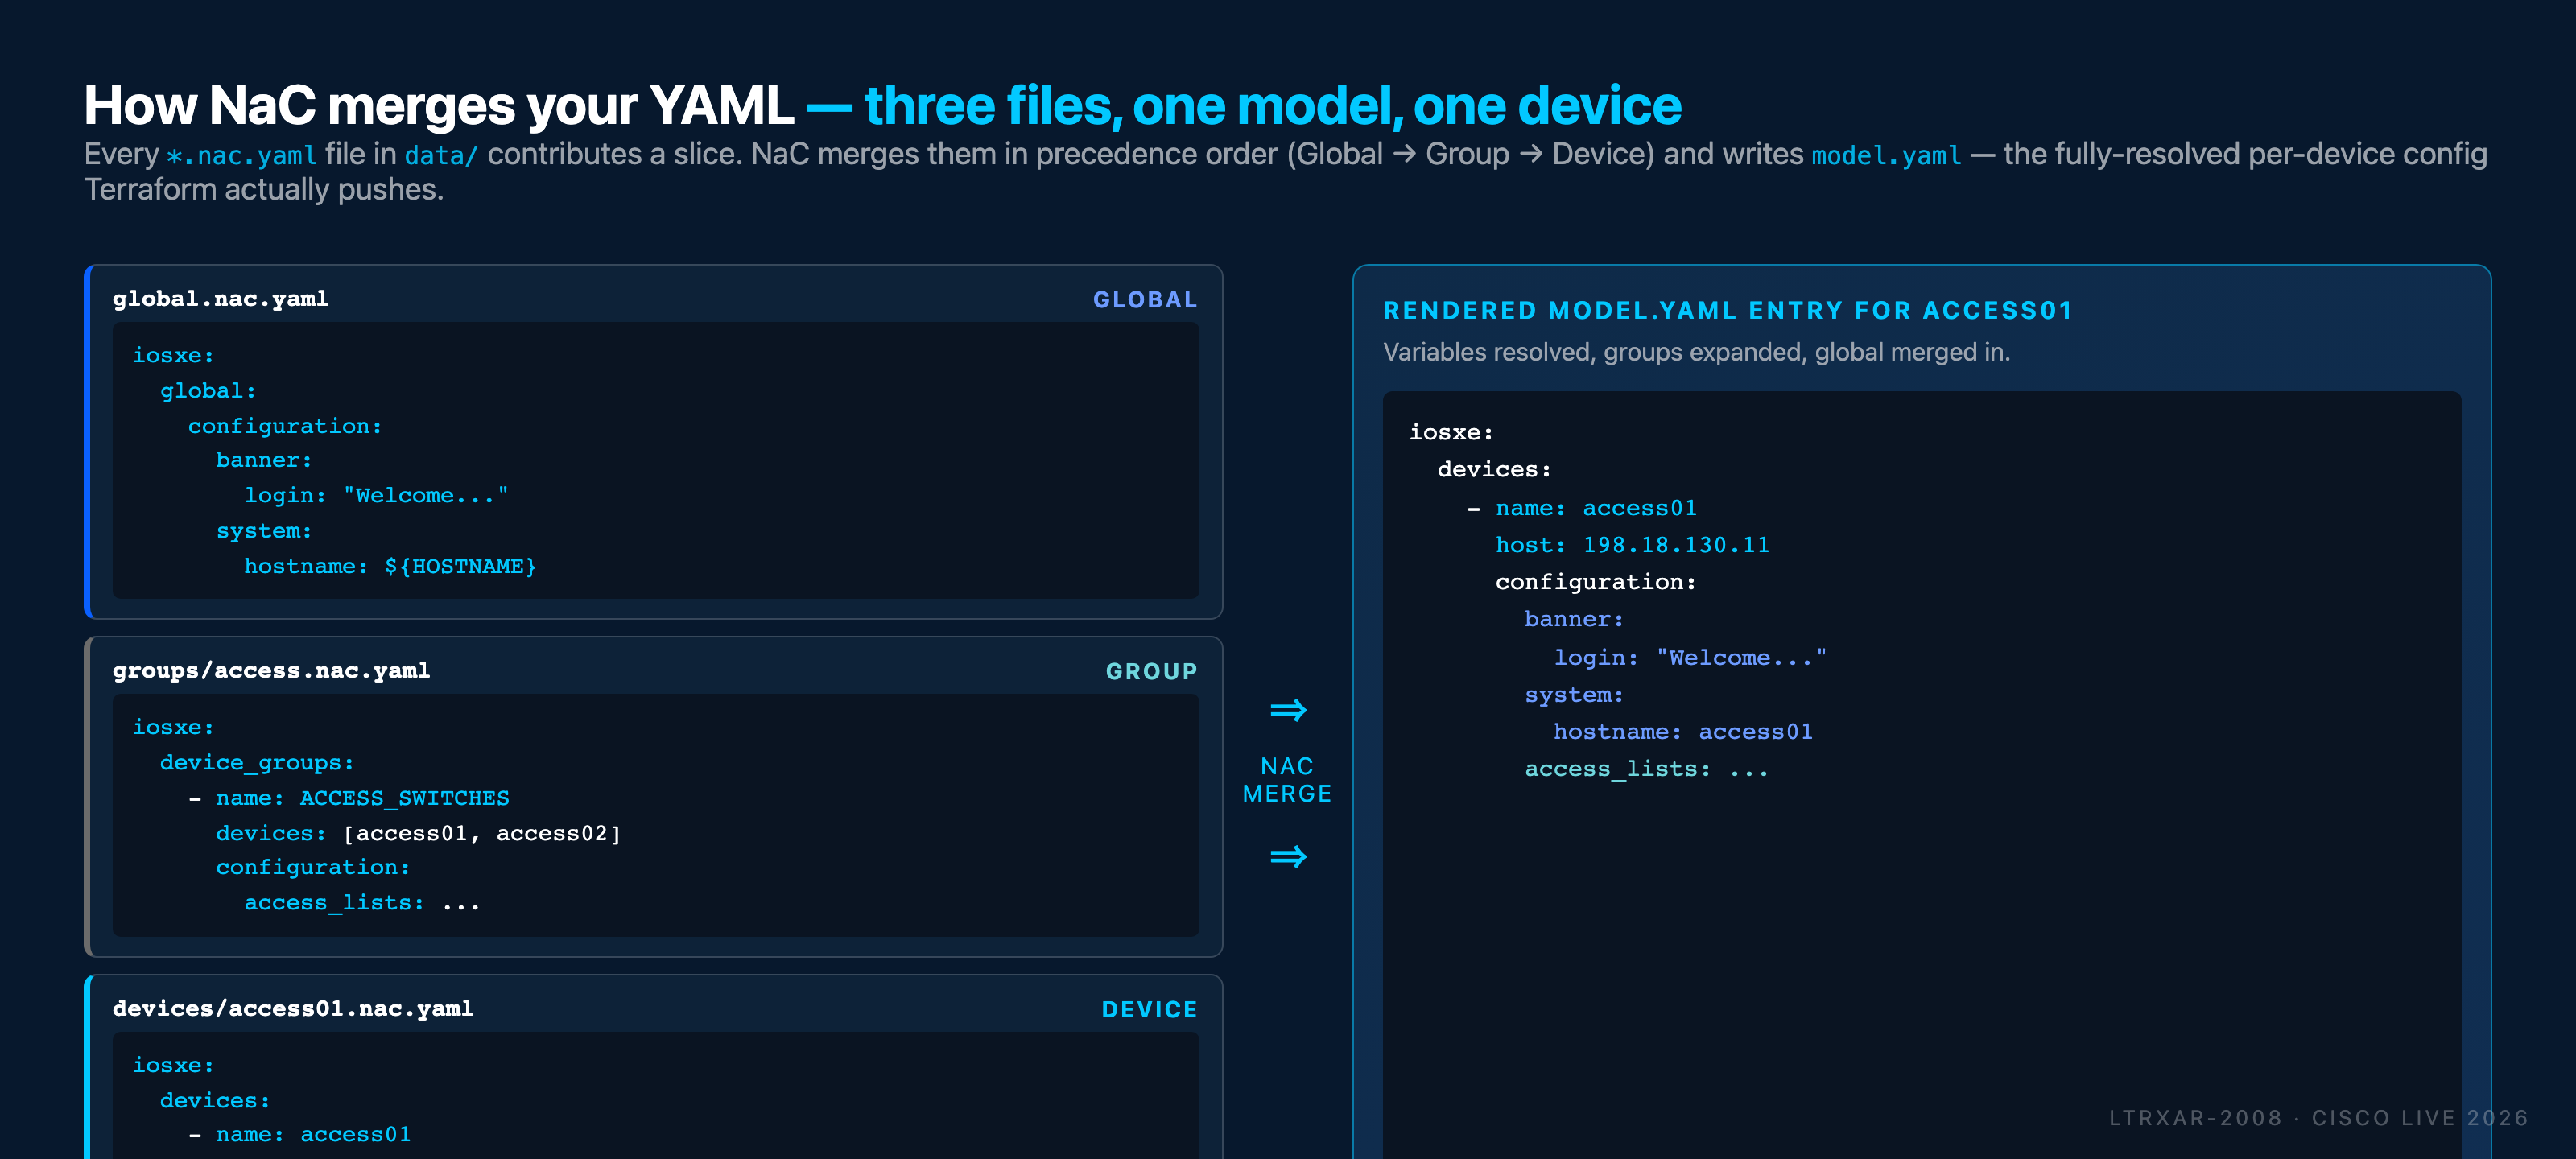
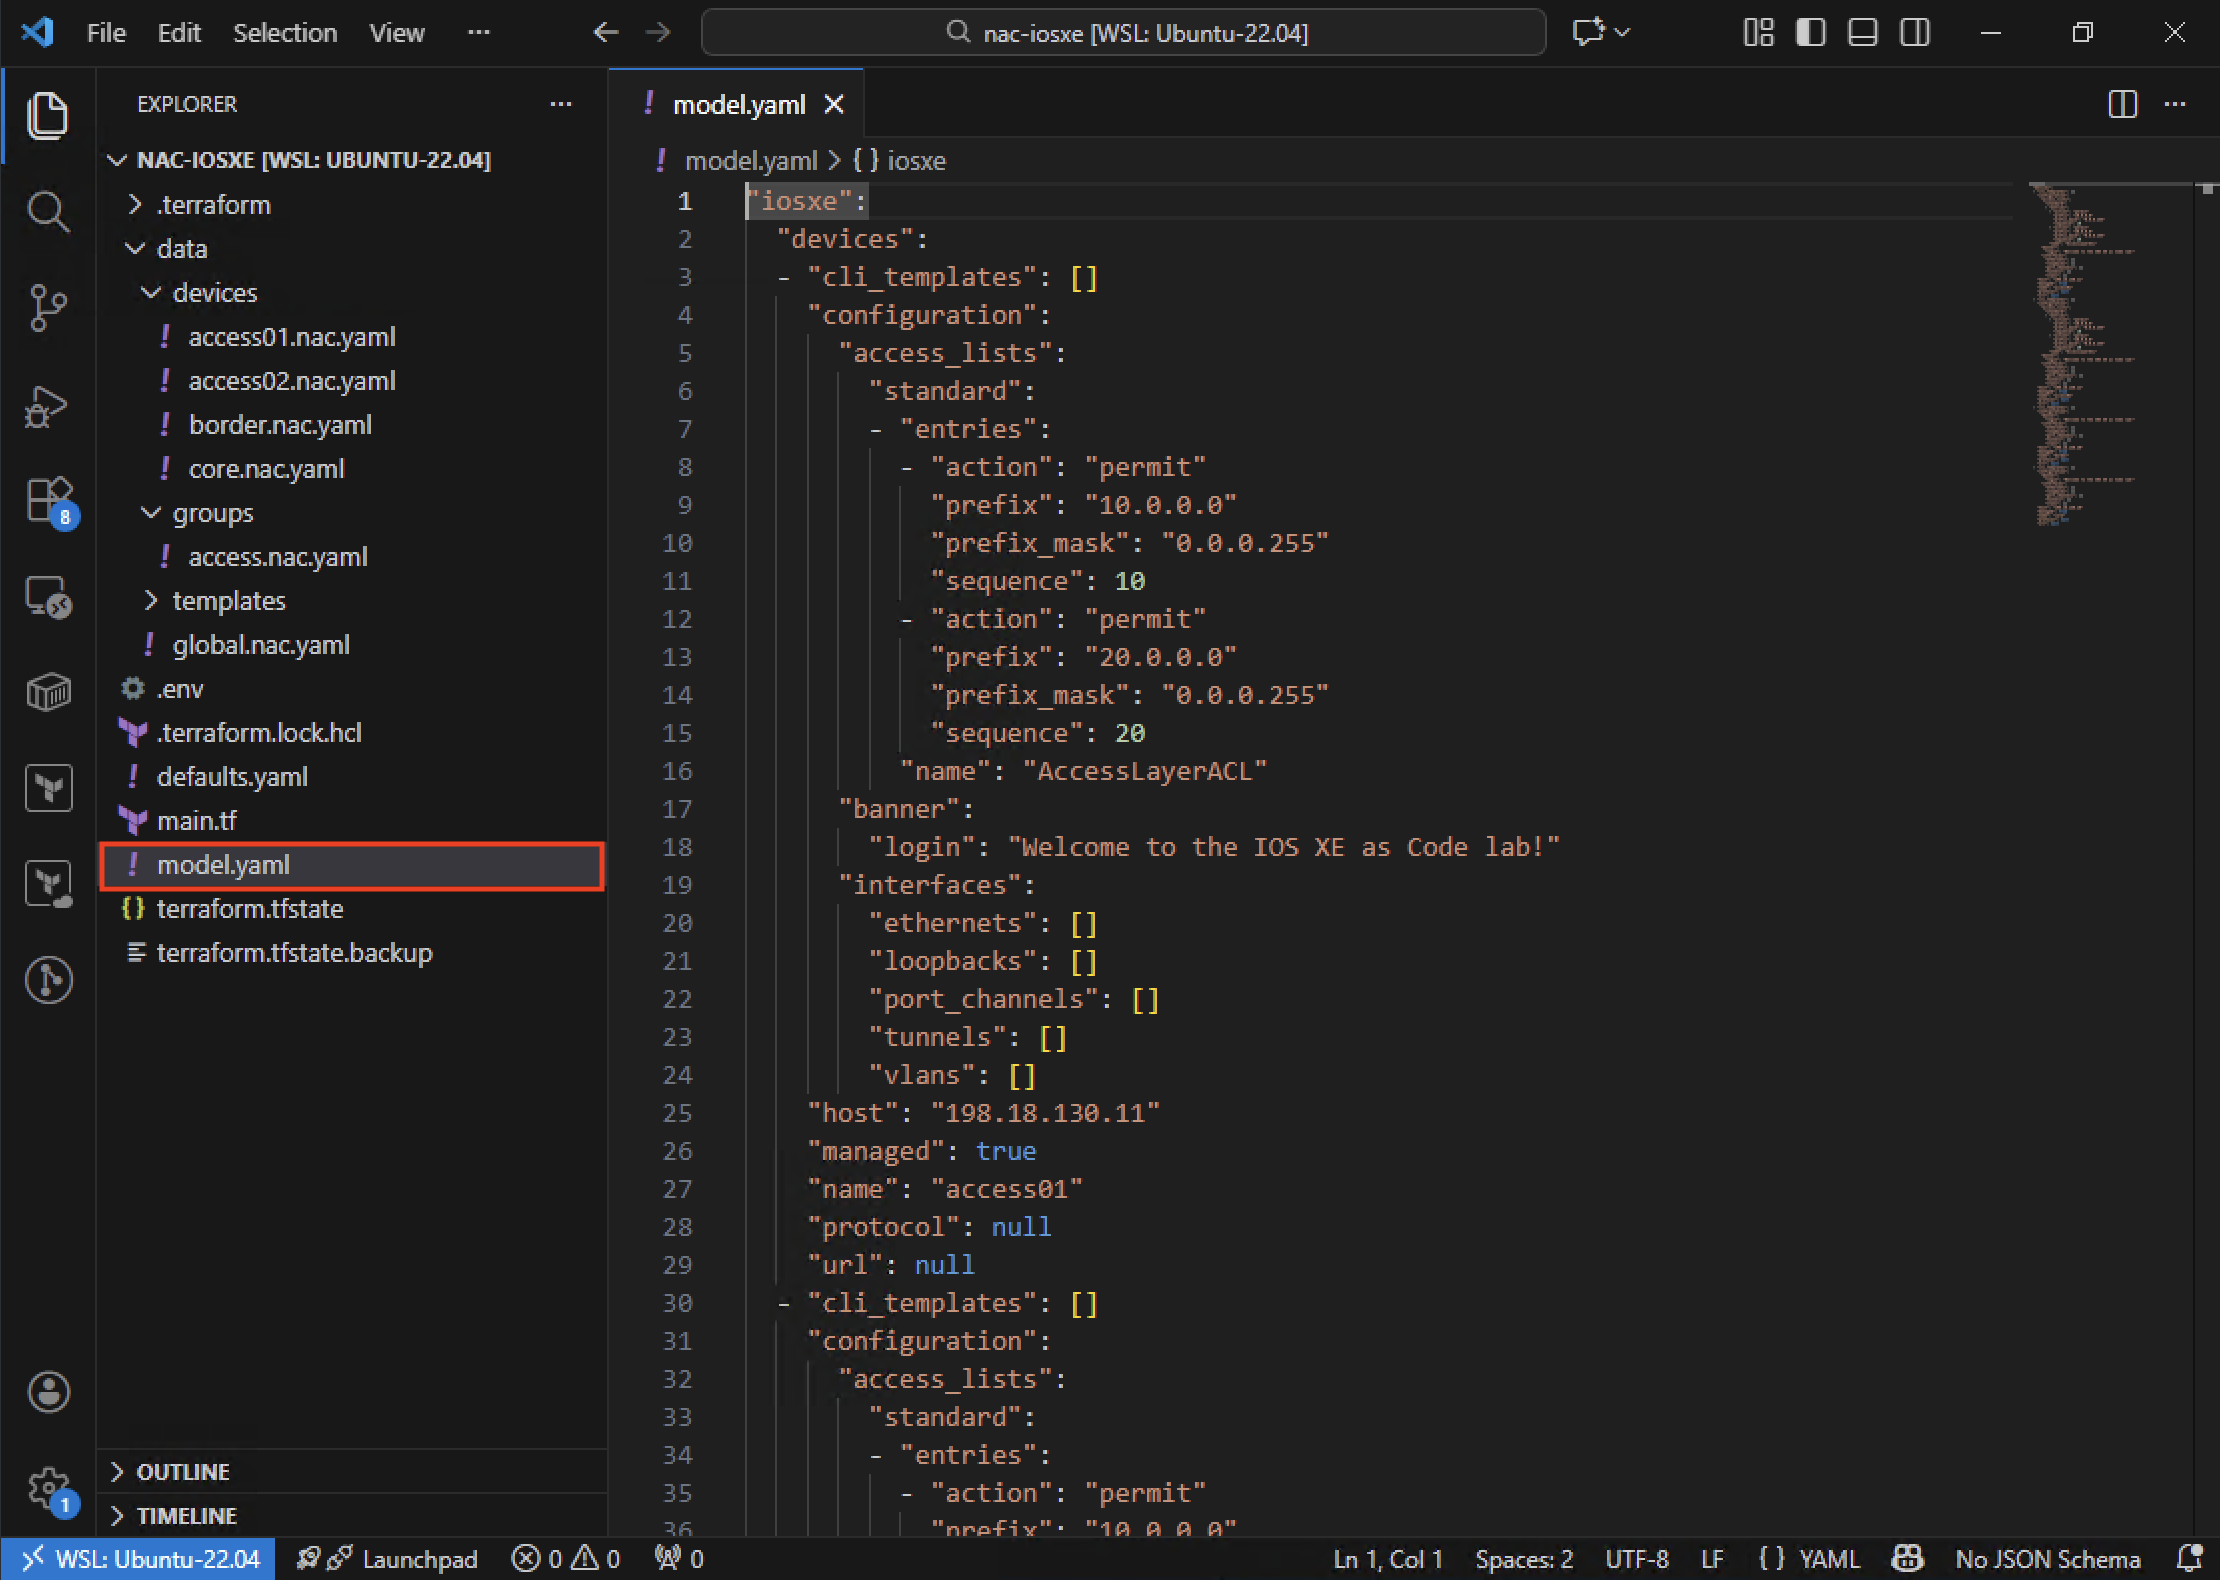
When Terraform applies your configuration, the Network as Code module performs a deep merge of all your YAML files - global configuration, device group configuration, and device-specific configuration - into a single per-device view. The result is written to model.yaml (because you set write_model_file = "model.yaml" in main.tf).
The merge follows the same precedence hierarchy you've been working with: global → device group → device, where more specific levels override less specific ones for the same keys. Variables are substituted, templates are rendered, and the output is a flat list of devices, each with its fully resolved configuration.
The three merge rules
The merge behavior is formally documented, but you've just produced a concrete example of each rule in action. Three rules govern what happens when two YAML files touch the same structure:
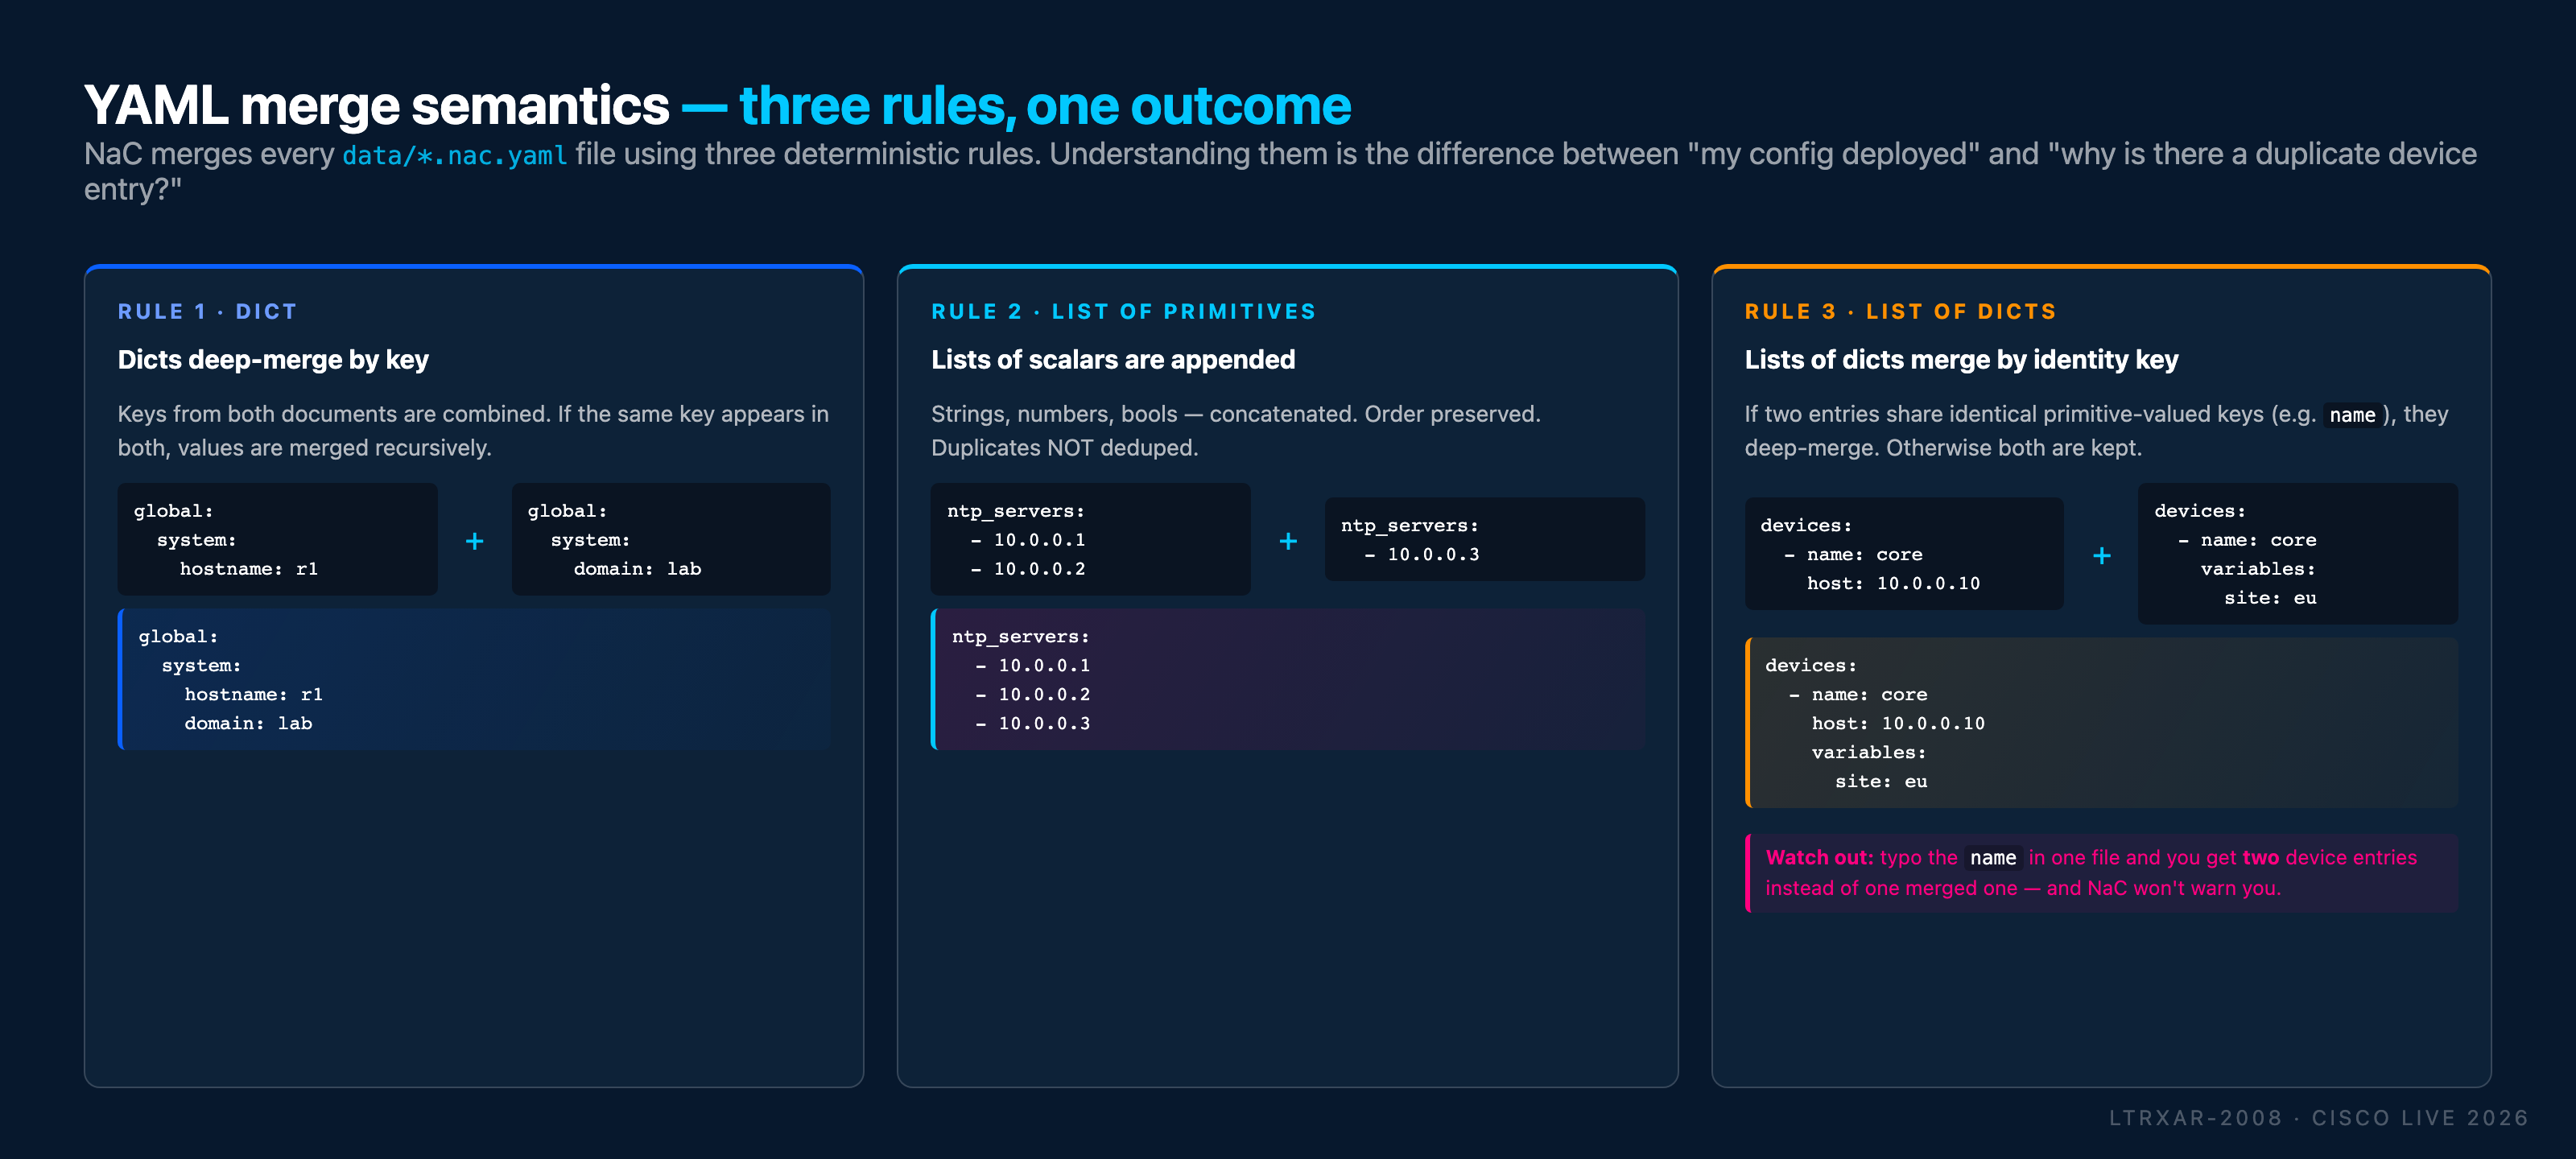
- Rule 1 (dict deep-merge) - the
configuration:block under each device is a dict, and the global banner + group ACL + per-device settings all deep-merge into one nested dict for each device. - Rule 2 (lists of scalars append) - not exercised yet, but the same behavior applies to e.g.
ntp_servers: [...]lists across files. - Rule 3 (lists of dicts merge by identity key) - this is why your four
devices:entries (one per file) produce four device entries, not eight. Network as Code identifiesdeviceslist members bynameand deep-merges entries that share the samename. Typo anamein one file and you silently end up with two device entries instead of one.
Open model.yaml in VS Code to see the result. Notice how the ACL from the ACCESS_SWITCHES group appears under access01 and access02 but not under core or border:
Why this matters:
- Debugging - if a device gets unexpected configuration,
model.yamlshows you exactly what the module computed for that device after all merges and variable substitutions. - Verification -
nac-test(Task 11) usesmodel.yamlas its input to generate post-deployment tests. The tests assert against what the model says should be on the device. - Transparency - rather than trusting the module as a black box, you can inspect the fully resolved intent for every device in one file.
What the module is actually saving you from - a concrete before/after
Your data/ directory right now is about 40 lines of YAML across
four files: four per-device registration entries, one global banner,
one group-level ACL. That's the input.
If the Network as Code module didn't exist and you were writing
equivalent Terraform directly against the terraform-provider-iosxe
resources, you'd be hand-writing HCL that looks like this:
resource "iosxe_banner" "core_banner"     { device = "core"     ; ... }
resource "iosxe_banner" "border_banner"   { device = "border"   ; ... }
resource "iosxe_banner" "access01_banner" { device = "access01" ; ... }
resource "iosxe_banner" "access02_banner" { device = "access02" ; ... }

resource "iosxe_access_list_standard" "access01_acl" {
  device = "access01"
  name   = "AccessLayerACL"
  entry  = [
    { sequence = 10, remark = "..." },
    { sequence = 20, remark = "..." },
    # ...etc, repeated inline per device
  ]
}
resource "iosxe_access_list_standard" "access02_acl" {
  device = "access02"
  name   = "AccessLayerACL"
  entry  = [
    # ...same entries, repeated verbatim
  ]
}

# ...plus provider blocks, variables, outputs, locals, for_each
# maps, and one resource per (device, feature) pair going forward.
That's roughly 150-200 lines of HCL for what you wrote in ~40 YAML lines, and the ratio gets worse as you add devices and features. The module is doing four distinct jobs under the hood:
- Deep-merging your YAML files into one view per device (global -> group -> device precedence).
- Fanning out each merged device's config into ~dozens of provider resource calls (one per feature).
- Rendering
${variables}and templates at merge time so your YAML stays declarative. - Tracking which resources apply to which devices so
terraform planshows a per-device diff instead of a flat list.
You can write everything you've written here against raw
terraform-provider-iosxe resources if you need to - the module
IS just convention + code generation on top of that provider. But
for any fleet beyond about two devices, the module is what makes
the math practical.
What you've accomplished
In this task, you have:
- ✅ Learned about device groups and configuration hierarchy
- ✅ Created an ACCESS_SWITCHES device group with access01 and access02 switches
- ✅ Applied a standard ACL to multiple devices using a single definition
- ✅ Verified selective configuration deployment to group members only
← Previous: Task 03 - Global configuration · Next: Task 05 - Single-device configuration